posts may contain Amazon affiliate links, which earn me a small commission when you buy (but doesn't cost you anything extra). Occasionally I receive free products and/or run sponsored posts—this will always be stated clearly in the post. Thank you for supporting this blog.

This website contains some quotations, excerpts, and screen clips from copyrighted material. These uses fall well within the copyright doctrine of "Fair Use".
dessert wars
Showing posts with label dessert wars. Show all posts
Saturday, April 16, 2011

Grapefruit Vanilla Bean Mini-Bundt Cakes

Saturday, April 16, 2011

Grapefruit Vanilla Bean Mini-Bundt Cakes

What's a girl with a craving for citrus cake that extends deep down to her toes to do?  And in the midst of said craving, she's fortunate enough to receive a case big, fat, beautiful Texas Grapefruit from Bonnie at Sweet Life and find an adorable mini-bundt pan on clearance and have some plump, fragrant Vanilla Beans from Beanilla that she happened to win from Dessert Wars beckoning her from the cupboard?

She gets busy baking.

This are light and spongy and mini...which always reels people in.  Really.  Just ask the looky-loos who were lurking behind me while I was busy with this photo shoot.
Grapefruit Vanilla Bean Mini-Bundt Cakes
from the kitchen of girlichef
makes 12

½ c. unsalted butter, at room temp.
2 Tbs. finely grated grapefruit zest
1 vanilla bean
2 large eggs, at room temp.
½ c. sour cream, at room temp.
¼ c. freshly squeezed grapefruit juice
1½ c. all purpose flour
1 tsp. baking powder
½ tsp. fine sea salt
½ tsp. baking soda (my favorite is Rumford by Clabber Girl...it's aluminum free)

icing:
~ ¼ c. freshly squeezed grapefruit juice
2 c. confectioners' sugar
 seeds from ½ of a vanilla bean
Preheat oven to 325° F.  Set out a non-stick mini-bundt cake pan to use.  Or, if it's not nonstick, grease the pan.

In a large bowl, cream butter, vanilla sugar, grapefruit zest, and the seeds scraped from one vanilla bean until light and fluffy.  One at a time, beat in the eggs.  Add sour cream and grapefruit juice and beat until just combined.
Whisk flour, baking powder, sea salt, and baking soda together, then add to bowl and beat until just combined. 

Scoop batter into a pastry bag (or large zippered baggy w/ one corner snipped off) and pipe evenly into 12 mini-bundt forms (my pan makes 12 individuals).  They should be ~¾ of the way full. Alternately, you could use this batter to make cupcakes or even one small cake (~8"...and in this case, no pastry bag required, simply scoop/pour batter into prepared pan).  Slide into the preheated oven and bake for ~20 minutes, or until it passes the tooth pick test.  Cake will be golden and springy and pull away from edges.  Time may need to be adjusted if making one large cake...but it shouldn't take too much longer. 

Immediately (and carefully) turn out onto a wire rack to cool.
While the cakes are cooling, whisk together the ingredients for the icing.  If it seems stiffer than you like, add a bit more juice to adjust consistency.  Drizzle over slightly cooled cakes.

These are equally delicious without any icing, or try sifting some confectioners' sugar over the top or serving with some lightly sweetened whipped cream.
The grapefruit that I used to make these cakes was sweet.  Super sweet and juicy.  I do recommend tasting your grapefruit before using it to make these...if it's extremely sour, you may want to add more sugar.  As they are, the cakes are not overly sweet. 

Sharing this post with:
dessert wars Iron Chef Clabber Girl sweets for a saturday s@1 ybr long

Dessert Wars: Vanilla Dreams
Iron Chef challenge: Baking Powder sponsored by Clabber Girl
Saturday, February 26, 2011

Dark Hot Chocolate with Bourbon Whipped Cream and Homemade Chocolate Marshmallows

Saturday, February 26, 2011

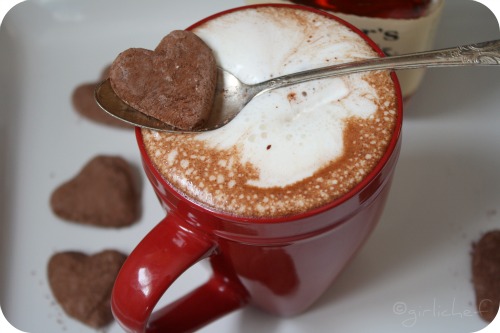
Dark Hot Chocolate with Bourbon Whipped Cream and Homemade Chocolate Marshmallows

Fair warning- this post will contain far too many photos.  I seriously could not decide which ones I wanted to include.  And believe or not, I actually cut some from the pile.  Remember that I said this once you've made your way to the bottom.  Hmmm.  Perhaps I could just put one sentence between each picture.  Make it seem like there's not too many.  We'll see how it goes.
Let's start off by talking about marshmallows.  Not just marshmallows.  Homemade marshmallows.  Not just homemade marshmallows.  Homemade chocolate marshmallows.  Not just homemade chocolate marshmallows.  Homemade chocolate marshmallows shaped like hearts.  Not just......kidding.  They are just homemade heart-shaped chocolate marshmallows!
Heart-Shaped Mini Chocolate Marshmallows
adapted from Saveur #131
makes ~40 heart-shaped (or ~80 square mini-marshmallows)

pan spray, for greasing

1½ c. sugar
¾ c. light corn syrup
¼ c. honey
½ c. water

3 Tbs. unflavored powdered gelatin, softened in  ½ cup cold water

½ c. Dutch-process cocoa powder, sifted

¼ c. Dutch-process cocoa, sifted
2 tbsp. cornstarch

Spray a 9" x 9" baking pan, line bottom and sides with parchment paper, and spray paper.

Combine sugar, syrup, honey, and ½ cup water in a 2-qt. saucepan over medium-high heat. Bring to a simmer; cook, without stirring, until syrup reaches 250° on a candy thermometer. Remove from heat; let cool to 220°.

Meanwhile, bring some water to a boil in a small saucepan. Place bowl of gelatin dissolved in water over boiling water without touching the bowl to the water; whisk until gelatin becomes liquid. Transfer to the bowl of a stand mixer fitted with a whisk; add ½ cup cocoa powder. Add the slightly cooled sugar syrup to gelatin; whisk on high speed until mixture holds stiff peaks, ~5–6 minutes. Pour mixture into prepared pan; smooth top with a rubber spatula that has been sprayed, as well. Let cool until set, ~6 hours.
Combine remaining cocoa powder and cornstarch in a bowl and transfer to a strainer; dust work surface with mixture. Slide a knife around edge of pan to release marshmallows; remove from pan. Dust cocoa mixture over top. Dip a small heart-shaped cutter into the cocoa mixture and cut out individual hearts.  (alternately, use a slicing knife dusted with cocoa mixture, and cut marshmallows into small squares or rectangles for "regular" mini-marshmallows). Toss marshmallows with remaining cocoa mixture.

*for full-size marshmallows, use an 8" x 8" square pan and cut into 1" thick squares
Once you have your marshmallows all laid out in front of you...beware of the call for hot chocolate that will echo through the room.  MmmHmm.  They practically BEG for it!  And since I hate to disappoint, I went ahead and made some Dark Hot Chocolate spiked with a little booze...inside and on top.

Dark Hot Chocolate (boozy or not)
makes 2 large mugs

4 oz. good quality Dark Chocolate
2 c. whole milk
½ tsp. vanilla extract
bourbon, optional (not optional for me, but...)

Place chocolate, milk, and vanilla in a heavy-bottomed pan over low heat, whisking pretty constantly until it's all melted and combined.  Pour a shot of bourbon into a waiting mug and top with hot chocolate.
But wait!  We can't stop there.  The rich, dark, hot chocolate then pleads for a big plop of boozy whipped cream.  You know, to melt down into it.  Okay, okay...

Bourbon Whipped Cream
makes ~2 c.

1 c. heavy cream
~2 Tbs. Bourbon
sugar
~½ tsp. vanilla

Place the cream and bourbon in a large bowl.  Pour in a little vanilla and some sugar and whip to stiff peaks.
So, now you plop a big old spoonful of the Bourbon Whipped Cream onto the steaming mug of Dark Hot Chocolate...and spoon in a few Heart-Shaped Mini Chocolate Marshmallows.  The marshmallows melt into the hot chocolate with the whipped cream, creating a thickened, chocolaty, boozy mug of dessert (or anytime) bliss!

This is my entry into this month's edition of Dessert Wars ...where the theme is Dark Chocolate and Hearts.  These are the prizes we are playing for:


Also sharing with Warm Desserts event held at Mharo Rajasthan's Recipes and Melt in Your Mouth Monday at Make Ahead Meals for Busy Moms.

Friday, January 28, 2011

Fried Nutella "Ravioli"

Friday, January 28, 2011

Fried Nutella "Ravioli"

I went through two jars of Nutella over the last three weeks.  I was trying to devise a somewhat unique dessert using Nutella.  Funny thing is, none of that Nutella actually went into a dessert.  It all got spooned into mouths or slathered on toast.  I suppose just having it around was inspiration enough.  Evil, tempting, beckoning inspiration.  Oh yeah.  It reached out and tried to stop me every time I walked past the pantry.  Occasionally I'd skirt by with a quick hip twist...or a silent tip-toe...or an exaggerated cartoon-spy-high-knee-step-forward-head-bob.  You know?  But usually it would snag the hem of my shirt just before I made it safely by. And then, before I knew it, there was a spoon in my hand.  I'd almost resigned myself to the fact that inspiration was just not going to strike.  Until it suddenly did.

This dessert is best made for a small gathering.  You want the fried ravioli to be warm when you eat them.  Plus, after about six of them have taken their dips in the oil, you don't want any others sharing that sizzling tub.  Any stray nuts in the breading that have escaped will have turned too dark and the oil will start to taste bad.  So.  A romantic dessert for two...or three?...totally worth the effort!

Fried Nutella "Ravioli"
an original from the kitchen of girlichef
yield: 2-3 svgs. (6 ravioli)

12 wonton wrappers
~6 Tbs. Nutella
2 eggs
1 Tbs. water
½ c. hazelnuts
¾ c. fresh breadcrumbs
coconut oil, for frying

Begin by laying 6 wontons wrappers on your work surface, floury side down.  Place ~1 Tbs. Nutella in the center of each piece of wrapper.
Beat together your eggs and water (in a large, shallow bowl); brush the open space around the rim of the  wrapper with the eggwash, then place another wrapper on top, flour side up.  Gently press the wrapper into place, lightly squeezing out any air bubbles so that the two sides are sealed together.
Place the hazelnuts in the bowl of a food processor.  Add breadcrumbs and process until fine.  Dump breading out into a large, shallow bowl.
Line a sheet tray with parchment or foil (sprayed w/ pan spray).  Use the rest of the egg wash to, one at a time, dip each "ravioli" in.  Shake to remove any excess, then dip in breading mixture to coat.  Turning and pressing to make sure no empty spaces are left.  Transfer each the prepared sheet tray.
Freeze for at least one hour, or up to overnight.  

Just before you are ready to serve, heat coconut oil (or your choice) ~1" deep, in a deep-sided pan until it begins to shimmer.  I didn't check the temperature, but I'm guessing it was around 325°-350° F.  Set up a wire rack over a sheet tray.  Carefully lower one ravioli at a time into the hot oil.  Fry until crisp and just turning golden and flipping if necessary, ~2-3 minutes total.  Remove to wire rack and repeat until all of the ravioli are fried.
They are definitely best served warm.  Hot and toasty on the outside...and when you bite in, the warm Nutella in the center coats your tongue and threatens to dribble down your chin.  A few little bites of bliss!

I served mine with a quick raspberry sauce.  Simply spoon out a couple big globs of raspberry jam into a small saucepan and add in about a tablespoon of water.  Bring it to a quick simmer and let it thicken up a bit.  Pass it through a strainer to remove the seeds et voilá!  It adds a burst of fruity tang for a pleasant contrast.
This is my entry into the January edition of DESSERT WARS, theme: Go Nuts Using Nutella!


Prizes we're playing for this month at Dessert Wars-

*Update 2/5/11...What better day to find out that I was the winner of Dessert Wars: Nutella than World Nutella Day!! Thank you so much☺!
JanuaryDessertWarrior