I used to believe that Japanese was somewhat of an elusive entity to me; it existed, but just beyond my realm of understanding. I've made a few Japanese recipes over the years, almost always something very basic. But here's the thing I've started to realize—Japanese cooking isn't as out of reach as it sometimes seems.
Like anything, a solid knowledge and skill base builds a foundation and unclouds vision. That's what (Iron) Chef Masaharu Morimoto offers up in his new cookbook, Mastering the Art of Japanese Home Cooking. While admitting that this book does not, and could not, contain "every dish in the Japanese grandmother's repertoire", it does feature ones that he whip up in your kitchen if he could...his favorites.
posts may contain Amazon affiliate links, which earn me a small commission when you buy (but doesn't cost you anything extra). Occasionally I receive free products and/or run sponsored posts—this will always be stated clearly in the post. Thank you for supporting this blog.
This website contains some quotations, excerpts, and screen clips from copyrighted material. These uses fall well within the copyright doctrine of "Fair Use".
kids luv it
Showing posts with label kids luv it. Show all posts
Friday, September 11, 2015
Sloppy Totchos
This is a sponsored post written by me on behalf of Manwich. All opinions are 100% mine.
Growing up, I always looked forward to Sloppy Joe night at the dinner table. Whenever I saw a couple pounds of ground beef on the counter next to a couple of cans of Manwich, my stomach started to growl. Not only did all of us kids actually like them (which can be a rarity with any more than one child, let alone four), they were also fun to eat. I mean, what kid doesn't enjoy getting a little messy? We almost always had potato chips alongside them, and I would scoop up all of the meat that escaped the bun with my chips to finish it.
Who am I kidding? I still do that today. Back then, we always ate them as a sandwich. Or should I say a meal? (You know, because "a sandwich is a sandwich, but a Manwich is a meal".) Never really thought to eat them any other way. And honestly, that's the way I serve them most often to my own kids. There's nothing like covertly making sure that they are entirely present at the meal by making them use both hands. Am I right?
Growing up, I always looked forward to Sloppy Joe night at the dinner table. Whenever I saw a couple pounds of ground beef on the counter next to a couple of cans of Manwich, my stomach started to growl. Not only did all of us kids actually like them (which can be a rarity with any more than one child, let alone four), they were also fun to eat. I mean, what kid doesn't enjoy getting a little messy? We almost always had potato chips alongside them, and I would scoop up all of the meat that escaped the bun with my chips to finish it.
Who am I kidding? I still do that today. Back then, we always ate them as a sandwich. Or should I say a meal? (You know, because "a sandwich is a sandwich, but a Manwich is a meal".) Never really thought to eat them any other way. And honestly, that's the way I serve them most often to my own kids. There's nothing like covertly making sure that they are entirely present at the meal by making them use both hands. Am I right?
Tuesday, August 26, 2014
Secret Ingredient Sliders
While you'll never hear me complain about a simple, delicious steak thrown on the grill or in a sizzling hot skillet, there are so many other speedy solutions. Case-in-point, these sliders. The majority of the time it takes to make them is in the oven; aside from that, it's only a matter of mixing up a few ingredients.
Now, you may notice that they contain a secret ingredient - so please, go into this meal-making venture with an open mind. And assuming you don't have any family or friends with a nut allergy, try sliding the finished product in front of them at dinner time and have them try to guess what the secret ingredient is. A few sly palates may detect it, but most will be left guessing.
I've been making these sliders for over four years, all thanks to another blogger. This blogger no longer has a blog, but these are based on a recipe shared once by her brother-in-law. So, you may have guessed the ingredient by now; I gave a little hint above, or maybe you scrolled down and saw the photo. But for those who weren't really paying that close attention, it's peanut butter!
Now, you may notice that they contain a secret ingredient - so please, go into this meal-making venture with an open mind. And assuming you don't have any family or friends with a nut allergy, try sliding the finished product in front of them at dinner time and have them try to guess what the secret ingredient is. A few sly palates may detect it, but most will be left guessing.
I've been making these sliders for over four years, all thanks to another blogger. This blogger no longer has a blog, but these are based on a recipe shared once by her brother-in-law. So, you may have guessed the ingredient by now; I gave a little hint above, or maybe you scrolled down and saw the photo. But for those who weren't really paying that close attention, it's peanut butter!
Sunday, August 24, 2014
Giant Evil Gummy Bears inspired by Cloudy with a Chance of Meatballs | #FoodnFlix
But they don't look evil! Looks can be deceiving, especially when you're in the middle of a giant food-storm that is threatening to wipe away the world as you know it! If you've seen Cloudy with a Chance of Meatballs, you know what I'm talking about.
In Cloudy with a Chance of Meatballs, Flint Lockwood is an inventor living on the small island of Swallow Falls; an island that survives on its sardine industry. Since he knows that there has to be more to life than just sardines, he invents the FLDSMDFR (short for the Flint Lockwood Diatonic Super Mutating Dynamic Food Replicator), a machine that converts water molecules into food molecules. And much to everybody's surprise - it works!
The FLDSMDFR causes food to rain from the sky, to the delight of the whole town. From cheeseburgers to enormous jello molds to mountains of ice cream (snow day!) to bacon and eggs, everybody's request was met. But soon, food waste started to build, and people turned greedy, and that all-out giant food-storm that I mentioned threatened to wipe out the recently renamed Chewandswallow (formerly Swallow Falls). Giant spaghetti twisters, giant walking roast chickens, dangerous ears of corn, and of course - GIANT EVIL GUMMY BEARS!
In Cloudy with a Chance of Meatballs, Flint Lockwood is an inventor living on the small island of Swallow Falls; an island that survives on its sardine industry. Since he knows that there has to be more to life than just sardines, he invents the FLDSMDFR (short for the Flint Lockwood Diatonic Super Mutating Dynamic Food Replicator), a machine that converts water molecules into food molecules. And much to everybody's surprise - it works!
The FLDSMDFR causes food to rain from the sky, to the delight of the whole town. From cheeseburgers to enormous jello molds to mountains of ice cream (snow day!) to bacon and eggs, everybody's request was met. But soon, food waste started to build, and people turned greedy, and that all-out giant food-storm that I mentioned threatened to wipe out the recently renamed Chewandswallow (formerly Swallow Falls). Giant spaghetti twisters, giant walking roast chickens, dangerous ears of corn, and of course - GIANT EVIL GUMMY BEARS!
Wednesday, August 20, 2014
Maple Bacon Doughnut Holes
It's official, school is back in session. I watch the cats suspiciously eye the hush that has settled over the house as I sip my coffee. Although I think it's too soon for school to be back in session (I'm an after-Labor-Day cheerleader), it is nice to fall back into a routine after a loose summer.
I would like to say that routine includes popping doughnut holes in my mouth while formulating recipes and writing stories to accompany them, but it doesn't. And truthfully, that's a good thing. One (me) can only handle doughnuts sporadically these days. So really, it's more likely that doughnuts will happen on the weekend when people besides me are home to eat them.
Case-in-point, these little fried dough balls of delight. Basically, they're raised doughnuts infused with real maple syrup and bacon. After you fry them, you drop them into a snow drift of powdered sugar and shake. The result is nothing short of dangerous.
I would like to say that routine includes popping doughnut holes in my mouth while formulating recipes and writing stories to accompany them, but it doesn't. And truthfully, that's a good thing. One (me) can only handle doughnuts sporadically these days. So really, it's more likely that doughnuts will happen on the weekend when people besides me are home to eat them.
Case-in-point, these little fried dough balls of delight. Basically, they're raised doughnuts infused with real maple syrup and bacon. After you fry them, you drop them into a snow drift of powdered sugar and shake. The result is nothing short of dangerous.
Sunday, April 13, 2014
Pizza Pockets
One might think that pizza pockets are just a smaller version of a calzone. Smaller and shaped differently. Oh, and they have sauce on the INSIDE. I've heard tell that real calzones would not be caught dead sporting sauce on the inside. Plus, the only cheese acceptable in a real calzone is ricotta. So actually, pizza pockets and calzones really are two entirely different beasts.
Just like pizza, they make a great family meal because they are versatile (customizable), fairly simple to make (especially if you keep a few balls of pizza dough in the freezer), and let's face it - delicious.
This time around, I used sauce, cheese, and sweet Italian sausage in all of them, but to half, I added some onions, mushrooms, and black garlic that were sauteed in the fat left in the pan from cooking the sausage. So. Ridiculously. Good.
You could really shape these in any way that you like, go in half moons if you like, but if you do, be prepared to suffer the scorn of the connoisseurs who think you're trying to make calzones. I shaped mine the same way that I do my Pretzel Pockets (aka Hot Pocket-style). Due to the folding, the edges wind up being a bit thicker, like soft breadsticks, but as a crust-lover, I like the bonus crust. Everybody seems to.
Just like pizza, they make a great family meal because they are versatile (customizable), fairly simple to make (especially if you keep a few balls of pizza dough in the freezer), and let's face it - delicious.
This time around, I used sauce, cheese, and sweet Italian sausage in all of them, but to half, I added some onions, mushrooms, and black garlic that were sauteed in the fat left in the pan from cooking the sausage. So. Ridiculously. Good.
You could really shape these in any way that you like, go in half moons if you like, but if you do, be prepared to suffer the scorn of the connoisseurs who think you're trying to make calzones. I shaped mine the same way that I do my Pretzel Pockets (aka Hot Pocket-style). Due to the folding, the edges wind up being a bit thicker, like soft breadsticks, but as a crust-lover, I like the bonus crust. Everybody seems to.
Sunday, February 23, 2014
Spicy Chili Mac
The Tao of Chili Making
Chili will have a list of ingredients so long that it makes your head spin. It can't be helped.
Don't even try making a small batch of Chili. It is impossible.
No matter how hard you try, two batches of Chili will never turn out the same.
Learn it. Practice it. Embrace it. Hey, you can't make this stuff up. Except I totally did. But that doesn't make it any less true.
I mean it when I say embrace it, though - I've never met a (giant) pot of chili that I didn't like. From mild to fire-breathing, from shredded beef to ground chicken, from 15-bean to no-bean, from green to white to red...I like 'em all.
Friday, November 15, 2013
Pizza Toast
For Weekday Supper, we always share meals that can be made quickly and without a lot of fuss. But this week, we've sped things up even faster to share ways of getting food on the table in a flash! Now, there are all sorts of ways to make lightning fast meals.
Those are just a few options. What are your tricks for getting a busy weekday supper on the meal in 15 minutes or less?
- use pre-cooked grains (that's what the weekend is for) for a stir-fry or salad
- slice/dice up leftover bits and bobs floating around in the fridge for quesadillas, pastas, or pizza toast
- cook angel hair pasta - it's so thin that it cooks in 2-3 minutes
- add a rotisserie chicken that you picked up on the way home from work to a salad that uses simply different lettuces, fruits and/or berries, and a simple vinaigrette
- pop a roast or chicken thighs into the slow cooker before you leave in the morning with simple sauce or seasoning that you can pour over. Pile it onto crusty buns with your favorite condiments after you peel off your coat
Those are just a few options. What are your tricks for getting a busy weekday supper on the meal in 15 minutes or less?
Thursday, January 17, 2013
Cowboy Casserole. {yee-haw}
I'll admit, the list of ingredients for this is a little bit unwieldy. But sometimes, I get in a mood, a mood that can only be described as ambitious. Apparently the day that I made this was one of those days. I mean, it's not a difficult recipe or anything. It just has a lot of ingredients. But oddly enough, most of them are ingredients that I almost always have in the house, anyway.
Plus, that long list? It bring major flavah! Did I just use that word the wrong way? Hmmmm. I think it fits. We're talking tasty, Southwest flavor. A hearty casserole that even non-cowboys can get behind.
And sometimes, I like prepping a dish and putting it all together in one little cooking vessel, only to cover it and stick it in the fridge. It makes me feel especially accomplished the next day. What's that? You want to have guests over for dinner? Ah yes, I whipped up a casserole yesterday, so that won't be a problem. I'll just pull the casserole out of the fridge and bake it. No muss, no fuss. (Previous day obviously forgotten.)
The layer of tortilla chips that are crushed up at the bottom of this casserole really remind me of this one chicken tortilla casserole that my mom made a few times when I was a kid. And now swears she doesn't remember how she made it. I've been trying to recreate it for years, to no avail. This isn't it. That one was green. But still, it sort of reminds me of it.

note:
Emeril's Southwest Seasoning (yield: ½ c.):
slightly adapted from Emeril Lagasse
Plus, that long list? It bring major flavah! Did I just use that word the wrong way? Hmmmm. I think it fits. We're talking tasty, Southwest flavor. A hearty casserole that even non-cowboys can get behind.
And sometimes, I like prepping a dish and putting it all together in one little cooking vessel, only to cover it and stick it in the fridge. It makes me feel especially accomplished the next day. What's that? You want to have guests over for dinner? Ah yes, I whipped up a casserole yesterday, so that won't be a problem. I'll just pull the casserole out of the fridge and bake it. No muss, no fuss. (Previous day obviously forgotten.)
The layer of tortilla chips that are crushed up at the bottom of this casserole really remind me of this one chicken tortilla casserole that my mom made a few times when I was a kid. And now swears she doesn't remember how she made it. I've been trying to recreate it for years, to no avail. This isn't it. That one was green. But still, it sort of reminds me of it.
Cowboy Casserole
by Heather Schmitt-González
Prep Time: 1½ hours (largely unattended)
Cook Time: 45 minutes
Keywords: bake entree chicken cheese tortillas American Southwest
Ingredients (serves 8-10)
- 2 lbs. boneless, skinless chicken breasts
- 2½ c. chicken stock
- ½ c. white wine
- handful fresh cilantro, ripped in half
- 1½ Tbs. lime juice
- 2 garlic cloves, peeled & smashed
- 1 tsp. black peppercorns
- 1 1/4 tsp. salt, divided
- 1/4 tsp. dried oregano
- 2 bay leaves
- 6 Tbs. unsalted butter
- 1 lb. white button mushrooms, quartered
- Pinch freshly ground black pepper
- 4 Tbs. all-purpose flour
- 1½ c. whole milk
- 12 c. tortilla chips
- 1 onion, finely chopped
- 1 large bell pepper, finely chopped
- 2 jalapeños, stemmed, seeded, & finely chopped (optional)
- 8 oz. Pepper Jack Cheese, shredded
- 8 oz. Sharp Cheddar, shredded
- 1 Tbs. Emeril's Southwest Seasoning, either store-bought or homemade (recipe follows)
- 2 tsp. chili powder
- 1 tsp. ground cumin
- 1 c. canned, diced tomatoes, drained
- 1 (4 oz.) can diced green chiles, drained
Instructions
Combine the chicken, chicken stock, wine, cilantro, lime juice, garlic, peppercorns, 1 teaspoon of the salt, the oregano, and bay leaves in a medium saucepan and bring to a boil. Reduce the heat to a simmer and cook, uncovered, for 10 minutes. Cover, remove from heat and allow the chicken to cool in the poaching liquid for 45 minutes. Remove the chicken from the cooking liquid and tear or cut into bite-size pieces; set aside. Strain the cooking liquid; reserve.
Preheat oven to 350° F.
Heat the butter in a large skillet over high heat until melted and just begins to foam. Add mushrooms, remaining salt, and black pepper. Cook, stirring occasionally, until the mushrooms release their liquid. Continue to cook until the mushrooms are golden brown and all the liquid has evaporated, ~6 minutes.
Scatter the flour over the mushrooms, and cook for 1 minute, stirring. Add the milk and stir, scraping up any bits from the bottom of the pan. Cook until the mixture begins to thicken.
Add 1½ cups of the reserved poaching liquid, stir, and cook until very thick and flavorful, ~10 minutes. Remove from the heat.
Place the tortilla chips in the bottom of a 9 x 13-inch glass casserole. Crush the chips with your hands so they form a thin layer on the bottom of the dish. Pour ~1 cup of the reserved cooking liquid over the tortilla chips and allow them to soak up the liquid. Scatter the chicken over the top of the tortilla layer. Spread the chopped onions, bell peppers, and jalapeños (if using) evenly over the chicken. Top with half of the grated cheeses. Sprinkle with the Southwest Seasoning, chili powder and ground cumin. Spoon the reserved mushroom mixture evenly over the top of the spices, then top with the tomatoes and green chiles. Cover with the remainder of the cheeses.
Bake uncovered for ~45 minutes, or until the cheese is bubbling and the casserole is heated through. Let sit for 5 minutes or so before serving.
This casserole may be prepared in advance. Assemble and cover; refrigerate overnight or freeze until ready to use. Allow to thaw 1 day in the refrigerator (if frozen); remove from fridge and allow to come to room temperature before baking as directed.
2 Tbs. chili powder - 2 Tbs. ground cumin - 2 Tbs. paprika - 1 tsp. ground black pepper - 1 Tbs. ground coriander - 1 tsp. cayenne pepper - 1 Tbs. garlic powder - 1 tsp. crushed red chile flakes - 1 Tbs. salt - 1 Tbs. dried oregano
Combine all ingredients thoroughly. Store in an airtight container at cool room temperature.
Powered by Recipage
Wednesday, December 19, 2012
Cinnamon Ornaments
Cinnamon smells like the holidays.
Twisted sticks steeping in cider or wine. Or infused into thick, creamy eggnog or rompope. Tied with twine to adorn a gift. Arranged in a pretty jar as both a means of aromatherapy and as seasonal decor.
Rust-colored powder folded into batters and doughs. Bubbling in the swirls of warm, puffy sweet rolls. Sprinkled atop a soft pillow of whipped cream on hot chocolate... or hot coffee... or hot boozy beverage.
Lip balms and hand creams filled with essential oils... stimulating, energizing, warming your skin against the nip of winter air.
Twisted sticks steeping in cider or wine. Or infused into thick, creamy eggnog or rompope. Tied with twine to adorn a gift. Arranged in a pretty jar as both a means of aromatherapy and as seasonal decor.
Rust-colored powder folded into batters and doughs. Bubbling in the swirls of warm, puffy sweet rolls. Sprinkled atop a soft pillow of whipped cream on hot chocolate... or hot coffee... or hot boozy beverage.
Lip balms and hand creams filled with essential oils... stimulating, energizing, warming your skin against the nip of winter air.
Sunday, October 28, 2012
Shrunken Heads in Spiced Cider

Sunday, October 14, 2012
Chicken a la King
Chicken a la King is one of those dishes whose origins are debated. Some say it was created in the 1880's by chef Charles Ranhofer of Delmonico's and originally called Chicken a la Keene (after Foxhall Parker Keene). The Claridge Hotel in London also lays claim to its creation in 1881 (named for James R. Keen, Foxhall's father). Yet another hotel in Brighton Beach, the Brighton Beach Hotel claims its creation in the 1890's (named after a patron and his wife, E. Clarke King). Or perhaps it was the creation of cook William "Bill" King of the Bellevue Hotel in Pennsylvania. After all, that is what his obituary in the New York Tribune said. (*source)
But all that aside, what I love about Chicken a la King is that it reminds me of being a kid. I can say with confidence that it was one of my absolute favorite dishes growing up, if not the favorite. I don't necessarily remember sitting down to the table to eat it. I can find no clarity on specific instances. But when I think of it, it makes me happy. That warm, creamy gravy studded with chunks of white meat chicken. Thin slices of mushroom and bits of color from bell peppers and herbs. And we always, I repeat ALWAYS served our Chicken a la King over biscuits. Smothered.
Funny thing is, my parents didn't make it from scratch. It came from a can. But man, oh man, did I love it. I didn't pay that can any mind. I mean, our biscuits came from a popable tube, so why would I question the can?
As a young mother, I would "make" Chicken a la King every once in a while. From the can. However, it was about that time in my life when I really started cooking. For real. So the can didn't make many appearances. But every once in a while, I'd throw caution to the wind and plunk one (okay, more than likely it was two) cans in my cart. But I didn't do it very often. I mean, aside from not wanting to eat whole meals from a can, that shtuff is pricey!
Naturally, I started experimenting. Searching out different recipes for it. Everybody has their own little variations. Some people use red and green bell peppers. I like to use pimientos or roasted red peppers. I like the way they sort of dissolve into the sauce/gravy and give it little red flecks. It reminds me of the one I grew up with. You can very easily use sherry or Madeira or even Marsala, but I usually use brandy. Some people cut their white button mushrooms into thick slices, I like to use a mix of white and crimini and slice them very thinly. And some people serve the whole shebang over noodles or rice. But 90% of the time, I choose biscuits. The other 10, I'll go with toast points.
But no matter what, this is a dish I make when the weather starts to turn chilly (and a couple more times throughout the cold months). And no matter what the day or time, when I smell it cooking and then sit down to eat, though I am grown and have kids of my own, I am instantly transported back to childhood. Pure comfort food. Warm and fuzzy. Uuuuhhhh...Fuzzy feelings, not fuzzy food.

But all that aside, what I love about Chicken a la King is that it reminds me of being a kid. I can say with confidence that it was one of my absolute favorite dishes growing up, if not the favorite. I don't necessarily remember sitting down to the table to eat it. I can find no clarity on specific instances. But when I think of it, it makes me happy. That warm, creamy gravy studded with chunks of white meat chicken. Thin slices of mushroom and bits of color from bell peppers and herbs. And we always, I repeat ALWAYS served our Chicken a la King over biscuits. Smothered.
Funny thing is, my parents didn't make it from scratch. It came from a can. But man, oh man, did I love it. I didn't pay that can any mind. I mean, our biscuits came from a popable tube, so why would I question the can?
As a young mother, I would "make" Chicken a la King every once in a while. From the can. However, it was about that time in my life when I really started cooking. For real. So the can didn't make many appearances. But every once in a while, I'd throw caution to the wind and plunk one (okay, more than likely it was two) cans in my cart. But I didn't do it very often. I mean, aside from not wanting to eat whole meals from a can, that shtuff is pricey!
Naturally, I started experimenting. Searching out different recipes for it. Everybody has their own little variations. Some people use red and green bell peppers. I like to use pimientos or roasted red peppers. I like the way they sort of dissolve into the sauce/gravy and give it little red flecks. It reminds me of the one I grew up with. You can very easily use sherry or Madeira or even Marsala, but I usually use brandy. Some people cut their white button mushrooms into thick slices, I like to use a mix of white and crimini and slice them very thinly. And some people serve the whole shebang over noodles or rice. But 90% of the time, I choose biscuits. The other 10, I'll go with toast points.
But no matter what, this is a dish I make when the weather starts to turn chilly (and a couple more times throughout the cold months). And no matter what the day or time, when I smell it cooking and then sit down to eat, though I am grown and have kids of my own, I am instantly transported back to childhood. Pure comfort food. Warm and fuzzy. Uuuuhhhh...Fuzzy feelings, not fuzzy food.
Chicken a la King
by Heather Schmitt-González
Prep Time: ~1 hour (unattended)
Cook Time: 45 minutes
Keywords: simmer entree chicken mushrooms American fall winter
Ingredients (serves 6-8)
- 1½ c. cup heavy cream
- 3 Tbs. lemon juice
- salt
- ~2½ lbs. boneless, skinless chicken breasts, cut into ½"-1" chunks
- 2 Tbs. unsalted butter
- 2 small onions, cut into small dice
- ~8 oz. white &/or crimini mushrooms, thinly sliced
- 1 (4 oz.) jar pimientos, drained
- ½ tsp. freshly ground black pepper
- 6 Tbs. all-purpose flour
- ¾ c. brandy
- 3 c. chicken stock or broth
- ¼ c. finely chopped fresh parsley
Instructions
Place 1 cup of the cream, 2 tablespoons of the lemon juice, and 2 teaspoons salt into a gallon-sized zippered baggie and squish around to mix. Add chicken and seal. Massage to coat and refrigerate for 30 minutes, or up to 2 hours.
Heat butter or oil in large pan over medium-high heat until melted and starting to bubble. Add onion and cook until translucent, ~3 minutes. Add mushrooms and pimientos, ~½ teaspoon salt, and the pepper and cook for another 4 - 5 minutes. Sprinkle in flour and cook for another minute. Add brandy, scraping up any browned bits with wooden spoon, and cook until brandy has basically evaporated and you have a thick, glumpy mass, ~1 minute. Add broth and remaining cream and cook until sauce is thick enough to leave a glimpse of a trail in the bottom of the pan when you run your wooden spoon through it, ~10-12 minutes.
Open the baggie and dump in the chicken mixture; reduce heat to medium-low. Simmer, stirring frequently, until chicken is cooked through, 10 minutes or so. Remove from heat and stir in remaining teaspoon of lemon juice and the chopped parsley. Serve over biscuits or toasted bread.
Thursday, September 13, 2012
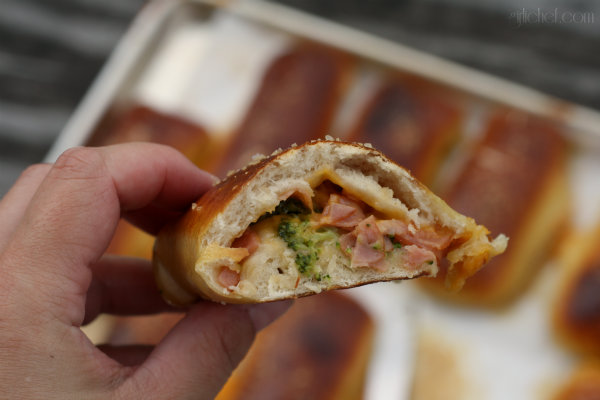
Ham, Cheese & Broccoli Pretzel Pockets
I'm a teeeeny-tiny-leeetle-bit obsessed with soft pretzels at this moment in time. Really. I can't get enough. I blame it on the bursts of life, or should I call them teasers, of crisp Autumn air. And football.
It's all football season's fault. Yeah, that's it. Football season made me do it.
Monday, September 10, 2012
The BEST Flan ever. Period.
This is officially my 1000th post. Ho. Lee. Cow. Looking back, it seems that these past 3 years and 7 or 8 months has just flown by. Now, not every single post contained a recipe, but I think it's safe to say that at least 95% of them did. And of those posts, not a single recipe was repeated. Shite!
Don't get me wrong, I have no problem with repeating recipes...the good ones are worth repeating...it's just that there are SO many things out there that I want to make. SO many. TOO many. And the list just keeps growing. So that is what keeps me from repeating recipes.
Sunday, September 9, 2012
Soft Pretzels w/ Spicy Beer Cheese Sauce
Today (I'm writing this on Saturday), we had absolutely PERFECT football weather. Clear blue skies with fluffy white clouds and temps in the upper 60's. For me, it doesn't get any better. And while those are the perfect conditions for hanging out in the stadium and watching a college football game, they're also pretty ideal for tailgating beforehand.
I feel most alive when the air is slightly crisp...when jeans or comfy pants and a t-shirt can be supplemented by a sweatshirt if you start feeling chilly. I love being able to chill outside of the stadium between rows of parked cars, temporary tents, and grills sizzling with brats, burgers, and dogs whose smell is enough to make you stop and chat.
And then there's the beer. It seems in endless supply. And while I've seen my fair share of people who have had a few too many...it's usually just a great social lubricant. Beer AND hot chocolate spiked with Butterscotch Schnapps. I don't drink that much anymore, but back in college when we'd walk from the dorm to the stadium, a tall thermos filled with that was the best medicine for staying warm. Sigh. Those were the days. And I can't even think of the combination without being transported back 19 years. Holy shtuff. 19 years ago I was a freshman in college. Ssshhhh...don't tell. It really doesn't seem like that long ago.
But these days, I love planning the food that we're going to bring tailgating. Everybody brings something, so you know you'll have lots of choices. One of my go-to foods for tailgating is pretzels in some form. They're one of my favorite munching foods. Heck, they're one of the whole family's favorite munching foods. From pretzels wrapped around hotdogs or sausages to pretzels filled with veggies, meats, and gooey cheese (coming soon) to pretzel bites and sticks to good ol' fashioned soft pretzels like these - they ALWAYS please. Especially when served with an ooey-gooey cheese sauce that is slightly spicy (more so the longer it sits) and tastes of beer. I have to make at least a double-batch. Even then, they disappear super fast.
These were gone in no longer than 20 minutes, which is about how long it usually takes them to get eaten. And not long after that 20 minutes everybody was telling me I should have made a triple batch. Next time.
What are some of your favorite tailgating foods (or foods that eat during football games)? What's your favorite - college or pro? Who do you cheer for? Feel free to leave any links to your answers in the comments...I'd love to have more recipes marked for future game days!

Notes:
adapted from Chuck Hughes
I feel most alive when the air is slightly crisp...when jeans or comfy pants and a t-shirt can be supplemented by a sweatshirt if you start feeling chilly. I love being able to chill outside of the stadium between rows of parked cars, temporary tents, and grills sizzling with brats, burgers, and dogs whose smell is enough to make you stop and chat.
And then there's the beer. It seems in endless supply. And while I've seen my fair share of people who have had a few too many...it's usually just a great social lubricant. Beer AND hot chocolate spiked with Butterscotch Schnapps. I don't drink that much anymore, but back in college when we'd walk from the dorm to the stadium, a tall thermos filled with that was the best medicine for staying warm. Sigh. Those were the days. And I can't even think of the combination without being transported back 19 years. Holy shtuff. 19 years ago I was a freshman in college. Ssshhhh...don't tell. It really doesn't seem like that long ago.
But these days, I love planning the food that we're going to bring tailgating. Everybody brings something, so you know you'll have lots of choices. One of my go-to foods for tailgating is pretzels in some form. They're one of my favorite munching foods. Heck, they're one of the whole family's favorite munching foods. From pretzels wrapped around hotdogs or sausages to pretzels filled with veggies, meats, and gooey cheese (coming soon) to pretzel bites and sticks to good ol' fashioned soft pretzels like these - they ALWAYS please. Especially when served with an ooey-gooey cheese sauce that is slightly spicy (more so the longer it sits) and tastes of beer. I have to make at least a double-batch. Even then, they disappear super fast.
These were gone in no longer than 20 minutes, which is about how long it usually takes them to get eaten. And not long after that 20 minutes everybody was telling me I should have made a triple batch. Next time.
What are some of your favorite tailgating foods (or foods that eat during football games)? What's your favorite - college or pro? Who do you cheer for? Feel free to leave any links to your answers in the comments...I'd love to have more recipes marked for future game days!
Soft Pretzels w/ Spicy Beer Cheese Sauce
by Heather Schmitt-González
Prep Time: 1½ hours-2 hours (largely una
Cook Time: 15-17 minutes
Keywords: simmer bake bread snack beer cheese flour chiles Super Bowl tailgating American
Ingredients (8 pretzels / ~2 cups sauce)
- 1½ c. lukewarm water (110 -115° F)
- 1 Tbs. sugar
- 2 tsp. fine sea salt
- 2 tsp.active dry yeast
- 4-4½ c. all-purpose flour
- 2 Tbs. butter, melted
- ⅔ c. baking soda
- 1 egg yolk beaten w/ 1 Tbs. water
- Coarse sea salt or kosher salt
- 1 bottle (12 oz.) beer
- 2 c. (8 oz.) shredded Sharp Cheddar Cheese
- 1 Tbs. all-purpose flour
- 8 oz. cream cheese, at room temperature
- 1 clove garlic, minced
- 1 jalapeño, minced (& seeded, if you wish)
- salt
- black pepper
Instructions
Making the Pretzels:
Combine the water and sugar in the bowl of a stand mixer and sprinkle the yeast on top. Let sit until the mixture begins to turn creamy, ~5 minutes. Add 4 cups of the flour, salt, and melted butter and mix on low using the dough hook attachment until well combined. If dough seems extremely sticky, start adding in a little bit of the extra flour at a time until dough is just slightly tacky, but no longer sticky. Increase speed to medium and knead until the dough is smooth and cleans the sides of the bowl, ~5 minutes.
Form dough into a loose ball and place in an oiled bowl Cover with plastic wrap or a clean kitchen towel and let sit in a warm place until doubled in size, ~1 hour.
Line a baking tray with parchment paper and lightly brush with vegetable oil or spray with pan spray. Set aside.
Once dough has risen turn out onto a lightly floured work surface. Divide into 8 (basically) equal portions using a bench scraper. Roll each portion into a rope that is 18"-24" long. Lift up ends of rope to form a sort of U-shape and then twist the two sides around each other and bring down to form a pretzel shape. Place on baking tray and repeat with all of the dough portions. Let sit uncovered while you prepare the water and preheat the oven.
Preheat the oven to 450° F. Bring 10 cups of water to a boil in a large, wide-ish pot (like a soup pot). Once it begins to boil, gradually add in the baking soda to prevent overflow. Once it comes back to the boil, lower the pretzels one at a time into the water for 30 seconds each, flipping over halfway. When picking up the formed dough, I like to use two fingers to pick it up, one through each pretzel "loop". This allows the dough to sort of stretch in the right direction. Then just lower it carefully into the boiling baking soda bath. Use a wide,flat slotted spoon or spatula to lift from the water. Let as much of the water as you can fall back into the pot and lay the pretzel back onto the prepared tray.
Once all of the pretzels are back on the tray, beat the egg yolk with the water and brush the top of each pretzel with it. Sprinkle with coarse salt (or parmesan, poppy seeds, sesame seeds, cinnamon-sugar, what-have-you). Slide into preheated oven and bake until the pretzels turn a deep golden brown, 15-17 minutes.
Transfer to a cooling rack and allow to sit for as many minutes as you can before tearing into them. That's usually 5 tops in my house.
Making the Spicy Beer Cheese Sauce:
This comes together very quickly - make it once you slide the pretzels into the oven and it will be finished before they come out.
Add beer to a medium saucepan set over medium heat and bring to a boil. While you're waiting, toss the cheddar cheese with the flour. Once beer is simmering, whisk in the reserved cheese and all of the remaining ingredients. Whisk regularly until the cheese has all melted and you have a smooth, creamy sauce. Hold warm until ready to serve.
We love soft pretzels pretty much ANYTIME. But if you want to take these tailgating (or somewhere similar), you can hold the cheese sauce in a small crockpot or thermos and wrap the warm pretzels in a towel and hold them in a cooler reserved for "hot" items. You may want to make a double batch - they go fast!
Tuesday, August 28, 2012
Chicken 'n Biscuits (Chicken Pie)
Let me just get this out there right now - I forgot to add the peas to this dish. What!? I don't know, I got all caught up in making dinner and I completely spaced them. When I was taking the (not-so-fabulous) photos, I kept thinking something was missing...that the dish didn't look quite right. It was the peas. Blast it!
Phew. Glad to have that off my chest.
Believe me, I did NOT let the lack of peas deter me from thoroughly enjoying this big ol' pan of comfort food. And neither did anyone else.
A second note - these may be some of the finest biscuits that I have ever eaten. I don't know if they would be as amazing baked separately from the chicken mixture as they were baked right on it, but I'm surely gonna be finding out soon. They are so tender and melt-in-your-mouth that it's a little insane.
I doubled the original recipe so that my whole family could eat dinner that night. But next time I make this...and there will be a next time...I will most likely triple the chicken mixture. I wanted a higher ratio of the creamy, rich chicken mixture against those tender biscuits.
Now. Scoot on back out of here you nasty-hot weather...I want that crispy air that signals Autumn to come woooooshing back in. So I can enjoy comfort dishes like these on a regular basis.

make chicken mixture:
slightly adapted from Rick and Lanie's Excellent Kitchen Adventures
I am sharing this post with:
IHCC theme: Out(side) of Mexico
Phew. Glad to have that off my chest.
Believe me, I did NOT let the lack of peas deter me from thoroughly enjoying this big ol' pan of comfort food. And neither did anyone else.
A second note - these may be some of the finest biscuits that I have ever eaten. I don't know if they would be as amazing baked separately from the chicken mixture as they were baked right on it, but I'm surely gonna be finding out soon. They are so tender and melt-in-your-mouth that it's a little insane.
I doubled the original recipe so that my whole family could eat dinner that night. But next time I make this...and there will be a next time...I will most likely triple the chicken mixture. I wanted a higher ratio of the creamy, rich chicken mixture against those tender biscuits.
Now. Scoot on back out of here you nasty-hot weather...I want that crispy air that signals Autumn to come woooooshing back in. So I can enjoy comfort dishes like these on a regular basis.
Chicken 'n Biscuits (Chicken Pie)
by Heather Schmitt-González
Prep Time: 30 minutes
Cook Time: 25 minutes
Keywords: bake entree chicken carrots American
Ingredients (serves 6-8)
- 3 c. all-purpose flour + more for kneading
- 2 Tbs. + 2 tsp. baking powder
- 2 tsp. sugar
- 1 tsp. salt
- 6 oz. (12 Tbs./1½ sticks) cold butter, cubed
- 1 c. milk
- 2 large eggs
- 4 Tbs. butter
- 1 medium onion, diced
- ½ c. all-purpose flour
- 4½ c. milk
- 2 lb. boneless, skinless chicken thighs, cut into 1" chunks
- 4 medium carrots, chopped
- salt
- ~1 tsp. freshly ground black pepper
- 2 tsp. fresh thyme leaves
- 2 c. frozen peas
Instructions
make the biscuits:
Beat together eggs and milk in a large measuring cup or bowl; set aside. Place flour, baking powder, sugar, and salt into the bowl of a food processor and pulse a few times to mix. Scatter butter pieces over the flour mixture and pulse 8 times. Turn on processor and slowly pour in milk-egg mixture until just combined, ~4 seconds. The dough will be extremely sticky.
Dump dough out of food processor onto a heavily floured work surface. Quickly and gently knead about 5 times, using floured hands. Pat dough out to about a ¾" thickness. Use a 2-3" biscuit cutter to cut out ~15 biscuits. Let sit on work surface while you continue on.
Preheat oven to 425° F.
Place butter in a medium-large saucepan over medium heat. Once the butter has melted, add the onion and cook, stirring often, until it begins to turn golden, 6-8 minutes. Add flour and stir thoroughly. Whisk in about half the milk. Mixture will begin to thicken. Add other half of milk, whisking almost constantly until mixture comes to a boil.
Add chicken, carrots, 1-2 teaspoons of salt, the black pepper, and the thyme. Reduce heat to medium-low and simmer for ~10 minutes. Taste and adjust seasoning, if necessary. Add the peas.
Pour the hot mixture into a baking dish (~9"x13") and smooth out the surface. Lay the cut biscuit dough over the top in a single layer. Set on a baking pan in the oven (to catch any eruptions).
Bake for ~25 minutes or until biscuits are browned. Let sit for ~10 minutes to allow mixture to set up a bit. Serve!
Powered by Recipage
IHCC theme: Out(side) of Mexico
Sunday, August 12, 2012
Chocolate Peanut Butter Squares
This week for #SundaySupper, we're talking about gearing up for Back to School with Katie Workman, author of The Mom 100 Cookbook. It is the third time the #SS group has teamed up with Katie to share recipes from that cookbook. I just missed the first by days when I joined up, but once I read back through everybody's posts, I knew I wanted to join in the two still to come. So I checked the book out from the library. And then I bought it the same day because I knew I didn't want to let it go. You might remember my Lasagna with Turkey Meat Sauce post - that was what I shared last time we hung out with Katie. I also shared my review of the cookbook last week.
Back to school can mean anything from nourishing breakfasts to packed lunches to simple weeknight meals. And OF COURSE it can mean treats. I've mentioned before that I'm a goes-waaaaay-back Peanut Butter Cup lover. So, any excuse for chocolate and peanut butter to find their way together and subsequently into my mouth...I'm taking it. Fortunately (or not...since that means less for me), the whole fam is the same way.
So, whether you cut these into little one-bite squares and tuck them into your kids lunch box as a happy ending to lunch or cut a big square to set alongside a tall, cold glass of milk as an after-school snack - these will be a well received treat. IF you're a family that believes chocolate + peanut butter = perfection.

notes:
ever-so-slightly adapted from The Mom 100 Cookbook
Back to school can mean anything from nourishing breakfasts to packed lunches to simple weeknight meals. And OF COURSE it can mean treats. I've mentioned before that I'm a goes-waaaaay-back Peanut Butter Cup lover. So, any excuse for chocolate and peanut butter to find their way together and subsequently into my mouth...I'm taking it. Fortunately (or not...since that means less for me), the whole fam is the same way.
So, whether you cut these into little one-bite squares and tuck them into your kids lunch box as a happy ending to lunch or cut a big square to set alongside a tall, cold glass of milk as an after-school snack - these will be a well received treat. IF you're a family that believes chocolate + peanut butter = perfection.
Chocolate Peanut Butter Squares
by Heather Schmitt-González
Prep Time: 15 minutes
Cook Time: 7 minutes
Keywords: snack dessert vegetarian chocolate peanut butter bars
Ingredients (25-36 squares)
- 6 Tbs. (3 oz. / ¾ stick) unsalted butter, at room temperature
- ¼ c. firmly packed dark brown sugar
- 1¼ c. powdered sugar
- ¾ c. creamy peanut butter
- ¼ c. graham cracker crumbs
- 12 oz. (2 c.) milk chocolate chips (or semisweet or a mix)
Instructions
Lightly butter or spray a 9-inch square baking pan. I like to also line it with a long strip of parchment or wax paper (makes it easy to lift from pan all in one square, if you wish). Grease the paper, too.
Combine brown and powdered sugars, peanut butter, graham cracker crumbs, and 5 tablespoons of the butter in a medium bowl and beat with an electric mixer until it is all combined well, but remains a bit crumbly. This should take about 1 minute. Press the mixture evenly into your prepared pan in a thin layer, ~¼" thick.
I like to stick the pan in the fridge or freezer while I'm melting the chocolate. If the peanut butter mixture is firm, I find it easier to spread on the melted chocolate. So, either set aside or stick in fridge or freezer and continue one.
So, combine chocolate and remaining tablespoon of butter in a small saucepan over very low heat and melt, stirring often until smooth, ~7 minutes. Let chocolate mixture cool very briefly and then, using a rubber spatula, carefully spread the hot chocolate over the peanut butter layer.
Cover the pan with plastic wrap and refrigerate until the chocolate has firmed up, ~1 hour. Cut into squares (5x5 or 6x6).
It's easiest to cut into squares after just 1 hour. I waited longer and the chocolate really cracked on me - not that this took anything away from the awesomeness-that-is-a-peanut-butter-square - just a heads up.
These are very rich and sinful (and delicious), so a small square tucked lovingly into a lunchbox would make the perfect end of lunch bite for kiddos as they head back to school. Or indulge in a larger square with a tall glass of cold milk at home.
Thursday, August 2, 2012
The Mom 100 Cookbook by Katie Workman {cookbook review}
author: Katie Workman
publisher: Workman Publishing
photos: yes
soft cover: 366 pages
chapters/sections: Quick and Easy Breakfasts - Lunch to Stay or to Go - A Handful of Snacks - Appetizers? Really? Really - Souped Up - 4 Salads and a Couple of Vinaigrettes - 4 Chickens and a Turkey (Sort of) - Main Dish Meat - Fish and Seafood - Pasta and Pizza-the Magic Words - Vegetarian Mains - Potluck - Mixed Company Dinners - Let's Call a Carb a Carb! - Best-Shot Vegetables - Weekend Brunches - Simple Weeknight Desserts - Special Occasion Desserts - Bake Sale - What You May Be Looking For
fun features: Each of the twenty chapters addresses a "dilemma". For example, chapter 1 is titled Quick and Easy Breakfasts. The dilemma for that chapter is: Getting the kids fed and out the door. Five recipes constitute each chapter (with variations). So, 20 chapters - 20 dilemmas - 5 solutions to each dilemma. I love this concept since it is both fun and practical at the same time. There's not a mom out there who hasn't found herself facing most or all of these situations before - and if you think you'll be the first, you are in for a big surprise.
(a few of the many) recipes destined for my kitchen: Crunchy Chewy Granola, Sautéed Corn Spinach Bacon and Scallions, One-Pot Arroz con Pollo, Honey-Hoisin Tofu, Sesame Noodles, Cheesy Chicken Enchiladas, Garlic Shrimp, Broiled Miso Cod Fingers, Cheddar and Cauliflower Soup, Fudgy One-Pot Brownies
my thoughts/review: I think that Katie Workman hit the nail on the head with this book. I love the concept and her writing style, very real...everyday..."I get it" approach. This book is made for moms (or dads). It's not made for those hoping to learn French cooking techniques. And maybe it's not really for grandma's or those who have been cooking for a long time. The recipes are fairly basic, yet not elementary. They are meant to get you into the kitchen and making pleasing family meals. I look at them as building-block recipes. Try them once. Try the variations. Katie includes Fork in the Road solutions for households where "picky palates are prevalent". The recipes are meant to ease your kids into trying new flavors and cuisines without overwhelming them. If you grew up in a Mexican household, it's possible that you'll try the Mexican Tortilla Casserole or the Cheesy Chicken Enchiladas and think...that's not Mexican food! BUT. For those households who didn't grow up with those glorious chiles and amazing spices permeating their being, these could be the "gateway" meals that they need to start exploring that cuisine.
I took a particular shine to this book, because even though I cook three meals a day for my family on a regular basis, sometimes I overlook the simple things I grew up with and loved as a kid. I'm very adventurous in the kitchen, and in turn, so are my kids. But they ARE still kids. And I still make them good ol' kid food.
I think for those who are uncomfortable in or fairly unfamiliar with the kitchen and those just starting to realize that the kitchen is where they'll be spending a LOT of time in the future, this book will become invaluable. I've been recommending it to lots of people and I think it is the PERFECT gift to give to young mothers and newlyweds. But it will be equally appreciated by moms who never learned to cook and want to break their families out of the "take-out" rut.
recipe(s) I have already tried:
Simple Fresh Mozzarella Pasta Casserole - A simple, cheesy pasta salad perfectly paired with Vodka Sauce. Everybody loved it.
Pigs in a Blanket - A childhood favorite of my own, but made with mini-dogs instead of full size. I loved her suggestions of topping with sesame seeds or poppy seeds. An all-around family favorite for dinner, game food, or party food.
One-Skillet Cheesy Beef and Macaroni (or Goulash to me) - This one-skillet dish reminded me of what I grew up calling goulash. A great starter, but we all agreed it needed a little something more. Thinking back on that goulash, it's gotta be a heaping spoonful of sour cream stirred in. However, it all got eaten.
Lasagna w/ Turkey Meat Sauce - My new favorite lasagna and meat sauce. I'll be making this often in big batches to freeze for later and to share with somebody who needs a meal.
Chocolate Peanut Butter Squares - Ummmm...do you love Reese's? Because we do. Very similar to homemade peanut butter cups, these bars are a rich, satisfying dessert option or lunch box treat. A little square'll do ya!
about the author: Katie Workman is the founding editor in chief of Cookstr and a food writer whose work has appeared in The Huffington Post, The Daily Beast, AOL Food, and other publications. She lives with her husband and two children in New York City. Read more "about Katie" on The Mom 100 site.
further info: website | youtube | facebook | blog | twitter
*I DID NOT receive a free copy of, nor any compensation for reviewing this book. I just liked it and wanted to share my thoughts. All opinions stated in this post are 100% my own.
I am sharing this post with:
Sunday, July 22, 2012
Lasagna w/ Turkey Meat Sauce
This week for #SundaySupper we are featuring recipes from the new cookbook by Katie Workman, The Mom 100 Cookbook. This is actually the second of three times the group will be doing this, but I jumped in just after the first event, so it's my first go at the book.
When I saw the group would be cooking with Katie, I picked up the book from my library. I knew they had it because I remembered seeing it on the "new" shelf not long before. As hard as it is for me to keep my mouth shut about the book (because I really, REALLY want to tell you all about it), I'm going to. Just because I want to devote a whole post entirely to a review of the book - and that would just be repetetive. So I won't.
I will tell you that I've already made six things from it in the past couple of weeks. And enjoyed everything. For today's #SundaySupper event, I decided to share my slightly adapted version of Katie's Lasagna and Turkey Meat Sauce.
I went out and picked up a couple of foil pans (because I wanted to make two and test out the freezing capabilities) and got to work. But it wasn't hard work. It was actually fairly simple. And entirely enjoyable. How 'bout I just tell you that THIS lasagna is now my go-to lasagna. I mean, lasagna's are all fairly similar. But the sauce and the proportions make great please-pretty-much-everybody meals.
I hope you'll scroll down to the bottom of the post when you're done checking out the recipe to see some other fantastic recipes from this book. And pay close attention to our #SundaySupper live Twitter chat time - we'll be giving away 3 copies of this cookbook. Plus, we'll be chatting live with the author herself, Katie Workman later tonight.

notes:
adapted from The Mom 100 Cookbook

notes:
adapted from The Mom 100 Cookbook
When I saw the group would be cooking with Katie, I picked up the book from my library. I knew they had it because I remembered seeing it on the "new" shelf not long before. As hard as it is for me to keep my mouth shut about the book (because I really, REALLY want to tell you all about it), I'm going to. Just because I want to devote a whole post entirely to a review of the book - and that would just be repetetive. So I won't.
I will tell you that I've already made six things from it in the past couple of weeks. And enjoyed everything. For today's #SundaySupper event, I decided to share my slightly adapted version of Katie's Lasagna and Turkey Meat Sauce.
I went out and picked up a couple of foil pans (because I wanted to make two and test out the freezing capabilities) and got to work. But it wasn't hard work. It was actually fairly simple. And entirely enjoyable. How 'bout I just tell you that THIS lasagna is now my go-to lasagna. I mean, lasagna's are all fairly similar. But the sauce and the proportions make great please-pretty-much-everybody meals.
I hope you'll scroll down to the bottom of the post when you're done checking out the recipe to see some other fantastic recipes from this book. And pay close attention to our #SundaySupper live Twitter chat time - we'll be giving away 3 copies of this cookbook. Plus, we'll be chatting live with the author herself, Katie Workman later tonight.
Turkey Meat Sauce
by Heather Schmitt-González
Prep Time: 10 minutes
Cook Time: 1 hour
Keywords: simmer entree condiment turkey tomatoes American Italian
Ingredients (~1 gallon)
- olive oil
- 1 lb. ground turkey (85/15)
- 1 lb. hot turkey sausage (raw, bulk)
- 1 lb. sweet turkey sausage (raw, bulk)
- ~1½ c. chopped onion
- 3 shallots, finely chopped
- 6 fat cloves garlic, minced
- ~1 Tbs. dried Oregano
- ~2 tsp. dried Basil
- couple glugs of wine (white or red)
- 4 (28 oz.) cans crushed tomatoes in puree
- ½ tsp. crushed red pepper flakes
- salt
- freshly ground black pepper
Instructions
Heat a good glug of olive oil in a large stockpot over medium-high heat. Add all three types of turkey and cook, stirring often to break up and combine meat, until browned through, ~8 minutes. Pour into a strainer set over a grease "holder" and let drain.
Using the same pot, heat another good glug dd onions and shallots and saute until soft, ~5 minutes. Add garlic, oregano, and basil and cook for 2 minutes more. Add wine and coook for another minute, scraping the fond from the bottom of the pot, until liquid evaporates.
Add tomatoes and red pepper flakes and stir to combine. Increase heat to medium-high and let mixture come to a simmer. Let cook for ~10 minutes, stirring occasionally. Add the drained turkey mixture to the pot, reduce heat to medium-low, and simmer until thickened, ~20 minutes. Taste and add salt and pepper to your liking. The amount you add will really depend on the spices in the turkey sausage you used.
Use as needed for lasagna or pasta and/or store any unused portion. Cool rapidly by spreading out in a couple of shallow pans. Transfer to jars, containers, or storage bags. Refrigerate for up to 4 days or freeze for up to 6 months.
One recipe (~1 gallon) is enough for two pans of lasagna with enough left over to toss with about a pound (dried weight) of pasta.
Lasagna with Turkey Meat Sauce
by Heather Schmitt-González
Prep Time: 20 minutes
Cook Time: 1 hour
Keywords: bake entree pasta American Italian
Ingredients (serves 6-8)
- 3 large eggs
- ~32 oz. ricotta cheese
- 1 tsp. dried Basil
- 2 tsp. dried Oregano
- 1 c. freshly grated Parmesan cheese
- salt
- freshly ground black pepper
- ~6 c. Turkey Meat Sauce
- 12 no-boil Lasagna sheets
- 1 lb. (4 c.) shredded mozzarella
Instructions
If you are baking the lasagna right away, preheat oven to 375° F.
Place eggs in a medium bowl and lightly beat. Stir in ricotta, basil, oregano, and three-quarters of the Parmesan. Season to taste with salt and pepper.
Ladle some of the sauce into the bottom of a 9"x13" baking dish. Place 4 lasagna noodles across the bottom of the dish, overlapping if necessary. Spread ⅓ of the ricotta mixture over the noodles. Spoon about 1½ cups of the sauce on the top, spreading to cover the ricotta. Sprinkle ⅓ of the mozzarella over that. Repeat two more times (so that you have three layers of noodles, ricotta, sauce, and cheese - not counting that sauce on the bottom of the pan). Sprinkle the remaining Parmesan over the top.
Spray one side of a sheet of aluminum foil with pan spray (this will keep the cheese from sticking). Cover the lasagna pan (sprayed side down) with the foil.
Place lasagna pan onto a sheet tray (to catch any drips) and slide into preheated oven. Bake for 1 hour, removing foil after 30 minutes. Allow to sit for ~15 minutes before cutting, so that it has time to "set up".
I like making 2 pans of lasagna at a time. One for now, and one for later. Simply double the recipe. If you've already made the Turkey Meat Sauce, you'll have enough for 2 pans, anyway...and then some. This is why I like making them in foil pans (still 9"x13"). Just label and date the foil and slide one (or more) into the freezer until you need it.
If you're feeling especially industrious, try doubling the meat sauce and stocking up your freezer - that will get you 5 pans of lasagna. Great in a pinch or if a friend or loved one needs a meal, as well.
You can also hold the lasagna in the fridge for a day or two before baking, if you need to. Just slide into the oven and bake when you're ready for it. It'll seem a bit watery, as the juices seep out as it sits, but it'll all meld back together nicely once it bakes.
If you have the space, try laying out all of the sheets of lasagna and spreading them evenly with the ricotta mixture BEFORE layering (this is tip from Katie Workman). Then you simply have to lay in the sheets when assembling the lasagna. I don't have space to do this, so I don't - but I like the idea.
Subscribe to:
Posts (Atom)


.jpg)