posts may contain Amazon affiliate links, which earn me a small commission when you buy (but doesn't cost you anything extra). Occasionally I receive free products and/or run sponsored posts—this will always be stated clearly in the post. Thank you for supporting this blog.

This website contains some quotations, excerpts, and screen clips from copyrighted material. These uses fall well within the copyright doctrine of "Fair Use".
Sunday, September 30, 2012

ChocoFlan (Impossible Cake)

Today marks the end of a six month period of cooking with my (unwitting) mentor over at IHCC.  The man who has taught me so much for so many years.  He taught me the basics of Mexican cuisine: the beautiful differences of earthy, dried chiles...the subtleties of using native herbs and spices...vast uses for masa harina...and the importance of building flavor.  Time is your friend when you want a good, authentic Mexican dish.

He's been a source of inspiration and knowledge to me for so long now, so while I'll not be cooking with him in an "official" capacity any longer, there's no way I'll be saying Adios.  Nope.  Instead I will be saying Gracias, Rick.  Thank you for sharing your passion for Mexican cuisine and culture.  And I'll be seeing you soon.
An really, there's no better thank you gesture than something made from the heart.  Rick taught me to make ChocoFlan a long time ago and I've been making people happy with it ever since.  So this one's for you, Rick!

ChocoFlan (Impossible Cake)

by Heather Schmitt-González
Prep Time: 20 minutes
Cook Time: 60 minutes
Keywords: bake dessert chocolate cake Mexican

Ingredients (serves 12-16)
    For the mold:
    • a pat of softened butter
    • all-purpose flour
    • 1 c. cajeta (goats milk caramel), store-bought or homemade
    For the cake:
    • 5 oz. (10 Tbs.) butter, slightly softened
    • 1 c. sugar
    • 1 egg
    • 2 Tbs. espresso powder dissolved in 1½ Tbs. hot water (or 3 Tbs. espresso)
    • ¾ c. all-purpose flour
    • 1 c. cake flour
    • ¾ tsp. baking powder
    • ¾ tsp.baking soda
    • 1/3 c. + 1 Tbs. cocoa powder
    • 9 floz. buttermilk
    For the flan:
    • 1 (12 oz.) can evaporated milk
    • 1 (14 oz.) can sweetened condensed milk
    • 4 large eggs
    • 1 tsp. pure vanilla extract
    Instructions
    Getting started:
    Turn on the oven to 350° F. Position oven rack in middle of oven. Generously butter the bottom and sides of a 10-inch round cake pan (you need one that's 3 inches deep), sprinkle with flour, tip the pan, tapping on the side of the counter several times, to evenly distribute the flour over the bottom and sides, then shake out the excess.

    Microwave the cajeta for 30 seconds to soften it, then pour over the bottom of the pan, tilting the pan to coat the bottom evenly. Bring a pot or kettle of water to a boil and hold at a simmer. Set out a deep pan that's larger than your cake pan (like a roasting pan) that can serve as a water bath during baking.

    Dissolve your espresso powder in the water.

    Make the cake layer:
    Beat the butter and sugar together using an electric mixer at medium-high speed until light in color and texture. Scrape the bowl. Beat in the egg and espresso.

    Sift together the all-purpose and cake flours, baking powder, baking soda, and cocoa powder. Beat in about half of the flour mixture, at medium-low speed, followed by half of the buttermilk. Repeat, scraping bowl as needed. Once everything is well combined, raise the speed to medium-high and beat for another minute or so.

    Scrape the cake batter into the prepared cake pan and spread level.

    Make the flan layer:
    In a blender, combine the two milks, the eggs and the vanilla. Blend until smooth.

    Hold a large ladle a few inches above the pan with the cake batter in it. Slowly, pour the flan mixture into the ladle and let it fall gently over the edges of the ladle and onto the cake batter. Using the ladle keeps the batter from getting "dented".
    Set the cake pan into the larger pan and then set on oven rack. Pour the simmering water into the larger pan, around the cake pan to a depth of at least 1-inch.

    Close the oven door and bake for ~60 minutes, or until the surface of the cake is almost firm to the touch, except for the very center (which will seem wobbly) .

    Remove from the water bath and cool to room temperature, ~1 hour. Slide into the refrigerator and allow to sit for at least 12 hours. This allows the two layers to meld together and not slide apart when unmolding.
    When ready, carefully run a thin-bladed knife around the edge of the pan to free the edges. If the cake does not slide around freely when you turn the pan (like turning a steering wheel), fill the bottom of your sink with hot water and set the pan in for 30 seconds. It should now move freely.

    Choose a serving platter that is large enough and has a rim (to stop the extra cajeta from flowing off the plate) and invert it over the top of your pan. Grasp the two tightly and in one quick motion, flip over so that the serving plate is on the bottom. Gently jiggle the pan back and forth several times to insure that the chocoflan has dropped, then lift the pan off. Scrape any remaining cajeta from the mold onto the cake.

    Enjoy!

    slightly adapted from Rick Bayless
    Powered by Recipage
    This was another recipe revisit ...see, the good ones really are worth coming back to.

    Oh, and I wanted to tell you that if you do not have cake flour, you can make your own.  For every 1 cup of cake flour that you need, measure out 1 cup of all-purpose flour and then remove 2 tablespoons of it and replace it with 2 tablespoons of corn starch.  Sift the whole lot 3 times and then it's ready to go - "homemade" cake flour!

    p.s...in case you're wondering who our next featured chef at IHCC will be- it's Madhur Jaffrey.  So please join us as we switch gears from Mexico to India (and beyond) starting tomorrow (and continuing for the next six months).

    I am sharing this post with:
    IHCC theme: Adios y Gracias, Rick
    Rick Bayless @IHCC button rounded Tasty Tuesdays 33 shades of green hearthnsoul150
    Saturday, September 29, 2012

    Tacos de Chicharrón y Salsa Casera

    The slow smile.  The simple phrase.  You take me back.  It's what I live for.  And this time, it was a humble taco filling that elicited the reaction.

    If you know me...even a little...you know my deep-rooted love for Mexican cuisine and culture.  Maybe you also know that food memory plays a starring role in why I cook and why I write.  And not just conjuring up my own memories, but memories of those around me.  They always make for the best stories.  The best responses.
    Friday, September 28, 2012

    On the Brain: Ballymaloe, Heather, Whisky, and Whiskey

    Yes.  I said Whisky and Whiskey.  Do you know the difference?  Because after spending a week touring distilleries in Ireland and Scotland, I can say with confidence that I do.  But it's no secret.  And it's nothing complex.  The Scots spell it without an 'e', the Irish spell it with an 'e'.

    Ta-da!

    And while I had an amazing time getting very familiar with Whisk(e)y, I was also fortunate enough to get a visit to Ballymaloe Cookery School in County Cork, Ireland.  And not only did I get to visit, I actually met and spoke with both Darina Allen and Rachel Allen.
    Ballymaloe is a magical place.  Welcoming, inviting, and beautiful.  That's all my brain can transfer to my fingers right now, but I have so much to tell.

    Oh yeah, and another life-long dream realized - I (Heather) saw Heather (the plant) in Scotland.  It doesn't get much better than that.  Unless you count sitting in a bar on an island in the most Southern of the Hebridean Islands of the west coast of Scotland listening to a live rendition of Loch Lomond.  Yeah.  That was pretty stellar all in and of itself.
    Also, seafood.  Seafood caught mere hours...maybe even moments...before making its way into my mouth and into my waiting belly.  It was glorious.  So tell me, have you ever drizzled a little smoky, peaty Scotch Whisky into your oyster before throwing it back?  If you haven't, you should remedy that.  Soon.

    Okay all, I just wanted to put up a little update...a little how-dee-doo...to let you know that even though I haven't posted anything in close to a week and a half (that's a long time for me), I'm still here.  My brain and my body are just otherwise occupies.  With thoughts of Ireland and Scotland.  Of Whisk(e)y and barley and pot stills.  Of oysters and lobster and crab and fish and mussels and salmon.  Of brown bread.  Of Heather and Highland Cattle.

    And of how in the heck I'm going to wrangle all of those things up and make them into cohesive thoughts and sentences.  Because while it may sound like a vacation, I was working.  More updates to come...
    Monday, September 17, 2012

    Salsa de Hongos y Jalapeños

    I am a lover of salsa.  Chunky or smooth.  Mild or spicy.  Red or green.  Blender Salsa or Pico de Gallo.  Heck, I'm even throw fruit salsa into the mix.  I mean, grilled chicken breast or fish with tucked under a small blanket of natural sweetness from the fruit mixed with onion and heat.  Mmm-hmm.  And, of course, mushroom salsa.

    Wait!  What?  You've never tried Mushroom Salsa before?  Never even heard of it, you say?

    Okay, neither had I before last month.
    But when I saw it sitting all pretty on the pages of the soon-to-be-released cookbook from the gals at Muy Bueno, I just knew that I had to try it.  I mean, it sounded kind of strange at first, but the more I paged back to look at it, the more the thought of it grew on me.  I'm a fan of mushrooms.  I'm a fan of jalapeños and red onion and lime juice and cilantro.  So why wouldn't I be a fan of it all chopped pretty and tossed and served as a salsa?  No reason I could muster.

    Let me tell you, I found it every bit as hard to resist as I did "regular" salsa.  I scooped 'em up with crunchy, salty tortilla chips and munched on 'em while watching the game.  The salsa was nice and earthy and pungent with a welcome tang from the lime juice.  The longer you let it sit, the more liquid the mushrooms will soak up and then release.  I had some later on in the day over simple sautéed Tilapia and the combination was perfect for a light meal.

    I like raw mushrooms, so I enjoyed eating it immediately after I made it, but the tastes develop a more complex flavor once you've let it sit and marinate for at least one hour.  It's even good the next day (refrigerate if you're saving it that long).
    This is the first thing I've made from a long list of things that I want to make in the Muy Bueno cookbook.  Please visit the Spotlight announcement page for more information and to see how everybody else's salsa (or Capirotada) turned out this week.  And then follow along for more delicious goodies over the next three weeks.  Plus, I mentioned that everybody will be giving away one copy of this book and I happen to know that somebody has already announced their giveaway - so you're not going to want to miss a single post in this Spotlight!

    Salsa de Hongos y Jalapeños (Mushroom, Jalapeño, & Cilantro Salsa)

    by Heather Schmitt-González
    Prep Time: 10 minutes
    Cook Time: n/a
    Keywords: appetizer condiment sauce vegetarian mushrooms chiles onions limes Mexican

    Ingredients (~3 cups)
    • 1 lb. mushrooms, stemmed & finely chopped
    • 1 very small red onion, finely chopped
    • 2-3 jalapeños, stemmed & finely chopped
    • handful cilantro, chopped
    • ½ c. freshly squeezed lime juice
    • 1½ Tbs. olive oil
    • salt
    • black pepper
    Instructions
    Combine mushrooms, onions, jalapeño, and cilantro in a bowl. Add lime juice and olive oil and toss to coat. Season with salt and pepper to taste.

    Eat soon or let sit a couple of hours at room temperature (this will allow the mushrooms to absorb all of the flavors further) before eating.

    Use this salsa as you would any salsa: scoop it up with tortilla chips or use it as a topping for fish, chicken, or steak.

    notes:
    For the mushrooms, I used half white button mushrooms and half crimini mushrooms.

    I reduced the lime juice called for in the original recipe by ¼ cup.

    slightly adapted from Muy Bueno: Three Generations of Mexican Flavor
    Powered by Recipage
    *This post is part of the Muy Bueno Cookbook Spotlight & Cook-Off sponsored by Hippocrene and hosted at girlichef*
    Muy Bueno Cookbook Cook-Off and Spotlight (small)
    Sunday, September 16, 2012

    Puerco Pibil (or Cochinita Pibil)

    Puerco Pibil (or Cochinita Pibil)
    So the other day I mentioned that I was going to go back into my archives and revisit a number of the recipes that I talked about during my first year of blogging.  Recipes that I still love and still make on a regular basis.  Well, a fairly regular basis.

    Skip back a few weeks to when I asked my hubby what he wanted me to make to eat on Día de Independencía.  He said Barbacoa.  Yes, I realize this is not Barbacoa.  Though you can make variations of Barbacoa with pork, beef, chicken, or even fish, the type he was talking about is the type he grew up eating.  And that was made from goat.  I knew I'd have trouble finding goat.  And I did.  So I thought maybe I would just go with lamb.  But I needed the shoulder, and for some reason I absolutely could not find any lamb should anywhere, either.  Chops?  Yes.  Rack?  Mm-hmm.  Leg?  You got it.  But shoulder?  Aaahhh, no.
    Saturday, September 15, 2012

    Smiley Cookies - Game Day or any day Fun! {product review}

    Today is the biggest (college football) game of the year in our house!  Yes, we are a house divided.  Michigan State vs. Notre Dame.  It will be a day of good-natured (basically) jabs and yelling at the tv and cheering at the top of our lungs and of course, showing support for our favorite team by wearing (and eating) team colors.

    Though on this day it's mostly about the football, you've got to know that food is always running through my mind, so there's no way it wouldn't play a major supporting roll.  This year I was excited to learn about Smiley Cookies.  I know I've seen them before.  Or maybe they were knock-off's.  But now that I've actually had the pleasure of being able to order personalized (team!) colors and put them to the test, they will become a permanent fixture at our yearly match-ups.  And that's just to start with.  I can see myself ordering them for all sorts of occasions.  Or when the mood strikes.
    product:  Smiley Cookies

    category:  food / cookies / desserts

    packaging:  These cookies were shipped in their packaging inside of a very sturdy (and adorable) box decorated with layers of Smiley Cookies.  This box was wrapped in packing material and fit snuggly inside a shipping box.  They were well-packed and I received them in perfect condition.  It was a joy to open the brown packing box to pull out the bright and colorful box nestled within.  And it only got better when I opened that box to pull out the cookies that were tiled into their plastic sleeves vertically.

    appearance:  These cookies are utterly irresistible.  Not a person, young or old was able to walk by them without reaching out to grab one.  Plus, with their customizable color schemes, you're guaranteed to please your guests and/or match any theme you hope to convey.

    taste/texture:  These taste like classic sugar cookies - not too soft, not too crunchy, they fit comfortably in between the two with a pleasantly crumbly texture.  The icing is not a soft icing, it is "set" like a thin, perfect shell that coats the top.  Overall, the cookie is sweet, but not overly so.  It's a pretty big cookie, and I think the sweet level is just right.  Have a glass of cold milk nearby and you may not even want to stop after one.
    about:  Smiley Cookies got their start at the Eat 'n Park restaurant more than 20 years ago as a way for the restaurant to share their spirit with the community around them.  It signified a commitment to community and charitable giving, as well as a "delightful family dining experience".  They even have a six-foot walking sugar cookie (with signature smiley face) as their mascot.  Each child who dines at the Eat 'n Park receives  one of these now-famous sugar cookies (totaling over 1 million free cookies every year).  Plus, over 200,000 smiley cookies are donated to local non-profit organizations yearly.

    And now, those of us who live in the US, but not anywhere near the Eat 'n Park in Pittsburgh, Pennsylvania are able to have these smiles delivered right to our doors by ordering (and customizing) them online.  You can order the traditional cookies (circle with a smile), but you can also get special holiday shapes like hearts, shamrocks, bunnies, and jack-o-lanters, not to mention flowers and more! Plus, the colors are customizable to match weddings, school colors, corporate logos, sports teams - or whatever you can think of.

    allergen information:  Smiley Cookies are made in a peanut-free and tree-nut free facility, and none are ever allowed in their bakery.  They also ensure that their ingredients are not produced in facilities that process nuts.  The cookies are also Wheat-free, Egg-free, Soy-free, and Dairy-free.  (I never would have guessed.)

    further info:  website | facebook | twitter | blog

    my thoughts/review:  I love them!  As did everyone else in the family and the friends we had over.  The sugar cookie taste, the soft, yet slightly crunchy and crumbly texture, the fact that I can personalize them however I like - perfect.  I can see myself ordering all sort of colors and shapes in the future.  Parties, school events, holidays, Tuesdays - it's happenin'.
    Oh yeah, by the way...
     GO STATE!!

    *I received two free packages of Smiley Cookies to taste and review.  All opinions stated in this post are 100% my own.
    Thursday, September 13, 2012

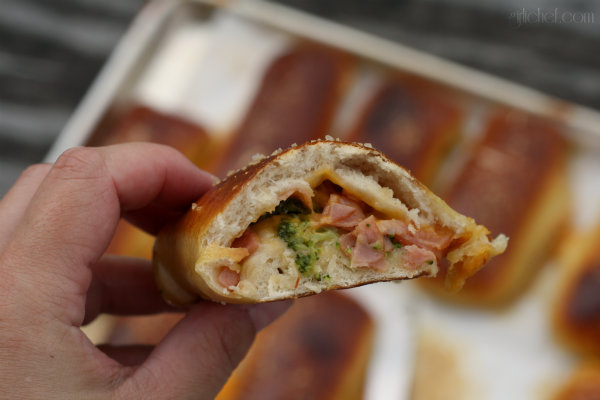
    Ham, Cheese & Broccoli Pretzel Pockets

    I'm a teeeeny-tiny-leeetle-bit obsessed with soft pretzels at this moment in time.  Really.  I can't get enough.  I blame it on the bursts of life, or should I call them teasers, of crisp Autumn air.  And football.

    It's all football season's fault.  Yeah, that's it.  Football season made me do it.

    Join us for a Mexican Inspired Fiesta with #SundaySupper

    Join us for a Mexican Inspired Fiesta with Sunday Supper
    This coming Sunday (September 16th) is Día de Independencia, or Mexican Independence Day.  Now, I don't need any excuse to make some tasty Mexican vittles...because I can find a reason around any corner.

    But what's even better than eating some tasty Mexican and Mexican-inspired cuisine?  Going to a fiesta and sampling all sorts of delicious comida (food)!  In Mexico, parties last for at least two days and nights, so it's about time to get started.

    I'm honored to be hosting #SundaySupper this week and what better way to celebrate than to have a Mexican Fiesta jam-packed full of good food and drink?  I can't think of one.

    Join us around the family table this week for our #SundaySupper Mexican Fiesta - this is a party that you won't want to miss.  We hope to inspire you with these mouthwatering recipes from our talented contributors.  We will be sharing them all day long and would love for you to share your favorite Mexican and Mexican-inspired recipes during our #SundaySupper live chat at 7pm (Eastern).

      Sopas (Soups), Ensaladas (Salads), and Entremeses (Starters)
      La Comida (the food)
      Postres (desserts)
      Bebidas (beverages)
      Please be sure you join us on Twitter throughout the day (this coming Sunday, September 16) during #SundaySupper. We’ll be meeting up at 7:00 pm (Eastern) for our weekly #SundaySupper  live chat where we’ll talk about our favorite recipes for a Mexican Fiesta! All you have to do is follow the #SundaySupper hashtag, or you can follow us through TweetChat!  We’d also love to feature your Mexican Fiesta recipes on our #SundaySupper Pinterest board and share them with all of our followers!
      Wednesday, September 12, 2012

      Parmesan-stuffed Olives inspired by The Roots of the Olive Tree {book tour}

      author: Courtney Miller Santo
      publisher: William Morrow
      "foodie" elements:  some (not as many as you'd think, though)
      hard cover: 308 pages

      random excerpt:  Anna had loved her father, but she never liked him all that much.  She suspected most people felt this way about one parent, or at the very least, a sibling.  It wasn't God's way to stick you with people who were easy to like—life was all a big test. (p.19)
      summary/synopsis (from dust cover):  Meet the Keller family, five generations of firstborn women—an unbroken line of daughters—living together in the same house on a secluded olive grove in the Sacramento Valley of Northern California.

      Anna, the family matriarch, is 112 and determined to become the oldest person in the world. An indomitable force, strong in mind and firm in body, she rules Hill House, the family home she shares with her daughter Bets, granddaughter Callie, great-granddaughter Deb, and great-great-granddaughter Erin. Though they lead ordinary lives, there is an element of the extraordinary to these women: the eldest two are defying longevity norms. Their unusual lifespans have caught the attention of a geneticist who believes they hold the key to breakthroughs that will revolutionize the aging process for everyone.

      But Anna is not interested in unlocking secrets the Keller blood holds. She believes there are some truths that must stay hidden, including certain knowledge about her origins that she has carried for more than a century. Like Anna, each of the Keller women conceals her true self from the others. While they are bound by blood and the house they share, living together has not always been easy. And it is about to become more complicated now that Erin, the youngest, is back, alone and pregnant, after two years abroad with an opera company. Her return and the arrival of the geneticist who has come to study the Keller family ignites explosive emotions that these women have kept buried and uncovers revelations that will shake them all to their roots.

      Told from varying viewpoints, Courtney Miller Santo’s compelling and evocative debut novel captures the joys and sorrows of family—the love, secrets, disappointments, jealousies, and forgiveness that tie generations to one another.

      my thoughts/review:  I really enjoyed the believability of the family dynamic in this novel.  So many times I've sugar-coated tales of fun-loving sisters and parents and children.  The family in this book has flaws and they bicker and argue and sometimes they hate each other.  That is not to say it's a big anger fest, the good stuff is included, too.  I was just trying to support my claim.

      I also really enjoyed the family's history and back-story about bringing the first olive trees to California.  The only thing I wished was that more had been done with the olives as far as food descriptions went.

      Overall, a quick and interesting read that held my attention.  I would recommend this novel to those who enjoy general fiction and/or women's lit with a few bites of food thrown in.

      about the author:  Courtney Miller Santo grasped the importance of stories from listening to her great-grandmother, who lives in Northern California.  She learned to write stories in the journalism program at Washington and Lee University, and then discovered the limits of true stories working as a reporter in Virginia.  She teaches creative writing at the University of Memphis, where she earned her MFA.  Her work has appeared or is forthcoming in The Los Angeles Review, Irreantum, Sunstone, and Segullah.  She lives in Tennessee with her husband, two children, and dog.  Her most prized possession is a photo of five generations of women in her family.

      further info: website | pinterest | facebook | twitter

      recipe inspired by the book:  Not so much a recipe this time as a snack.  On page 138, Deborah is behind the tasting counter at the Pit Stop (Callie's store...which in case you couldn't guess sells olives and olive-paraphernalia).  A simple line snuck into a conversation... "Doesn't mean it isn't true," he said, reaching for a parmesan-stuffed olive.  From that point on, I couldn't get it out of my head.  I've tried garlic-stuffed olives, almond-stuffed olives, blue cheese-stuffed olives, and of course olives stuffed with pimentos, but never stuffed with parm.

      I knew I wanted to use California olives, since that's where this family is now rooted, so I found some Lindsay Natural California Speckled Green Ripe Olives that were packed in water and sea salt (nothing else).  These olives are not like the green olives that most people are used to - not salty or tangy.  Instead, they are nutty and butter and kissed with just a hint of salt.  It's a surprise when you bit into them for the first time.  When studded with a shard of salty Parmesan cheese, they make addictive little munchies.
      *I received a free copy of this book to review from the publisher.  All thoughts and opinions stated in this post are 100% mine.

      tlc-tour-host fr2button
      Monday, September 10, 2012

      The BEST Flan ever. Period.

      The BEST Flan ever.
      This is officially my 1000th post.  Ho. Lee. Cow.  Looking back, it seems that these past 3 years and 7 or 8 months has just flown by.  Now, not every single post contained a recipe, but I think it's safe to say that at least 95% of them did.  And of those posts, not a single recipe was repeated.  Shite!

      Don't get me wrong, I have no problem with repeating recipes...the good ones are worth repeating...it's just that there are SO many things out there that I want to make.  SO many.  TOO many.  And the list just keeps growing.  So that is what keeps me from repeating recipes.
      Sunday, September 9, 2012

      Soft Pretzels w/ Spicy Beer Cheese Sauce

      Soft Pretzels w/ Spicy Beer Cheese Sauce
      Today (I'm writing this on Saturday), we had absolutely PERFECT football weather.  Clear blue skies with fluffy white clouds and temps in the upper 60's.  For me, it doesn't get any better.  And while those are the perfect conditions for hanging out in the stadium and watching a college football game, they're also pretty ideal for tailgating beforehand.

      I feel most alive when the air is slightly crisp...when jeans or comfy pants and a t-shirt can be supplemented by a sweatshirt if you start feeling chilly.  I love being able to chill outside of the stadium between rows of parked cars, temporary tents, and grills sizzling with brats, burgers, and dogs whose smell is enough to make you stop and chat.
      Soft Pretzels w/ Spicy Beer Cheese Sauce
      And then there's the beer.  It seems in endless supply.  And while I've seen my fair share of people who have had a few too many...it's usually just a great social lubricant.  Beer AND hot chocolate spiked with Butterscotch Schnapps.  I don't drink that much anymore, but back in college when we'd walk from the dorm to the stadium, a tall thermos filled with that was the best medicine for staying warm.  Sigh.  Those were the days.  And I can't even think of the combination without being transported back 19 years.  Holy shtuff.  19 years ago I was a freshman in college.  Ssshhhh...don't tell.  It really doesn't seem like that long ago.
      Soft Pretzels w/ Spicy Beer Cheese Sauce
      But these days, I love planning the food that we're going to bring tailgating.  Everybody brings something, so you know you'll have lots of choices.  One of my go-to foods for tailgating is pretzels in some form.  They're one of my favorite munching foods.  Heck, they're one of the whole family's favorite munching foods.  From pretzels wrapped around hotdogs or sausages to pretzels filled with veggies, meats, and gooey cheese (coming soon) to pretzel bites and sticks to good ol' fashioned soft pretzels like these - they ALWAYS please.  Especially when served with an ooey-gooey cheese sauce that is slightly spicy (more so the longer it sits) and tastes of beer.  I have to make at least a double-batch.  Even then, they disappear super fast.

      These were gone in no longer than 20 minutes, which is about how long it usually takes them to get eaten.  And not long after that 20 minutes everybody was telling me I should have made a triple batch.  Next time.
      Soft Pretzels w/ Spicy Beer Cheese Sauce
      What are some of your favorite tailgating foods (or foods that eat during football games)?  What's your favorite - college or pro?  Who do you cheer for?  Feel free to leave any links to your answers in the comments...I'd love to have more recipes marked for future game days!

      Soft Pretzels w/ Spicy Beer Cheese Sauce
      Soft Pretzels w/ Spicy Beer Cheese Sauce
      by Heather Schmitt-González
      Prep Time: 1½ hours-2 hours (largely una
      Cook Time: 15-17 minutes
      Keywords: simmer bake bread snack beer cheese flour chiles Super Bowl tailgating American

      Ingredients (8 pretzels / ~2 cups sauce)
        Pretzels:
        • 1½ c. lukewarm water (110 -115° F)
        • 1 Tbs. sugar
        • 2 tsp. fine sea salt
        • 2 tsp.active dry yeast
        • 4-4½ c. all-purpose flour
        • 2 Tbs. butter, melted
        • ⅔ c. baking soda
        • 1 egg yolk beaten w/ 1 Tbs. water
        • Coarse sea salt or kosher salt
        Spicy Beer Cheese Sauce:
        • 1 bottle (12 oz.) beer
        • 2 c. (8 oz.) shredded Sharp Cheddar Cheese
        • 1 Tbs. all-purpose flour
        • 8 oz. cream cheese, at room temperature
        • 1 clove garlic, minced
        • 1 jalapeño, minced (& seeded, if you wish)
        • salt
        • black pepper
        Instructions
        Making the Pretzels:
        Combine the water and sugar in the bowl of a stand mixer and sprinkle the yeast on top. Let sit until the mixture begins to turn creamy, ~5 minutes. Add 4 cups of the flour, salt, and melted butter and mix on low using the dough hook attachment until well combined. If dough seems extremely sticky, start adding in a little bit of the extra flour at a time until dough is just slightly tacky, but no longer sticky. Increase speed to medium and knead until the dough is smooth and cleans the sides of the bowl, ~5 minutes.

        Form dough into a loose ball and place in an oiled bowl Cover with plastic wrap or a clean kitchen towel and let sit in a warm place until doubled in size, ~1 hour.

        Line a baking tray with parchment paper and lightly brush with vegetable oil or spray with pan spray. Set aside.

        Once dough has risen turn out onto a lightly floured work surface. Divide into 8 (basically) equal portions using a bench scraper. Roll each portion into a rope that is 18"-24" long. Lift up ends of rope to form a sort of U-shape and then twist the two sides around each other and bring down to form a pretzel shape. Place on baking tray and repeat with all of the dough portions. Let sit uncovered while you prepare the water and preheat the oven.
        forming pretzels
        Preheat the oven to 450° F. Bring 10 cups of water to a boil in a large, wide-ish pot (like a soup pot). Once it begins to boil, gradually add in the baking soda to prevent overflow. Once it comes back to the boil, lower the pretzels one at a time into the water for 30 seconds each, flipping over halfway. When picking up the formed dough, I like to use two fingers to pick it up, one through each pretzel "loop". This allows the dough to sort of stretch in the right direction. Then just lower it carefully into the boiling baking soda bath. Use a wide,flat slotted spoon or spatula to lift from the water. Let as much of the water as you can fall back into the pot and lay the pretzel back onto the prepared tray.

        Once all of the pretzels are back on the tray, beat the egg yolk with the water and brush the top of each pretzel with it. Sprinkle with coarse salt (or parmesan, poppy seeds, sesame seeds, cinnamon-sugar, what-have-you). Slide into preheated oven and bake until the pretzels turn a deep golden brown, 15-17 minutes.
        Transfer to a cooling rack and allow to sit for as many minutes as you can before tearing into them. That's usually 5 tops in my house.
        Soft Pretzels w/ Spicy Beer Cheese Sauce
        Making the Spicy Beer Cheese Sauce:
        This comes together very quickly - make it once you slide the pretzels into the oven and it will be finished before they come out.

        Add beer to a medium saucepan set over medium heat and bring to a boil. While you're waiting, toss the cheddar cheese with the flour. Once beer is simmering, whisk in the reserved cheese and all of the remaining ingredients. Whisk regularly until the cheese has all melted and you have a smooth, creamy sauce. Hold warm until ready to serve.

        Notes:
        We love soft pretzels pretty much ANYTIME. But if you want to take these tailgating (or somewhere similar), you can hold the cheese sauce in a small crockpot or thermos and wrap the warm pretzels in a towel and hold them in a cooler reserved for "hot" items. You may want to make a double batch - they go fast!

        adapted from Chuck Hughes
        Soft Pretzels w/ Spicy Beer Cheese Sauce

        I heart soft pretzels
        Saturday, September 8, 2012

        Essential Sweet-n-Smoky Chipotle Paste

        Have I ever told you of my dried chile addiction?  They literally make me weak in the knees.  And I'm not talking about the overly-dried chiles that are so brittle they break apart at the slightest touch.  No, I'm talking about the dried chiles that are soft and pliable and ridiculously sexy.  Just a sniff has been known to lighten my mood or calm my nerves.

        Take for instance this ancho chile that I have in my hand.  I know you can't see it, but I want you to close your eyes and visualize it.  But don't keep them closed or you can't continue reading my riveting words.  So picture a chile.  It's a deep, deep red.  It is smooth on the outside and sticky with spicy resin on the inside.  When I lift it to my nose and take in its scent, I smell sweet and rich and raisiny all at the same time.

        No picture a gallon-sized baggie full of smaller packets of different types of dried chiles.  Aside from the anchos, there are pasillas, and mulatos...there are guajillos and moritas.  There are piquins and chiles de arbol.
        That bag is sitting on a shelf in my pantry.  And every once in a while I just NEED to stop, zip open the top, and take a deep whiff.  It just makes me all kinds of happy.  I'm gonna have to include it in my "top 5 favorite smells" list.  What?  You don't have a favorite smells list?  Well, I do.

        Approaching the subject of making something with those chiles (while quietly leaving behind my weird habits), I want to talk about the glorious smokiness of the morita, or dried chipotle chile.  There are a few different types of chipotles, but the red morita is my preference.  A chipotle is a red jalapeño that has been smoked and dried over the course of several days.  That is where those seductive smoky undertones come from.  If you open up a package that is filled with dried chipotles, you'll get a big nose full of it.  I highly recommend it.  Getting a nose full.  As if you couldn't have guessed.
        This paste is extremely potent.  It makes an awesome seasoning-agent for those heat and spice lovers out there. And while it is tempered with a little sweetness from a syrup made with little cones of piloncillo, it is still FIRE.  So tell me, what do you think you would season with this paste that is deep, earthy, and smoky with a hint of sweetness?

        Essential Sweet-n-Smoky Chipotle Paste

        by Heather Schmitt-González
        Prep Time: 10 minutes
        Cook Time: 30 minutes
        Keywords: simmer condiment preserving nut-free soy-free vegan vegetarian chiles Mexican

        Ingredients (1¼ cups)
        • 2½ oz. piloncillo (or ⅓ c. dark brown sugar + 2 tsp. molasses)
        • vegetable oil, for frying
        • 4 oz. (~50) dried chipotle chiles (moritas/colorados), stemmed
        • 3 garlic cloves, peeled
        • ~½ tsp. salt
        Instructions
        Place 1¼ cups of water into a medium-sized saucepan and add piloncillo. Bring to a boil, then remove from heat and stir until sugar is dissolved.

        Set a medium-sized skillet over medium heat. Add ~¼-inch of oil. When oil is hot, add half of the chiles and stir and toss them constantly until they start to smell amazing (but be careful not to inhale too deeply or you'll probably have a coughing fit) and change color a bit, ~1 minute. Transfer them to the pan with the piloncillo syrup, leaving behind as much oil as possible. Repeat with second half of chiles. Add garlic cloves to pan with oil and cook, stirring, until golden; this should take a couple more minutes. Add those to the chiles.

        Pour everything into the jar of a blender or food processor and puree until very smooth.

        Wipe out the skillet and then coat it with a thin layer of oil and set it over medium-high heat. When it's hot, add all of the chile puree at once. Stir for a minute, scraping up anything that sticks to the bottom. Reduce heat to medium-low and cook for another 10-20 minutes, stirring frequently, until the salsa has become as thick as tomato paste. It will smell (and taste) extremely spicy and be darkened considerably...almost black).

        Taste CAREFULLY and season with salt. Store in a glass jar in the refrigerator. Will keep for weeks if stored properly.

        suggested uses:
        Stir a tablespoon or so into beans, soups, or bland barbecue sauces.

        Mix a couple tablespoons with fish broth, wine, or water and use as boiling/steaming liquid to cook mussels or clams. Season and add chopped cilantro before pouring over the shellfish.

        Make a cheese spread with cream cheese, goat cheese, green onions, cilantro or thyme, and some of the paste; season. Spread on crusty bread and add some ripe tomato slices.

        Add a bit of water to thin the paste out and make it "saucy" then pass at the table as a condiment.

        Make garlic-chipotle shrimp.

        ever-so-slightly adapted from Rick Bayless's Mexican Kitchen
        Powered by Recipage
        I am sharing this post with:
        IHCC theme: ¡Esta Rojo!
        Rick Bayless @IHCC button rounded
        Friday, September 7, 2012

        belVita Breakfast Biscuits {+ a chance to w!n $500}

        This is a Sponsored post written by me on behalf of Kraft Foods for SocialSpark. All opinions are 100% mine.
        kraft
        Looking back to when I was a kid, I'm guessing that I would have been over-the-moon if my mom walked me down the cookie aisle at the grocery store to get breakfast.  But that never happened.  Cereal aisle?  Yes, of course.  Refrigerated section?  You bet.  Cookie aisle?  Never.

        Although I'm guessing that if I was a kid today, things would be different.  Why, you ask?  Oh you can bet I'm about to tell you.  It would be different because now you can find belVita Breakfast Biscuits IN THE COOKIE AISLE!  They are available in 5 delicious flavors: Golden Oat, Blueberry (my favorite), Apple Cinnamon, Cinnamon Brown Sugar (new), and Chocolate (new).  That's the tasty bit.  I don't mind grabbing one of the conveniently portioned crunchy and lightly-sweetened 4-packs on a morning that I am on the go.  Or that I just don't feel like making a big production out of breakfast.  Plus, when you pair them with some fresh fruit and low-fat dairy, you have a complete breakfast.  Think Cinnamon Brown Sugar, a carton of low-fat Greek yogurt, and a juicy peach... That's nutritious energy that lasts all morning!

        belVita Breakfast Biscuits are a good source of fiber and energy releasing b-vitamins, plus they have 18g-20g of whole grain per serving.  They are free of high-fructose corn syrup, partially hydrogenated oils, and artificial flavors or sweeteners.

        So really, they're NOT a cookie...they're a biscuit.   That can be our little secret as you walk the kids down the cookie aisle in search of breakfast or a morning snack.  You can also find them by the checkout counter.  Nestled in among the sweets and sugary snacks.  Who knows, maybe your kids will start reaching for "those cookies they eat for breakfast" instead of the candy bars.

        If you think you've learned something about breakfast and belVita, then head over to walmart.com/belvita and take the belVita Breakfast Challenge and be entered to win a $500 Walmart gift card.  To be entered, you simply need to complete three "challenges".  The first challenge consists of 5 multiple-choice questions (you'll find a few of the answers somewhere in this post).  The second challenge is a Prep & Go Hunt...points for starting your day off right (super easy - there are no wrong answers.  Hint: pick belVita!!).  The final challenge is a Flavor Matcher (basically, the Memory card-flipping game).  Call me a dork, but I think it's kind of fun.  And it only takes 5 minutes or so.  You can enter once per email address per day.

        NO PURCHASE NECESSARY. Open to residents of the 50 U.S. and D.C., 18 years and older. Visit www.walmart.com/belVita to enter and see Official Rules. Ends 9/15/12.
        Visit Sponsor's Site