
posts may contain Amazon affiliate links, which earn me a small commission when you buy (but doesn't cost you anything extra). Occasionally I receive free products and/or run sponsored posts—this will always be stated clearly in the post. Thank you for supporting this blog.

This website contains some quotations, excerpts, and screen clips from copyrighted material. These uses fall well within the copyright doctrine of "Fair Use".
Sunday, April 26, 2009

Sweet and Spicy Chili


A while back, I was one of the fortunate bloggers to be contacted by Diana of POM Wonderful. She asked me if I'd like to try POM....um, YES! I actually had always wanted to try it...don't know why I hadn't gotten around to it yet. Just one of those things, I suppose. When Diana told me she was going to get a case (A CASE!!) shipped out to me, I was super excited. I think this may have been the first "promotional"-type item I was offered as a blogger...and I felt cool. I told hubby.... see, I told you this blogging thing was awesome ...he nodded and smiled. I probably sounded like a gushing-goofball when I thanked Diana and told her I'd let her know as soon as I posted something about POM. She was very kind and though she would no longer be in this position once I posted, she told me to send my info along to Molly and Janny who would be handling all the POM Blogger fun...so, Molly and Janny I am sorry it took me so long....I didn't forget!


When the case of POM arrived, the first thing I did was crack one open and take a big swig....WHOA...tart! But you know what? Addicting. I keep drinking and actually realized I really enjoyed the tartness of the juice. It is sort of reminiscent of cranberry juice, but with more punch to it. I ended up drinking a couple of bottles...the rest survived the move with us...and I finally decided it was long past time for me to figure out what I actually wanted to make with it. I browsed the POM website and was amazed by the number of recipes posted there! I found lots that I wanted to try (of course) and decided I wanted to make chili with it. I liked a chili recipe I saw on the site, but decided to make my own chili recipe somewhat inspired by the one there.

Sweet and Spicy Chili
w/ the flavors of pomegranate, star anise, allspice and peppers
Yield: ~3 quarts

20 oz. ground turkey
3 Tbs. Olive oil
1 large onion, chopped
1 c. pearl onions, peeled (frozen will work)
3 garlic cloves, minced
3 bell peppers, chopped (preferably several colors)
1-2 jalapenos (to taste), chopped...seeds & all
5 allspice berries
1-2 star anise, whole
1 cinnamon stick
1/4 c. ancho chili powder
1 1/2 tsp. cumin
1/2 tsp. freshly ground black pepper
2 bay leaves
6 oz. can tomato paste (pref. no salt added)
2 c. POM Wonderful juice
1 quart broth/stock (of your choice)
1 can (15 oz) dark red kidney beans, drained
1 can (15 oz) white kidney beans (cannellini), drained
Sea Salt- to taste
Garnish...choose your favorite chili toppings


First, brown your ground turkey in a dutch oven. Add olive oil, then both types of onion and garlic and stir occasionally for a couple of minutes, until just starting to soften. Add bell peppers and jalapenos. Cook for a few more minutes, stirring from time to time.
Grind up your allspice in a mortar.
Add it to the pot, along with your star anise, cinnamon, chili powder, cumin, black pepper and bay leaves. Stir around for a minute or so, letting the spices bloom. Add tomato paste and stir it in good, letting it cook for another minute or so...this will cook down that tomato flavor and make it nice and sweet.
See all that gorgeous color on the bottom of the pan...it is NOT burnt! It is flavor...and it has been building up the whole time you've been adding more ingredients. Add the POM to the pot, stirring up the fond (brown bits) from the bottom as you go along. Let it cook down for another couple of minutes.

Now add your broth/stock to the pot, followed by the beans.

Bring to a boil, then reduce heat to a simmer and let it cook, partially covered for about 20-30 minutes. Remove from heat and let sit for a bit to cool down. Discard cinnamon stick, star anise and bay leaves. Season to taste with salt, if you think it needs it.

Ladle into a bowl.


Garnish with your favorite toppings. I love to add garnish...it brings a note of brightness to compliment the earthy flavors of the chili. I used two types of cheese (have I ever mentioned how much I love cheese?): shredded cheddar and crumbled queso fresco, avocado, cilantro and a few squeezes of lime.
This chili is both sweet and spicy at the same time. The pomegranate and the spices add a sort-of warmth as well as sweet....so it's not a cloying sweetness. The jalapenos with their seeds & ribs and the chili powder bring that underlying heat...you know the kind...it makes your nose run a little while you can't stop yourself from wanting more.

I like to use big, rustic cuts for chili...look at those large chunks of vegetables paired with the gorgeous beans...oh yeah. It is a feast for the eyes and the soul...as well as being satisfying to the tummy.

Do you know that some cultures in history believed the Pomegranate held profound and mystical healing powers? I believe it! I want to say thanks again to the folks at POM Wonderful. I really enjoyed getting to sample your product...and I will definitely buy it on my own.
If you don't believe me, just see what I do next...I'm going to send this over to Deb at Kahakai Kitchens for Souper Sundays, too!!!
Friday, April 24, 2009

Blueberry Scones w/ Lemon Glaze

Hi all...and happy gorgeous Friday!!! Wow, what a day it is here. I woke up early this morning to bake some scones...I've always secretly dreamed of opening or going back to work in a bakery, but honestly, I cannot get up that early! I greatly admire the men and women who do...they are working while we are sleeping; baking us gorgeous bread and pastries....ah, it's devotion. I did a small stint working in a bakery during my apprenticeship.

I actually love mornings, but always end up staying awake too late, so.... I am USELESS with no sleep! I love to sleep. I need to sleep. I am a grouchy girl if I don't get enough rest. So, I was pretty proud of myself this morning (you know, the getting up earlier than usual and all). I bookmarked this recipe a while ago and finally....here it is!

Blueberry Scones w/ Lemon Glaze
from Tyler Florence's Real Kitchen 
yield: 8

for the scones:
2 c. AP flour, plus more for dusting blueberries
1 Tbs. baking powder
1/2 tsp. salt
2 Tbs. sugar
5 Tbs. unsalted butter, cold, cut into chunks
1 c. heavy cream
1 c. fresh blueberries

for the glaze:
1/2 c. freshly squeezed lemon juice 
2 c. confectioners' sugar, sifted
zest of 1 lemon, finely grated
1 Tbs. unsalted butter

Preheat oven to 400 degrees F. Sift together first 4 ingredients. Using a pastry blender, cut in the butter to coat the pieces with flour. The mixture should look like coarse crumbs. make a well in the center and pour in the heavy cream. Fold everything together just to incorporate; do no overwork the dough.
Wash your fresh blueberries & dry them.
Toss the blueberries in some flour to help prevent them from sinking to bottom of scone when bakes; then fold them into batter. Tyler says take care not to mash or bruise the blueberries so they don't "bleed" into the dough. I think I may be the only person in the world who actually likes it when the blueberries turn the dough (or batter, depending on what you're making) blue! Press dough onto a lightly floured surface into a rectangle. Cut in half; then cut the pieces in half again. Cut the squares in half o a diagonal to form a triangle. Place on an ungreased cookie sheet. Bake for 15-20 minutes, until golden. Let scones cool a bit before you apply glaze.
Mix lemon juice and confectioners' sugar together in a microwave-safe bowl. Stir until sugar dissolves. Add the lemon zest and butter. Nuke it for 30 seconds on high (actually took mine closer to a minute and a half). Whisk to smooth out any lumps and then drizzle glaze over top of scones.
Let sit a moment before serving.
I really liked these scones. They were tender and nicely flavored...the glaze was an awesome zesty contrast to the bready-ness of the scone and the mild blueberries!

Enjoy the rest of your Friday, and don't forget to head over to Tyler Florence Fridays to see what everybody else cooked up!
Wednesday, April 22, 2009

I'll just sit back and watch him cook.

I love it when Mexichef heads into the kitchen and I sit back to watch! I'm only ever sure of one thing...it will be Mexican food. Okay, two things...it will be awesome. Tortas are one of our favorite things around here...use either Bolillo Bread or Telera Bread and your favorite fillings...and you have a tasty, portable (somewhat) meal. We definitley paper-plated this one! Mexichef is not very organized...when he cooks there are ingredients strewn all over, ALL OVER the kitchen. Most of the pots & pans are dirtied, and the counters need a good scrubbing. Oh well, it's worth it! Tortas con Todo (Tortas w/ everything) by mexichef This is more of a process than a recipe...this is the way he did it and the ingredients he used. Heat a large skillet over medium-high heat. Cook some chorizo. Add thin sliced beef in the chorizo grease and fry it up. Once those are cooked, add sliced onion, jalepeno and cook down a bit. Place sliced ham over the top.

Meanwhile, heat a comal or a skillet. Melt a little butter on it. Add bread, sliced side down until nice & toasty. Sprinkle queso fresco over the top & let it get a little melty. Place half a bun over filling to measure and "cut" around with a spatula. Add more yummies, such as sliced avocado, shredded lettuce, tomato, more cheese, crema, cilantro, salsa and a squeeze of lime! Now I sit back and enjoy a plate of my hubby's labors. Muy Ricos!

Monday, April 20, 2009

Root Beer Floats

Root Beer floats were something I loved as a kid. Sometimes we went to the A&W Drive-In to get one...those were the best! But, making them at home was fun, too...my son loves the IBC root beer bottles (so do I). Not long ago, while searching for fun "flavorings" for a science project at school, we came across Root Beer concentrate. How cool would it be to make our own root beer!? And from that, make root beer floats! We don't get soda that often in our house...just time to time (that way it's just a treat, not an addiction). If you like root beer, give this a try; it's fun with or without the kids.
This is (basically) the process, on the back of the McCormick Root Beer Concentrate box:
Easy Homemade Root Beer
makes 6 c.

1 1/2 c. water

3/4 c. sugar

1 1/2 tsp. Root Beer Concentrate

1 bottle (1 liter) cold soda water, seltzer or club soda

Bring water to boil in medium saucepan. Stir in sugar until dissolved. Add concentrate; stir until well mixed. Pour into a container and refrigerate until ready to serve.

When ready to serve, pour reserved root beer mixture into a pitcher and slowly pour in the soda. Stir slightly to blend. Serve immediately! Yup, it is as easy as that. Now, for double the fun, turn it into Root Beer Floats!!!! I do recommend making it when you're ready to use it all, because it loses it's fizz pretty quickly. I ended up pouring the remainder of what we made back into the club soda bottle and twisting the cap tightly. It lasted until the next day like this. Scoop some vanilla (or whichever kind you like to use) ice cream into a glass. Slowly pour root beer over the ice cream...look at the size of that head! Pop in a straw, and go to town...beware of brain freeze! I also love the way little root beer ice crystals form around the edges of the ice cream and get that little crunch! I'm betting there is probably a way to do this a little more "naturally". Maybe sarsaparilla root or something like that? Has anybody ever made it from scratch-scratch? I would love to know how to do it! Doesn't this make you feel like eating a chili-cheese dog w/ fries, too? Must be the drive-in memories.
Sunday, April 19, 2009

Golden Garlic Soup w/ Fideos {National Garlic Day}

Today is National Garlic Day! Garlic is one of my favorite things. I said it. I love garlic. I even ate it before I was married. A lot of it. Guess I only wanted to attract the kind of guy who likes garlic, himself. Mission accomplished...tee hee. And you how most people hate walking around with the smell of garlic on their hands? I actually like that. Weirdo, huh? It's even better if you've chopped up some lime &/or some ginger along with the garlic....ah, it's like perfume to me. I wanted to all smart and give you a big tutorial on the many uses and benefits of garlic; then I realized how much I have to get done today and I didn't prepare in advance, so I'm just going to show you some fun garlic-lovers cookbooks and share a new soup recipe I came up with this morning.
Golden Garlic Soup w/ Fideos
bfrom the kitchen of girlichef

Olive Oil
onions, small- 3 sliced fairly thin
garlic cloves, peeled- 10 sliced thin
bay leaves, fresh- 2
thyme, fresh- few sprigs
3 1/2 oz. fideo (or broken up vermicelli)
Chicken/Beef/Veg Stock or Broth (your choice or a mixture)- 1 1/2 quarts
salt & pepper- to taste
for garnish:
queso fresco, cut into small cubes
crushed, dried chiles (I used chile de arbol, chopped up in spice grinder)

Put a pot on over medium heat. Add a few swirls of olive oil. Add your sliced onions, stirring occasionally, until golden.
While onions are cooking, peel your garlic.
Slice them up very thin, either by hand or in one of these nifty little mini-mandolin type slicers (love this!).
Add to pot once onions are golden. Continue to cook and stir around a bit, until garlic gets soft and golden. Add your herbs and your fideos. Stir them around for a couple of minutes to toast them.

Add the broth/stock of your choice and bring to a simmer. Simmer for about 5 minutes or so, until fideos are al dente.
Remove bay leaves and thyme sprigs. Ladle into bowls and garnish with queso fresco and crushed chiles.
This soup is a garlic-lover's dream! Golden, caramelized, earthy garlic and onions along with the underlying heat from the sprinkling of chiles and the salty, just-meltiness (I know, not a word) of the cheese combine so beautifully...I think I'll go have another bowl of it once I'm finished here.

So, Happy Garlic Day to all....vampires and bugs be warned!

I'm also going to try to send this over to Deb for entry in Souper Sundays, even though I'm pretty sure I'm late and won't make it into today's roundup.
Saturday, April 18, 2009

Cookbook Spotlight (lucky me!) ....White Hot Chocolate

A few weeks ago, I was fortunate enough to win a giveaway from Deb at Kahakai Kitchen. Deb was offered an advanced copy of Gale Gand's (not yet released!) new cookbook titled BRUNCH! The publisher also offered her another copy to give away to one of her reader's....that, dear friends, is where I come in. I entered the giveaway with high hopes (as always). I then won the giveaway (not usual). I then proceeded to move...after Deb had given the publisher my address. My old address. I did not know I was moving at the time I passed it on. So, I missed the initial deadline to give something from the cookbook a try....and then blog about it :( I then found out that the deadline was extended due to a few people hadn't received their books yet. On a wing and a prayer, I drove by my old house and walked up to the door and low and behold...there was a nice little package, about the size of a book stuck between the screen door and the front door! It was addressed to me! Yes! I received my book in the nick of time....now, what to make. I worked all day (had to get up at 4 o'clock. A.M.!)...so, I'm beat and the deadline is looming. Looking through this book, I basically wanted to make EVERYTHING! What I decided on was a little night-time comfort. Yes, I know. It's called BRUNCH!! I don't think Gale would mind that I decided to make her WHITE HOT CHOCOLATE and drink it before bed. I can't give away the recipe...remember, not published yet...but I can say I loved it. The kiddos loved it. Even hubby loved it. We'll make it again...maybe have a mixed-up hot chocolate party one day. Nice...winter party idea. Well...I'm off to curl up with a book and the rest of my white hot chocolate now before falling into a deep sleep. Right after I email my entry over to Stephanie & Cath (they are hosting the Cookbook Spotlight). And Deb...thanks again :)

"Barefoot" Chinese Chicken Salad

I know that I am running a little behind on this recipe...I was moving, after all. This recipe was supposed to be posted for Barefoot Bloggers last week. I am so glad that I made it once I was back in the kitchen, though. As usual, Ina does not disappoint! I loved everything about this dish! The dressing on the warm chicken was my absolute favorite part of the whole dish, though. I love it cold, as well. I put the leftovers in the fridge and pulled it back out the next day and OH...amazing! I will make this again and again. I know it would go over well at spring & summer picnics. This recipe was chosen by McKenzie of Kenzie's Kitchen (thank you!!!). This is set to make a huge batch...enough to feed about 12 people, I halved it because I did not want any going bad. I think I probably could have eaten a whole batch by myself over the course of a couple of days, though.
Chinese Chicken Salad by Ina Garten from Barefoot Contessa Parties! Or FoodNetwork.com

Ingredients:

4 split chicken breasts, bone-in, skin-on

good olive oil

kosher salt

black pepper

1/2 lb. asparagus, trimmed & cut diagonally in thirds

1 red bell pepper- cored & seeded

2 scallions- sliced diagonally I used shallots (forgot the scallions..brain fart)

1 Tbs. white sesame seeds, toasted

For Dressing:

1/2 c. vegetable oil

1/4 c. good apple cider vinegar

3 Tbs. soy sauce

1 1/2 Tbs. dark sesame oil

1/2 Tbs. honey

1 clove garlic, minced

1/2 tsp. peeled, grated fresh ginger

1/2 Tbs. white sesame seeds, toasted

1/4 c. smooth peanut butter

2 tsp kosher salt

1/2 tsp. freshly ground black pepper

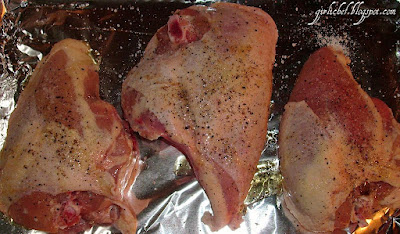
Preheat oven to 350 degrees F. Place chicken breasts on a sheet pan, rub skin with olive oil and season liberally with salt & pepper. Roast 35- 40 minutes, until just cooked. Set aside until cook enough to handle. Remove skin and take meat from bone. Shred chicken in large bite sized pieces.Blanch asparagus in a pot of salted, boiling water for 3-5 minutes until crisp-tender. Plunge into ice water to stop cooking. Drain. Cut bell pepper into pieces about the size of the asparagus.

Toast your sesame seeds! Whisk all of your dressing ingredients together. I did it all in a large measuring cup. Combine asparagus, peppers and chicken in a large bowl. Pour dressing all over and toss. Add scallions and sesame seeds. Season to taste. Serve cold or at room temperature. I liked it slightly warm as well. You've probably already seen everybody else's version since I'm so late, but head on over to Barefoot Bloggers to check out some more if not!
Friday, April 17, 2009

Cherry Poppy seed Muffins for TFF

I didn't realize how much I'd missed Tyler until I took a moment to breathe. There were a few regular foodie blogger events that went on the back burner while I was moving...time to move them back up to the forefront! Hello Tyler...I'm ready to hit the kitchen with you again. Let's go! I marked a page a while back for Cherry Poppy seed muffins, and decided to dig the cookbook out of the packing peanuts (okay, I didn't actually use packing peanuts, I used newspaper...lots of it) and get to baking! Cherry Poppy seed Muffins by Tyler Florence from Tyler Florence's Real Kitchen p. 89 1/2 c. unsalted butter, melted, plus more for greasing the pan I used pan spray 2 c. AP flour, plus more for dusting the cherries 1 c. sugar, plus more for dusting tops I used raw sugar for the tops 1 Tbs. baking powder 1 tsp. salt 1 c. milk 2 eggs, lightly beaten 1 Tbs. poppy seeds zest of 1 orange, finely grated 1 c. dried cherries Preheat oven to 400 degrees F. Grease a 12 cup muffin tin. In a large bowl, mix the flour, sugar, baking powder and salt together until evenly combined. In another bowl, whisk together the milk and eggs; then add the melted butter, poppy seeds and orange zest. Make a well in the center of the dry ingredients. Pour the wet ingredients into the well. Fold everything together to form a batter. Toss the cherries with some flour to help prevent them from sinking to the bottom of the muffin when baked. Fold them into the batter.
Spoon the batter into the prepared muffin tins, filling them 2/3 full. Dust the top with a little sugar to form a crust as the muffins bake. Bake for 20-25 minutes, until a wooden toothpick comes out clean when inserted into the center muffin. Place muffin tin on a cutting board to cool.
Okay, I liked them. I didn't love them. I always do that with muffins, though...not really sure why. I'm not the biggest muffin fan; usually they are to dense for me. I don't like heavy muffins...these were a tad heavy. I like light, airy muffins. But, the flavors were good and I'd probably make them again. For other people. Be sure to head on over to Tyler Florence Fridays to see what the other foodies and Tyler cooked up this week!
