posts may contain Amazon affiliate links, which earn me a small commission when you buy (but doesn't cost you anything extra). Occasionally I receive free products and/or run sponsored posts—this will always be stated clearly in the post. Thank you for supporting this blog.

This website contains some quotations, excerpts, and screen clips from copyrighted material. These uses fall well within the copyright doctrine of "Fair Use".
Tuesday, May 10, 2011

Sour Apple Sangria and a product review: Sidral Mundet

While we don't drink soda very often at home, when we're craving one, we always choose the type that uses good old sugar as the sweetener.  More often than not, we will grab a Mexican soda...because they are usually (always that I've seen, but I have no other basis for this assumption) made with real sugar.  I actually get a craving for a Mexican Coke every once in a while...and I love a Jarritos or Barrilito (usually in Tamarindo or Sangria or even a Toronja)...the kids like to switch it up (usually between Fresa, Tuti Fruti, Mandarina, and Limón)...but Mexi chooses Sidral Mundet 99.9% of the time.

Sidral Mundet tastes like fizzy apple juice...what's not to love!?  You should have heard the clamor when I slid the (one!) bottle that I received for reviewing from its box.  "Oh, me! Can I have it?  I want it! Pleeeeeeease?"  Sheesh.  Sorry niños, this one is all mommy's.  For testing purposes, of course.  Lest you think I'm cruel, I did buy a bigger (1.5 L) bottle from the market the next day...so everybody else could get a glass or two.  I mean, I figured they deserved it after I gulped and smiled and made refreshed "aaaaah's" in front of them and their pleading puppy-dog eyes.  Made from 6 simple ingredients (carbonated water, natural sugar, apple juice, citric acid, caramel color, and sodium bonzoate as a preservative), I don't mind treating us to a bottle of Sidral Mundet every now and again.

The other bottle that I found nestled in next to the Sidral was a Mundet Manzana Verde (Green Apple Soda).  This one was new to all of us...I haven't seen it sold anywhere around here before.  I was a bit tentative about trying it, just because I'm not a big fan of the whole sour apple flavor-thing.  I mean, have you smelled somebody's breath after they've sucked on a Sour Apple sucker?  Gag.  But I braced myself and took one for the team.  Not bad.  It doesn't have that cloying sweetness that I was expecting...it was slightly tart, yet mellow and I didn't really mind it.  Mexi thought the same thing.  Niños all thought it was pretty good.  I think it is the perfect thing to use as a drink mixer...
Sour Apple Sangria
from the kitchen of girlichef
(makes ~1200-1500 mL)

1 (750 mL) bottle Pinot Grigio
(or even a fruity Sauvignon Blanc...choose something with notes of green apple & pear or tropical fruits)
1 - 2 (355 mL) bottles Mundet Manzana Verde (Green Apple flavored soda)
1 fat lemon, sliced in thin rounds
2 small limes, sliced in thin rounds
1-2 Granny Smith apples, cored & sliced in thin rounds, to taste
ice
Place fruit in the bottom of a pitcher, or other type of jar large enough to hold everything.  Pour in the wine and a bottle of the soda.  Taste and add more soda, if you like.  Add a few handfuls of ice.  Pour into glasses and serve cold.
Next time I'm going to make a RED APPLE SANGRIA using a Sidral Mundet and (probably) a Chardonnay...with red apple slices and orange slices and maybe some red grapes.  Interested in more?  Check out Sidral Mundet on Facebook or follow them on Twitter.
*I received one free bottle of each flavor soda (and a really cool tote bag) to review, should I choose.  All opinions stated in this post are 100% mine.
I am sharing this post with:
wanderfood-badge what's cookin wednesday whats on the menu wednesday
Monday, May 9, 2011

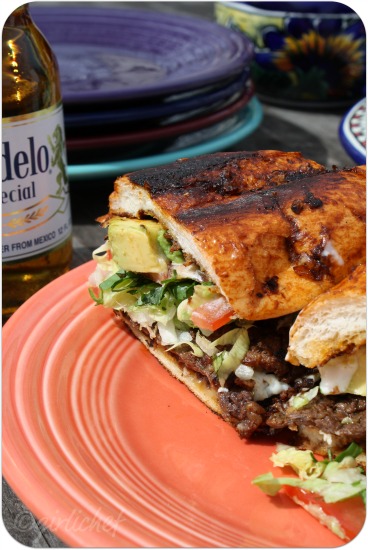
Crispy Pambazos (...let's call it a cross between a Pambazo and a Torta)

Let me start out by sharing a little bit of Pambazo trivia.  The pambazo (a type of Mexican sandwich) takes its name from the bread it is traditionally made with...Pan Basso.  Basically a peasant bread that is very large and is chewier, or tougher and drier than a Bolillo or Telera bread.  Since the bread is "tougher", it holds up well to the bath it takes in a salsa made of chiles (traditionally Guajillos).  An honest to goodness Pambazo is made by dipping the bread in a chile sauce...all of the bread...bathed in salsa...then it is split down the middle and filled with a filling of papas con chorizo (potatoes and chorizo) and then lettuce, queso fresco, crema and cilantro are piled on top of that.  It is one big, glorious mess. 

While the Pambazo I am bringing you today is not traditional...it is delicious.  We started making Pambazos this way at home since we haven't been able to find any Pan Basso.  Of course, now that I write it out, it seems silly.  I mean, why don't I just find a recipe and make it myself, right?  One of these days.  Until then, we use either bolillos or telera bread...and these breads don't hold up to a salsa bath quite as well as the traditional bread does.  Meaning, when we immerse the whole thing in salsa, by the time we're halfway through our sandwiches, the bread is mush (annoying mush as opposed to the glorious sponge that is pan basso).  So.  We decided that instead of bathing our bread in a chile salsa, we would give it a sponge bath instead.  By making a chile paste and brushing the bread (inside and out) with it, we are able to obtain the messy hands and face that you look forward to accompanying the undertaking of a Pambazo while having our sandwich (basically) stay together.  Plus, we just like crisping up the crust. 

So, in essence, I suppose this is really a Pambazo-Torta hybrid.  Fill it with the traditional papas con chorizo or refried beans...or stack it with your personal favorite fillings.  This is a favorite combination in our house.
Crispy Pambazos
from the kitchen of girlichef
makes 4 sandwiches


for the arrachera:
1 lb. arrachera, run through jaccarder (skirt steak)
2-3 limes (scant ¼ c.), juiced
5 garlic cloves, pressed or minced very well (you want it juicy)
scant tsp. kosher salt

for the chile paste (makes 1 heaping cup):

6 pasilla chiles, stemmed
2 small tomato
3 garlic cloves, peeled
½ tsp. kosher salt

chorizo con frijoles negro:
8 oz. fresh chorizo
1½-2 c. cooked black beans

all the rest:
4 Bolillos (big ones)
butter, at room temp.
~6 oz. Queso Fresco, crumbled
few handfuls iceberg lettuce, shredded
2 tomatoes, sliced
2 avocados, sliced
Mexican Crema
½ bunch cilantro, chopped roughly
for the arrachera:
Separate the meat into ~10" sections.  It's easy if it's been run through the jaccarder...you can just rip it.  Place it in a gallon-size zippered baggie and add lime juice, garlic, and salt.  Smoosh it all around to coat the meat, seal the baggie and let sit at room temperature for 30 minutes or up to an hour.  Preheat a grill, grill pan, or heavy skillet.  Add meat and turn when the bottom is beautifully browned.  Seriously, this can't really get "too" done.  It won't take too long, it's very thin...maybe 3 or 4 minutes per side...I love getting crispy bits here and there.  It will be packed with flavor and wonderfully "chewy".  I mean that in a good way.  Set aside.
for the chile paste:
Place chiles, tomato and garlic in a small pan and cover with water.  Bring to a simmer and let cook for ~5-6 minutes, or until everything is tender.  Transfer everything to the jar of a blender, using a slotted spoon to leave behind the water.  Add salt and blend.  You shouldn't need any extra water (there's plenty in the veggies...you're looking for a paste)...but by all means, add a dribble at a time if it won't move through the blender.  Set aside.  (You probably won't use all of this...but you can blend it up with some water and use it as salsa later.)

for the chorizo con frijoles negro:
Cook until chorizo is browned and cooked all the way through over medium heat, ~10 minutes.  If your chorizo is greasy, drain off all but a thin coating on the bottom of the pan.  Add the beans with a bit of their juices or some water (~¼ c.) and mash up with a potato masher.  Lower heat and cook over low until warm through and the flavors have combined, ~4-5 minutes.  (You probably won't use all of this, but it is excellent as a taco filling, or shmeared on tostadas...or my personal favorite, as a sope topping!)  Set aside.
to assemble and finish Pambazos:
Slice your bolillos open, lengthwise.  Preheat a heavy skillet or griddle over medium-low heat.  Spread a bit of butter on BOTH sides of EACH half.  Place cut and buttered sides down first (do this in batches, if necessary) and leave until golden, ~2-3 minutes.  Flip so buttered outsides are now down.  Brush a good layer of chile paste on the now golden cut sides.  Begin to layer your ingredients on the bottom halves of the bolillos...starting with a good layer of the chorizo-bean mixture.  Next, lay a quarter of the arrachera.  Sprinkle with a quarter of the queso, lettuce, tomato, and avocado.  Drizzle with as much crema as you'd like, then sprinkle with cilantro, to taste.  Place the "lid" on and then paint it with a good layer of chile paste...then flip it carefully (you may want to add another small pat of butter to the pan).  Now paint the bottom with a layer of chile paste.  Flip the Pambazo back over to cook the last side (recently "pasted" bottom) when the top has crisped up a bit.  It will look dark, but as long as you watch it, that's just the chile cooking...not burning.  However, DO watch it, because it can burn easily.  Once the bottom half is cooked the same way, lift from the skillet onto a platter or serving plate.  Cut in half carefully and serve with ice-cold cervezas!
p.s.~ Yes, I realize... ¡Este pambazo es gigantesco! Simplemente siéntese, relájese y disfrute.  Sit back, relax, and enjoy☺.  And work out double-time tomorrow...
 
I am sharing this post with:
Souper_Sundays2 tnsc HearthandSoulBadge-1 Tasty Tuesdays 33 shades of green delectabletuesday 5569196101_967c9f3b57_o PeppersTuesdaysTastyTidbits TastyTuesdayBB tastytuesdayfortheloveofblogs tuesdays at the table

Sunday, May 8, 2011

Baked Brie with Rigatoni and Spinach

If you were to ask me what I wanted for Mother's Day, my answer would be simple...just hugs and kisses and a happy day at home with the kiddos that call me mom.  I'm a bit of a homebody.  I like home.  Of course, if you were to throw in a day where I was free from the burdens responsibilities of home like laundry and dishes and cleaning, I wouldn't turn that down.  And if somebody happened to bake me up a round of sexy, oozy, beckoning cheese...well, I may just cry.  

While I adore folding noodles into this warm, comforting blanket of cheese...I also adore eating it with nothing other than a loaf of crusty bread and a bottle of wine.  And I'm not gonna lie, I could eat the whole round all by my lonesome.  But if somebody else happens to be around, I'll share. 
Baked Brie with Rigatoni and Spinach
adapted from (recipe for Baked Camembert & Pasta) Jamie's Food Revolution
serves ~4

1 (8 oz) round of Brie (in the round box)
2 garlic cloves, peeled & sliced paper thin
1 sprig fresh rosemary, leaves picked
olive oil
sea salt
cracked pepper
16 oz. uncooked Rigatoni (or other pasta)
6 oz. baby spinach
freshly grated Parmesan

Preheat oven to 350° F.  Line a sheet tray with foil.  Score a circle in the top rind of the Brie, leaving a border of ~½".  Peel/trim back the circle of rind and eat or discard.  Guess which one of those things I did?  Strew the garlic over the exposed cheese.  Crack some pepper over it.  Scatter the rosemary leaves over it and then drizzle the whole thing with a bit of olive oil.
Place the whole thing on your prepared sheet tray and slide into the oven for ~25 minutes or until it oozes deliciousness.  In the meantime, bring a large pot of water to a boil.  (Try to time this to coincide with the last ten minutes or so of your Brie's time in the oven.)  Salt your water and cook your pasta.  Add spinach to water during last minute of cooking time.  Drain, saving ~1 cup of your cooking water.  Return pasta and spinach to pot, drizzle with a bit more olive oil, season with salt and pepper, to taste and grate some Parmesan cheese over it.  Toss.
Divide pasta mixture among serving bowls and serve with your baked Brie...passing it so that everybody can scoop or pour as much as they like over their individual servings of pasta.  Fair warning, if I'm at the table, you may want me to go last...because I could just pass on the pasta and go at the Brie with a spoon...
Happy Mother's Day to all of the mama's out there...I hope this day brings you happiness!  And cheese.
Saturday, May 7, 2011

Give it Away Now...


So, a few weeks back, I won these fun greeting cards made by Lady Stiles from The Beauty of Life.  Cute, huh?  

What's that?  You said you want some, too?  

Okay, okay...settle down...you may just get lucky and find a set of these in your very own mailbox one day soon. MmmHmm.  Lady Stiles is going to send one lucky reader a set of their very own greeting cards.  Just like mine.  Only not.  You will actually get 2 extra cards with surprise photos and greetings.  Sweet.

If you would like to enter to win a set of these beauties, simply leave a comment on this post telling me why snail mail totally kicks e-mails butt.  You can be serious.  You can jest.  You can make up a story.  You can tell me a truth.  It would also be nice if you'd stop over and say hello to Lady Stiles...it's not a requirement, but "it'd be a lot cooler if you did."***

***BONUS ENTRY: Tell me which movie this quote (the underlined one) is from (in a separate comment).  It's an oldie but a goodie...and back in college, we used to watch it on a loop...and recite it by heart. 

Giveaway ends May 14th at 11:59 pm (Eastern time).  Be sure I have some way of getting in touch with you if you win (email, link back to blog, etc.).  Good Luck!

*Update May 15: Winner by random dot org draw is #2 Erin from Eating My Way Back...congrats Erin! Thanks to all who participated...and yup, the movie was Dazed and ConfusedAll right, all right, all right...

Friday, May 6, 2011

Fresh Coconut Almond Tart

Do you have any of those dishes?  You know the ones.  You make them once a year, every year, like clockwork?  And you're not quite sure why you only make them just once...but you accept it.  And you enjoy it.  Well, I do happen to have a few dishes like that...and this Fresh Coconut Tart just so happens to be one of them.  It is always Springtime when I make it...um, perhaps that is because coconuts happen to be in season during this time in Northwestern Indiana.  Aaaahhhh, no.  It's probably just that the first time I made it was in Spring, and since it became a yearly thing, I wound up making it at about the same time from there on out.  I (and other members of the fam) have just come to associate it with Spring.  You know what the funny thing is?  This is actually a recipe rewind.  This will be the first time I have ever shared a recipe two times here at girlichef.  But I thought that would be okay because I'm way more experienced at blogging now than I was when I shared it a little over two years ago.  We had just moved into our new home, I had my old camera, I knew less about how to take a good photo...shall I continue?  The one thing I will say, is that back then, I did all sorts of step-by-step posts...and that was one of them.   So, if you'd like to see how to open the coconut and get the meat out, you could go back and check out the first post.  Although, I also demonstrate the method when I made fresh coconut milk...and those shots are a little more current (I recommend this post for method of getting the coconut water out of the coconut and the meat from the shell)

The best thing about making something for so many years like clockwork is that you develop methods for making your life a little easier.  Shortcuts, favorite ingredients and methods that differ from where you first started but still give you the same results.  When picking a coconut to make this tart, I look for the one with the most coconut water inside.  People may think I'm nuts, picking up each individual coconut and giving it a shake, but if they tried this tart, they'd nod their heads in understanding.  The more the better so that you can make a really flavorful, concentrated homemade sweetened condensed coconut milk.  Which, I might add, is totally worth making for other purposes, as well.  So good.  Another thing I've decided over the years is that my favorite bread to use for the crust is Pan de Acambaro, which is a Mexican Sweet Bread from Guanajuato that tastes a lot lot Pan de Muerto...which you could also use (but if you do...be sure to use an unglazed loaf without sesame seeds or any fillings).  Challah would be a good option, as well.  Although, that said, I have also made this with a simple French or Italian loaf...basically you want a plain, sturdy loaf that holds up well.  And perhaps last, but not least, I toast my almonds and coconut on the stove top, in a skillet instead of doing it in the oven.  I don't know if I'm actually saving myself time here, but it seems like it to me.  Whichever method you decide to use will give you great results. 
Fresh Coconut Almond Tart
makes one 9" tart, serving 8-10

for the crust:
2 oz. slivered almonds, toasted
3 Tbs. sugar
4 oz. Pan de Acambaro (or another firm, white bread)
1¾ oz. butter, melted

for the tart:
1 coconut with a LOT of liquid inside
2 oz. slivered almonds, toasted
1 c. heavy cream
⅔ c. sugar
3 large egg yolks
1 tsp. Mexican vanilla

for the crust:
Combine toasted almonds and sugar in a food processor and process until fairly fine.  Add bread, ripped into hunks and pulse until you have fine crumbs.  Slowly drizzle in the butter and pulse until everything comes together.  Place a 9" tart pan with a removable bottom onto a foil-lined baking sheet and dump the mixture into it.  Press the mixture evenly and firmly over the bottom and up the sides of the pan.  Transfer to the refrigerator.  I like to leave this in the fridge for at least 30 minutes.
for the tart:
Let's begin with the trickiest part, which is getting all of the good stuff out of that hard coconut shell.  Preheat the oven to 325° F.  Set a strainer over a bowl.  Pierce the eyes of the coconut...I like twisting a corkscrew through each...and let all of the liquid drain into the bowl, through the strainer.  Once you've gotten all the liquid out of the coconut, place it on a baking sheet and put it into the preheated oven for ~15 minutes.  This helps to loosen the meat from the shell.  Remove from oven and once cool enough to handle (a few minutes), break the coconut in half.  I either hand it off to Mexi to whack once with a machete, or else I hammer a flat-head screw driver into the middle in a few spot until it splits.  Pry the flesh from the shell, then use a vegetable peeler of a paring knife to remove the brown layer from the meat.  Feed through coconut meat through the shredding attachment of the food processor.  Measure out 2½ cups for the tart, and save the rest to use as garnish.

Turn the oven up to 350° F.  Combine coconut water, cream, and sugar in a medium saucepan (seriously, go larger rather than smaller to prevent boil-overs).  Simmer over medium heat, stirring from time to time, until reduced to 1 cup, ~10-15 minutes.  You know you're gonna want to dip a finger in...I can't resist...sweetened condensed coconut milk* is the best thing since...well...sweetened condensed regular milk. Anyhoo...pour that into a large bowl and stir in the reserved coconut, toasted almonds, vanilla and egg yolks.  Remove the crust from the fridge and pour the filling in.  Bake until set and golden on top, ~35-40 minutes.  Set on a wire rack to cool, then pop out of the tart pan.

Toast the remaining coconut, if you like and use it as garnish along with some Mexican Crema (which helps to cut the sweet with a bit of creamy-sour) or créme fraîche.

This tart refrigerates well...simply wrap some plastic wrap around it.  I prefer it warm, though...so a microwave for just a few seconds (so it doesn't get soggy) or a preheated oven for ~5 minutes does wonders to take off the chill.
*yup, Sweetened Condensed Coconut Milk is what you have at this point...you can make it and use it in place of Sweetened Condensed Milk in other recipes!

I am sharing this post with:
fridaypotluck FCFButton foodfriday Foodie Friday Logo 2 foodiefridaylittlebrickranch food trip friday fwff saturday swap sweets for a saturday