posts may contain Amazon affiliate links, which earn me a small commission when you buy (but doesn't cost you anything extra). Occasionally I receive free products and/or run sponsored posts—this will always be stated clearly in the post. Thank you for supporting this blog.

This website contains some quotations, excerpts, and screen clips from copyrighted material. These uses fall well within the copyright doctrine of "Fair Use".
Monday, June 17, 2013

Food Blogger Prop Swap Reveal

Food Blogger Prop Swap reveal 2013 | www.girlichef.com
I am participating in the Food Blogger Prop Swap, hosted by Alyssa of www.EverydayMaven.com and Faith of www.AnEdibleMosaic.com, I sent a box of props to a food blogger and received this box in return!

Food Blogger Prop SwapWhen I saw that Alyssa and Faith's idea of having a prop swap with other food bloggers, I just knew that I wanted to participate - such fun!  I had all sorts of things picked out that I could "send away" to a new home.  And then I went to put them into my box and realized that it wouldn't all fit.  Grrrr.  It was much bigger with nothing in it.

I would be sending my box to Cindy from Cindy's Recipes and Writings, so I tried to choose things that I thought might be her style.  But really, I was hoping against hope that she could at least get a few uses and photo set-ups out of what she received.  If you want to check out what she thought of the box, you can see her post here.

My box was sent to me by Nancy at A Communal Table - which was double-cool because I am new to her and her blog.  Bonus!  I received a few plates and a few bowls, in various colors and sizes, along with a stack of linens (which she wrapped the plates and bowls in - smart!).  Thanks so much, Nancy!  I know that I'll get a lot of use out of everything you sent.

As a matter of fact, I've already been putting the props to good use, as you can see in the photos below...
Food Blogger Prop Swap Reveal | www.girlichef.com
  Looking forward to next time!


This linky list is now closed.

Sunday, June 16, 2013

Nan e Barbari (Persian Flatbread) {Bread Baking Babes}

Nan e Barbari (Persian Flatbread) - Bread Baking Babes | www.girlichef.com
If you are not yet comfortable with yeast, I do not recommend starting the familiarization process with this bread.  It's slack.  It's sticky.  In a nutshell, it's a frustrating pain-in-the-bum.  I only say this because I've "spoken" with a fair number of friends out there who are just starting to dip their toes into the yeast pool.  And thinking back a few years to when I was the one hanging onto the ladder with all of my might - if I had tried making this bread then, I might have cried.  I definitely would have given up.

So yes, beginners beware!  While these loaves are tasty, with a chewy inside and a thin outer crust that is flavored with an unusual (well, not unuuuuusual-unusual...just that I hadn't used this method before now) and strangely intriguing "wash" of sorts.  Plus, it's the type of bread that you can get major satisfaction from ripping hunks of it off of the loaf.  Or I can, at least.  But you may want to get comfortable with a few "easier" loaves under your belt first (this Cuban Bread, this Fast Focaccia, or maybe this Yeasted Beer Bread are all good places to start - not to mention any no-knead varieties, which are what really helped me understand how yeast works).

Now, if you and yeast are old buddies...or at least on good terms...tackling our Bread Baking Babes bread of the month, chosen by our brave host, Elizabeth could be some fun.  If you consider cursing loose, wet dough into submission using inevitably messy hands and sheer willpower fun.  And depending on the day, I do.  Because really, what's more rewarding than a loaf of fresh baked bread that smells so good the neighbor kids playing in your yard comment on it!?
Nan e Barbari (Persian Flatbread) - Bread Baking Babes | www.girlichef.com
Okay, eating it. That's just as rewarding, but you get my drift.  But definitely make it on a day where you have time to give it some attention...not a day when you're rushing around doing a million things.  It may have the tendency to piss you off, if you do.  I think going into it with full knowledge of what you're getting yourself into is key!

So, if I haven't scared you off, here's our bread of the month...

Nan e Barbari (Persian Flatbread)
by Heather Schmitt-Gonzalez
Prep Time: 2 - 2.5 hours (largely unatten
Cook Time: 15-30 minutes (depending on me
Keywords: bake bread vegan nut-free soy-free dairy-free Middle Eastern

Ingredients (2 loaves)
    for the dough:
    • 5 grams (~1-1/2 teaspoons) active dry yeast
    • 360 grams (1-1/2 cups) lukewarm
    • 60 grams (1/2 cup) 100% whole wheat flour
    • 360 grams (2-3/4 cups) unbleached all purpose flour + more as needed
    • 2 grams (1/2 teaspoon) baking powder
    • 6 grams (1 teaspoon) sea salt
    to finish:
    • handful of sesame seeds, nigella seeds, or poppyseeds
    for the Romal (sauce):
    • 1/2 teaspoon unbleached all-purpose flour
    • 1/2 teaspoon baking soda
    • 80 grams (1/3 cup) water
    Instructions
    making the dough by hand:
    Pour the water into a large bowl, and whisk in the yeast.

    Add the flours, baking powder, and salt; stir with a wooden spoon until the dough pulls away from the sides of the bowl.

    Turn the dough out onto an floured board.

    Using both hands on either side of the dough and thumbs resting on the top in the center, lift it up and flip it over in the air before plopping it back down on the board. Fold the dough in half away from you as you plop the dough down. Keep repeating until the dough is smooth. Every so often, use a dough scraper to clean the board. Stretching the dough is desired on the turns. But this won't start happening right away.

    When the dough is smooth, place it into a clean, lightly oiled mixing bowl. Cover with a sheet of plastic wrap and allow to rise at room temperature until doubled in size.

    making the dough in a bread machine:
    Add all ingredients to the pan of your bread machine in the order suggested by the manufacturer. Select dough cycle. Go about your business until your bread machine screeches at you.

    preparing the Romal (sauce):
    Whisk flour, baking soda and water in a small pot, and bring it to a boil. Remove from heat and set aside to cool.

    Pre-shaping:
    Put a good coating of flour on a work surface and gently dump and scrape the risen dough onto it - yes, the dough is very loose and will come out in long, stringy strands.

    Using a bench scraper, cut the dough in half. Form each piece into a ball as best you can (using well-floured hands) and place them at a fair distance apart on your work surface. Cover gently with a clean tea towel, or a couple sheets of plastic wrap that have been sprayed with cooking spray. Allow to rise until doubled in size, 30-60 minutes.

    Final Shaping:
    Flip a baking sheet upside down and line it with parchment paper. Set aside.

    Brush each round with the Romal - really slather the sauce on, it will keep your hands from sticking to the dough!

    Dip your fingers in the sauce and dimple the rounds down to form two ovals with lengthwise furrows. Transfer each to one half of the prepared baking sheet.
    Nan e Barbari (Persian Flatbread) - Bread Baking Babes | www.girlichef.com
    Liberally brush ovals with the sauce once more and sprinkle with whichever type of seeds you are using. Allow the dough to stand for about 30 minutes.

    Baking in an oven:
    While your dough is standing, preheat the oven to 375° F. Once the dough has finished resting, gently lift and stretch the ovals again, taking care not to deflate them. When doing this step, wet your hands slightly (use the Romal if you have some left), and gently pull using the tops of your hands (palms down). Slide the sheet into the oven and bake for 30 minutes.

    I think that baking the loaves makes them look quite anemic, as traditionally they are baked in a grill or barbecue, which seems to give them a beautiful golden color. If you are able to bake them this way, I'd recommend it (instructions follow).

    Baking on a grill or barbecue:
    Put a stone into the barbecue and preheat it to high. Before putting them onto the stone, pull each oval with your hands to lengthen it (using same method as above).

    Slide the dough onto the hot stone (parchment and all). Move the stone over to cook the bread on indirect heat. Close the barbecue lid. Every so often turn the bread around to account for uneven heat in the barbecue. Cook the bread until it is golden, about 15 minutes.

    Serve warm, preferably as an accompaniment to a meal of meats, kabobs, and thickly cut vegetable salads.

    notes:
    These loaves are based on this Barbari Bread. To see these done cooked on a barbecue, check out Elizabeth's post on blog from OUR kitchen.
    Nan e Barbari (Persian Flatbread) - Bread Baking Babes | www.girlichef.com

    The Bread Baking Babes are:   Bake My Day - Karenblog from OUR kitchen - ElizabethFeeding my Enthusiasms - Pat/Ellegirlichef  - HeatherLife's a Feast - JamieLiving in the Kitchen with Puppies - NatashyaLucullian Delights - IlvaMy Kitchen In Half Cups - TannaNotitie Van Lien - LienPaulchen's Foodblog - AstridProvecho Peru - GretchenThyme for Cooking - Katie (Bitchin’ Bread Baking Babe Bibliothécaire)

    The Bread Baking Buddies are: YOU!

    If you'd like to bake along as a buddy this month, head on over to the hosting Babe's kitchen for this month (Elizabeth at blog from OUR kitchen) for the base recipe (you're welcome to adapt) and any special instructions.  Then send her your post by the 28th to receive your buddy badge and be included in the Bread Baking Buddy roundup.  I hope you join us!

    I am also sending this post over to Susan's Yeastspotting
    Friday, June 14, 2013

    Fast Focaccia w/ Strawberries

    Fast Focaccia w/ Strawberries | www.girlichef.com
    You know those perfect moments?  Moments when everything that is happening flows together with a natural precision.  Easy like Sunday morning moments.  And by moments, I mean a block of time.   This week I had a one of those moments...one of those mornings, actually.

    Lately we've been dealing with some of those hotter-than-Hades days, even though we're still riding the tail-end of Spring.  I'm loathe to turn on the air conditioning so early, but the tiny beads of sweat trickling steadily down my back at the slightest movement have dictated otherwise.  Fortunately, those days have been giving way to some cooler nights.  Nights when I can throw open my windows and bask in the lightest whisper of a breeze.

    So, it's times like this that I love waking up when the rest of the house is still quiet.  Through the windows, there's a bit of fog hanging in the air.  The kitchen has cooled off during the night, but there's still a reminder of yesterday's oppressive heat that even a dark sky couldn't shake.  And there are some strawberries so ripe, so sweet, sitting in a bowl on the counter, that I can smell summer as the breeze sneaks through the window and lifts their scent as it snakes by.
    Fast Focaccia w/ Strawberries | www.girlichef.com
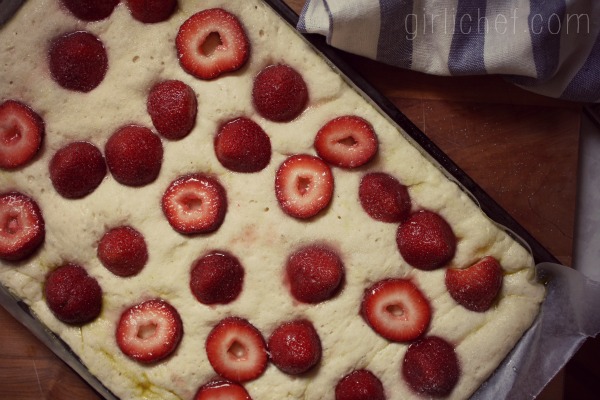
    I'm in the mood for some freshly baked bread with my coffee.  And then I remember a  recipe that I set aside with best intentions a few weeks back.  A fast focaccia, that was born even faster due to the residual heat in the air.  A bubbly dough, risen in thirty minutes time is topped with those ruby red berries and their sweet, sticky juices.

    An hour later, after giving the focaccia a good dusting of what looked like summer snow, I came away with with a chewy, sweet bread that was crisp on the edges, and had fragrant, juicy strawberries in every bite.  Though it wasn't fried, the focaccia itself reminded me of a fried dough.  It must have been the fruit and powdered sugar.  With some iced coffee, and the family awake and enjoying the cooler morning air, we ate this outside with the morning sun on our shoulders.  I snipped off a couple of big pieces and passed them over the fence to share with our neighbors who were also out tinkering in their yard.

    It was a perfect moment.
    Fast Focaccia w/ Strawberries | www.girlichef.com
    Fast Focaccia w/ Strawberries
    by Heather Schmitt-Gonzalez
    Prep Time: 15 minutes (active) + 60-90 minutes (unattended)
    Cook Time: 25 minutes
    Keywords: bake bread vegan dairy-free nut-free soy-free strawberries Italian spring summer

    Ingredients (1 focaccia)
    • 2 tablespoons active dry yeast
    • 1 1/4 cups lukewarm water (110° F)
    • 5 heaping tablespoons sugar
    • 2 2/3 cups bread flour
    • big pinch of sea salt
    • 2 1/2 tablespoons olive oil
    • 1 pound ripe strawberries
    • confectioners'/powdered sugar, to serve
    Instructions
    Combine the yeast, water, and 1 heaping tablespoon of the sugar in a large bowl until the yeast blooms (looks creamy). Using a wooden spoon, stir in the flour and salt until the dough comes together. Turn out onto a lightly floured work surface and knead a few times. The dough should be slightly sticky - flour your hands lightly to keep the dough from sticking to them, but don't let the dough become too stiff.

    Flick a bit of water onto a 15"x10" (or thereabouts) rimmed baking sheet, and line it with wax paper. Pour the olive oil onto the wax paper and spread it around with your hands. Plop the dough onto the sheet, and use your hands to gently coax and stretch it into the shape of the pan. Lay a sheet of plastic wrap over the top of the pan and let sit until the dough rises up just over the edges of the pan. This could take up to 1-1/2 hours, but in my kitchen on a warm summer morning, it could happen as quickly as 30-40 minutes. Keep an eye on it.

    While the dough is rising, hull the strawberries. If they are particularly large, cut them in half, or even into thirds. Leave smaller ones whole. Place them into a bowl and toss them with 2-1/2 heaping tablespoons of the sugar. Cover and set aside at room temperature.

    When the dough has almost finished rising, preheat the oven to 400° F.

    When the dough is nice and puffed up, give the strawberries a gentle stir. Quickly, but gently (so as not to deflate the dough), place the strawberries all over the dough, keeping most of them upright (purely for looks); drizzle the gathered juices around, as you go.

    Scatter the remaining 1-1/2 heaping tablespoons of sugar evenly over the top of the dough and strawberries, going right out to the edges.

    Slide into preheated oven and bake for about 25 minutes, or until the focaccia is golden and a bit crisp on the edges and the strawberries look soft and juicy. Take care not to overcook, or the berries will break down into a jam. Remove from the oven, and very carefully slide the loaf, wax paper and all, onto a wire rack to cool.

    Once the bread has cooled down to room temperature, sift some confectioners' sugar generously over the focaccia, cut off pieces with kitchen scissors; eat!

    notes:
    This focaccia is best eaten right away, but definitely the same day (otherwise it will get too wet from the berries).

    slightly adapted from Recipes and Dreams from an Italian Life by Tessa Kiros
    Powered by Recipage
    Fast Focaccia w/ Strawberries | www.girlichef.com
    Sending this post to Susan's Yeastspotting and to IHCC: June Potluck.
    Wednesday, June 12, 2013

    Paletas de Fresas con Crema {#SummerOfThePopsicle Guest Post: Sweet Life}

    It's Wednesday!  It's Wednesday!  Yes, Wednesday is quickly shaping up to be my absolute favorite day of the week.  Each week I eagerly await another popsicle, paleta, or ice pop from one of my ridiculously talented friends - and each week I am rewarded with an icy cold treat to beat the heat that's been weighing me down.  This week, we have mi amiga...my Texan chica...the Queen of Margaritas sharing her beautiful memory-infused paletas with us!

    Who's Holding the Stick: Vianney from Sweet Life
    Paletas de Fresas con Crema {#SummerOfThePopsicle Guest Post: Sweet Life} | www.girlichef.com
    Fresas con Crema is one of the most requested desserts at my house.  Thick, tangy crema drizzled over juicy red strawberries who could resist?  The crema is made with media crema, (half and half) sweetened with powdered sugar or regular sugar.  Some prefer it thin drizzled over the top, some as in I prefer it thick served in a glass, layered with sliced berries.  

    When we lived further down South in Edinburg, you could pick up a vaso (glass) of fresas con crema at the local H-E-B before you did your shopping.  At every festival, church event or park you would find vendors selling fresas con crema.  We tried them all.  So we thought.

    One day I loaded up the girls and set out to pay the water bill.  The day was a scorcher and I was hopelessly pleading my case that we were already out, why not go ahead and run a few more errands.  They were not having it, it was just too dang hot.  As I drive away from Water Department I spotted a drive-thru convenience store.  You can literally drive your entire vehicle through the metal building and an attendant will walk up, take your order and deliver your goods.  What a treat for this mami!
    Paletas de Fresas con Crema {#SummerOfThePopsicle Guest Post: Sweet Life} | www.girlichef.com
    Of course I pulled in hoping to find a cool treat to keep the girls happy and I could finish my errands.  And what do I find scrawled in bright red letters as “today’s special?”  Fresas con Crema. SOLD!

    I ordered two, paid and we were off. My girl’s content, I thrilled to be able to mark off everything off my to-do list.  Then I heard the squeals… mom, you MUST try the fresas con crema.  Mom, pull over.

    And I did.  And I tasted it. And I made a u-turn and drove back to ask for the recipe.

    The owner said his mom used crema Mexican, not media crema.  Crema Mexicans is thicker, tangier and is sturdy enough to hold the weight of the berries.  I’ve used crema Mexican ever since to make my fresas con crema and thought it would make a great paleta.  If you cannot find crema Mexican substitute with thick greek yogurt.        

    Paletas de Fresas con Crema
    Paletas de Fresas con Crema {#SummerOfThePopsicle Guest Post: Sweet Life} | www.girlichef.com
    by Vianney Rodriguez from Sweet Life (Guest Post)
    Prep Time: 5 minutes (+ time to freeze)
    Cook Time: n/a
    Keywords: snack dessert vegetarian nut-free soy-free strawberries popsicles American Mexican summer

    Ingredients (6 paletas)
    • 2 cups fresh strawberries, sliced
    • 2 cups crema Mexicana
    • ¼ cup milk
    • ¼ cup powdered sugar
    • 6 Dixie cups
    • 6 Popsicle sticks
    Instructions
    In a medium bowl whisk together crema Mexicana, milk and powdered sugar.

    To each Dixie cup add one slice of strawberry. Add remaining strawberries to crema mixture, stir slowly to combine (try not to mash the berries or the color will bleed into the crema).

    Divide the fresas con crema equally between the 6 cups. Freeze for 4-6 hours or until set.

    Substitution-
    Greek yogurt for crema Mexican
    Powered by Recipage

    Thanks Vianney!  You don't know how badly I wish I could reach into the screen and snag one of your beautiful paletas.  While you're busy dreaming of these cold treats, why not head over and pay Vianney a visit at Sweet Life...maybe catch up with her on Facebook, Twitter, Instagram, or Pinterest.

    **Also - stay tuned for an awesome #SummerOfThePopsicle giveaway coming up very soon that Vianney and I are hosting together!  You will not want to miss it!**

    Summer of the Popsicle 2
    Monday, June 10, 2013

    Blackened Tilapia w/ Quick Collard Greens

    Blackened Tilapia w/ Quick Collard Greens
    When I think of a quick-cooking protein, fish is always the first to come to mind.  With the addition of some veggies, a quick and healthy meal can be on your supper plates in virtually no time.  Perfect solution for a busy weekday.
    Sunday, June 9, 2013

    Brown Rice Breakfast Pudding

    Brown Rice Breakfast Pudding
    So, I might have mentioned the fact that we eat a lot of rice pudding in this house.  You know, a few times.  Here and there.  We (and by we, I mean my husband - because he makes it 95% of the time) will switch up the liquid that we use...or the sweetener.  Most often it's plain when he makes it, but sometimes if he's feeling feisty, he'll add a cinnamon stick.

    When I make it, I like to add vanilla, or some citrus zest, or maybe a splash of rosewater.  With the rosewater, I like pistachios or cashews.  With anything else (or nothing else), I like to add dried fruit - Michigan cherries being my first choice.

    But you know what's funny?  Strange, not ha-ha.  Until now, I have never even tried to make rice pudding using brown rice.  Whaaaa!?  I mean, why?  Nutty, chewy brown rice is my favorite, after all.  Maybe I just figured it would take too long.  You know, somewhere in the back of my brain as my hand passed over the jar of brown rice to reach the white rice nestled behind it.
    Brown Rice Breakfast Pudding
    It did take a little longer, but not so much longer that it mattered all that much.  And the great thing about this recipe?  It uses not only brown rice, but also rice milk, making it dairy-free for those who allergic or sensitive to it (or just don't eat it).  It's also gluten-free.  But that being said, for those rice pudding/arroz con leche lovers out there - it's still creamy and comforting!  You don't even realize that there isn't any sort of (dairy) milk in it.

    Really.  Just ask my hubby who ate all of the leftovers; he had no clue that I didn't use milk in it.  I didn't not tell him because I thought he wouldn't like it that way, it just didn't cross my mind.  He was at work when I made it, so I told him there was some in the fridge - he warmed up a big bowl (and then emptied it) with nary a complaint.

    Brown Rice Breakfast Pudding
    Brown Rice Breakfast Pudding
    by Heather Schmitt-Gonzalez
    Prep Time: 5 minutes
    Cook Time: 50 minutes
    Keywords: simmer breakfast dessert gluten-free nut-free soy-free vegan rice dried fruit pudding

    Ingredients (serves 6)
    • 2 cups uncooked brown rice, preferably short-grain
    • 4 cups unsweetened rice milk + more as needed
    • 3 1/2 cups water
    • 4 tablespoons brown rice syrup (or to taste)
    • big pinch of sea salt
    • 1 cup dried fruit (I like to use a mix of cherries, apricots, cranberries, yellow raisins, and currents - I love the colors it brings to the dish)
    Instructions
    Combine brown rice, rice milk, water, brown rice syrup, and salt in a large, heavy-bottomed pot. Bring to a boil, and then decrease the heat to a gentle simmer. Allow to simmer for 40 minutes, stirring often. Stir in the dried fruit and cook for 10 minutes longer.

    You want it to be thick, but not stiff. If your liquid runs low during cooking, add a bit more rice milk or water. The pudding should have just enough liquid left to be "loose".

    Serve with extra rice milk and brown rice syrup, if you wish.

    Store leftovers in an airtight container for up to 3 days.

    notes:
    You could substitute maple syrup for the brown rice syrup, if you wish.

    Brown Rice Breakfast Pudding
    Saturday, June 8, 2013

    Chicken, Strawberry, & Tarragon Salad w/ Cashews & Cashel Blue

    Chicken, Strawberry, & Tarragon Salad w/ Cashews & Cashel Blue | www.girlichef.com
    Every time I make a salad, I make a proclamation that it's only the first in a line of many that will be gracing my table in weeks to come.  Visions of salad plates and dainty forks dance in my head.  And then tomorrow rolls around I promptly forget that decree.

    Seriously.  Every.  Single.  Time.
    Wednesday, June 5, 2013

    Striped Juice Popsicles {#SummerOfThePopsicle guest post: The view from Great Island}

    Hi guys!  So, last week marked the start of this amazing Summer of the Popsicle II guest-post series that I will be running throughout the entire summer.  Now, I mentioned that the Wednesdays of this summer are going to be jam-packed with gorgeous photos, tempting recipes, and fabulous bloggers - I know you will agree.

    You need only take a glance at the first photo below to see what I mean.  I believe that I first became friends with Sue back when we were both taking part in the 50 Women Game-Changers (in Food) series.  Sue is constantly putting me in a state of awe at her gorgeous photography, not to inventive and colorful (oh yeah, see below if you don't believe me) recipes.  Please help me in welcoming my second guest-popsicler of the summer!

    Who's Holding the Stick: Sue from The view from Great Island
    Striped Juice Popsicles: a #SummerOfThePopsicle guest post from The View from Great Island | www.girlichef.com
    I'm so excited to be 'holding the stick' today for my great pal Heather. Heather was the one who got me started on popsicle making in the first place...after drooling all last year during her inaugural Summer of the Popsicle I finally got hip and bought my own mold. I haven't looked back since.
    Striped Juice Popsicles: a #SummerOfThePopsicle guest post from The View from Great Island | www.girlichef.com
    Aren't stripes just so summery? Think beach umbrellas, sailboats, seersucker, espadrilles and French sailor shirts. My eye is drawn to them wherever I see them. After my striped ice cube post last week, I couldn't resist trying out the technique with pops. The possibilities are endless, limited only by the number of different fruit juices you can fit in your fridge. Everybody will be wowed by the pretty stripes, but they couldn't be easier to make.
    Striped Juice Popsicles: a #SummerOfThePopsicle guest post from The View from Great Island | www.girlichef.com
    I used a variety of different juices for my pops, including bottled, canned and fresh squeezed. There's really no right or wrong way to do this. You could pick two colors and alternate them, or go to town and do multicolored stripes like I did. Measure as you go for precise stripes, or go for a random, organic look.
    Striped Juice Popsicles: a #SummerOfThePopsicle guest post from The View from Great Island | www.girlichef.com
    For these popsicles I used pineapple. pink grapefruit, grape, cherry, orange, and pomegranate. That vivid pink stripe is a splash of Snapple because I couldn't resist that shade. Experiment! You'll get a new blend of bright fruit flavors with every lick. Your kids and their friends will think you are a genius.
    Striped Juice Popsicles: a #SummerOfThePopsicle guest post from The View from Great Island | www.girlichef.com
    This is more of a method than a recipe...

    Summer Striped Popsicles
    assorted fruit juices: you can use fresh, canned, frozen or bottled
    • It helps if your juices are cold to begin with. Start by putting a small amount of one juice in the bottom of each of your popsicle molds. You can do a thick or a thin layer, or some of each, it's up to you. Put the mold in the freezer and freeze until firm, about 30 minutes. 
    • Take a different juice for each subsequent layer. Pour the layer and then freeze again until solid. 
    • When you are about 1/3 of the way filled, take the frozen mold out of the freezer and insert the stick. I make a little incision in the ice with a small sharp knife dipped in boiling water. Make a slit just big enough to insert your stick so it won't tip. Once you have all your sticks in place, add another layer, and keep going as above, until the popsicle mold is full. 
    • To unmold your pops, briefly dip the mold in a sink of hot water, just up to, but not over the top. Pull out the pops. If they don't wiggle out easily, dip the mold again for a few more seconds. 
    • To store your pops, wrap them in waxed paper.
    Striped Juice Popsicles: a #SummerOfThePopsicle guest post from The View from Great Island | www.girlichef.com
    Here's a couple of ideas to think about...you can make custom team colored pops---if you need white, use thinned vanilla yogurt. If you need 'unnatural' colors like blue, use Gatorade or Snapple. Make gourmet citrus pops with gradations of fresh squeezed citrus, or do red white and blue for the 4th of July.
    Striped Juice Popsicles: a #SummerOfThePopsicle guest post from The View from Great Island | www.girlichef.com
    So, while you're busy contemplating which flavors and colors of stripes you want to put into YOUR next batch of popsicles, why not head over and pay Sue a visit at The view from Great Island, and follow her on Facebook, if you don't already!  You will not be disappointed.

    Thanks so much for bringing your gorgeous, colorful popsicles to share with me and everybody who drops by, Sue!
    Summer of the Popsicle 2