Who's Holding the Stick: Well my friends, this is it. Today wraps up an amazing summer (of the popsicle) full of generous friends stopping by and sharing their frozen creations on a stick. But, we'll talk more about that next week when I bring the whole shebang to a close. Right now, please join me in giving the lovely Ericka from Nibbles & Feasts a warm welcome as she gently coaxes us from summer to fall with her fun and tasty little Rompope Pops!
The fall season is about to begin. But that doesn’t mean that my paleta season will be ending any time soon. Living in California, September tends to be one of the hottest months of the year, which means that I still have 30 more warm days to indulge in my favorite frozen treats.
Since fall is my favorite season of the year, I am torn. I love paletas but I am really looking forward to the fall colors, wearing sweaters, scarfs and definitely welcoming the beginning of the holidays.
To give it one last goodbye to my summer, I decided to combine the best of both worlds and make rompope paletas.
posts may contain Amazon affiliate links, which earn me a small commission when you buy (but doesn't cost you anything extra). Occasionally I receive free products and/or run sponsored posts—this will always be stated clearly in the post. Thank you for supporting this blog.
This website contains some quotations, excerpts, and screen clips from copyrighted material. These uses fall well within the copyright doctrine of "Fair Use".
Holding the Stick Guest-Popsicler
Showing posts with label Holding the Stick Guest-Popsicler. Show all posts
Wednesday, September 4, 2013
Pumpkin Cheesecake Popsicles {#SummerOfThePopsicle Guest Post: The Messy Baker}
Who's Holding the Stick: This week I am happy to have another one of my Sunday Supper friends taking over the Summer of the Popsicle! Please help me welcome the sweet, talented Jennie of The Messy Baker today. And I couldn't be more excited that Jennie is ushering in the flavors of Fall with these tempting pops!
Hi, girlichef fans! My name is Jennie. I'm the author, baker, and spatula licker over at The Messy Baker. I'm here today to bring you a frozen treat on a stick. Since we're nearing the end of summer and fall is right around the corner, I decided to make a frozen treat using one of my favorite ingredients--pumpkin!
Soon pumpkin will be all the rage. It will trickle in slowly at first. You'll see a few pumpkin recipes here and there. Then--bam!-- pumpkin everything. There will be copious amounts of pumpkin recipes as far as the eye can see. I'm a lover of pumpkin, so it's cool. I don't mind it one bit. The hardest part for me is choosing which delicious recipe to try first. I'm not going to lie, I try to pack in as many pumpkin recipes as I can before the season is over and I'm left to wait an entire year before having it again.
One of my very favorite pumpkin recipes is pumpkin cheesecake. It's only Squirrel and I, so baking a pumpkin cheesecake for just the two of us isn't ideal. So, I did the next best thing... I made pumpkin cheesecake popsicles. They taste just like cheesecake, only they're individual and frozen. I even made them healthier by using a mixture of low-fat cream cheese and Greek yogurt. I sweetened the frozen treats with all-natural maple syrup and my homemade vanilla syrup (store-bought vanilla syrup will work just fine). The result is creamy popsicle perfection without the guilt.
You're going to love these popsicles. They're velvety smooth and oh so creamy. They taste just like their cheesecake counterpart, only healthier and individually frozen.
The popsicle mixture only takes minutes to whip together and a few hours in the freezer to set up.
I used pumpkin pie spice to add that classic fall flavor that I look forward to months before fall even arrives. The warm spices contrast perfectly with the cold pumpkin mixture.
These frozen treats are perfect for the warm days of September, yet they taste like the warm, spicy flavors of fall. Enjoy!
A big thank you to Heather for having me over for popsicles!

Oh my gosh, Jennie - I have never had a pumpkin popsicle...I need to remedy that pronto! These sound amazing, I love the cheesecake/pumpkin combo...and I am SO ready for the flavors of Fall.
If you want to see what other delicious treats Jennie is bringing to the table, head on over and see her at her place, The Messy Baker - or visit her on Facebook, Twitter, Pinterest, Google+, or Instagram.
Hi, girlichef fans! My name is Jennie. I'm the author, baker, and spatula licker over at The Messy Baker. I'm here today to bring you a frozen treat on a stick. Since we're nearing the end of summer and fall is right around the corner, I decided to make a frozen treat using one of my favorite ingredients--pumpkin!
Soon pumpkin will be all the rage. It will trickle in slowly at first. You'll see a few pumpkin recipes here and there. Then--bam!-- pumpkin everything. There will be copious amounts of pumpkin recipes as far as the eye can see. I'm a lover of pumpkin, so it's cool. I don't mind it one bit. The hardest part for me is choosing which delicious recipe to try first. I'm not going to lie, I try to pack in as many pumpkin recipes as I can before the season is over and I'm left to wait an entire year before having it again.
One of my very favorite pumpkin recipes is pumpkin cheesecake. It's only Squirrel and I, so baking a pumpkin cheesecake for just the two of us isn't ideal. So, I did the next best thing... I made pumpkin cheesecake popsicles. They taste just like cheesecake, only they're individual and frozen. I even made them healthier by using a mixture of low-fat cream cheese and Greek yogurt. I sweetened the frozen treats with all-natural maple syrup and my homemade vanilla syrup (store-bought vanilla syrup will work just fine). The result is creamy popsicle perfection without the guilt.
You're going to love these popsicles. They're velvety smooth and oh so creamy. They taste just like their cheesecake counterpart, only healthier and individually frozen.
The popsicle mixture only takes minutes to whip together and a few hours in the freezer to set up.
I used pumpkin pie spice to add that classic fall flavor that I look forward to months before fall even arrives. The warm spices contrast perfectly with the cold pumpkin mixture.
These frozen treats are perfect for the warm days of September, yet they taste like the warm, spicy flavors of fall. Enjoy!
A big thank you to Heather for having me over for popsicles!
Pumpkin Cheesecake Popsicles
a guest post from Jennie Phaneuf of The Messy Baker
Prep Time: 4 hours 10 mins
Cook Time: n/a
Keywords: dessert snack nut-free soy-free vegetarian cream cheese pumpkin frozen popsicles summer fall
Ingredients (6 popsicles)
- 4 ounces low-fat cream cheese, at room-temperature
- 1/2 cup Greek yogurt (fat-free or 2%)
- 1 cup pumpkin puree
- 1/2 cup pure maple syrup
- 2 tablespoons vanilla syrup
- 1/2 teaspoon pumpkin pie spice
- 1/8 teaspoon cinnamon
- 1/2 cup low-fat milk
Instructions
In a large bowl, add cream cheese and Greek yogurt. Using a hand mixer, whisk until smooth. Add the pumpkin puree and whisk until smooth.
Add the maple syrup, vanilla syrup, pumpkin pie spice, cinnamon, and milk. With your mixer on low, slowly whisk until the mixture is completely smooth.
Pour the mixture into your popsicle molds. Freeze for at least 4 hours.
If you want to see what other delicious treats Jennie is bringing to the table, head on over and see her at her place, The Messy Baker - or visit her on Facebook, Twitter, Pinterest, Google+, or Instagram.
Wednesday, August 28, 2013
Turtle Cheesecake Popsicles {#SummerOfThePopsicle Guest Post: Barefeet In The Kitchen}
Who's Holding the Stick: Rah-rah-sis-boom-bah...it's Wednesday! My favorite day of the week all summer long, because I invite one of my talented blogging friends to take over my space...and they come in full-force. Bearing popsicles! So today, please help me welcome Mary from Barefeet In The Kitchen!
When Heather from girlichef invited me to guest post for her Summer of the Popsicle series, I immediately had visions of popsicles running through my head. I couldn't resist the chance to come up with a truly indulgent treat.I started with creamy cheesecake ice cream, swirled caramel into it and then froze the mixture into popsicles. Once frozen, they are dipped in chocolate and sprinkled with nuts. I loved this combination and the kids have already requested that I make these again.
If you don't happen to have a popsicle mold lying around the house, grab some dixie cups next time you are at the store. A small square of foil over the top will help support your sticks. Of course, if your kids have used every popsicle stick in the house, you'll need to be a bit more creative. Find some plastic spoons and break off the spoon portion. The handles will work just fine on their own.
Turtle Cheesecake Popsicles
by a guest post from Mary Younkin of Barefeet In The Kitchen
Prep Time: 10 minutes (+ time to freeze)
Cook Time: 2-3 minutes (to melt chocolate)
Keywords: dessert snack vegetarian soy-free chocolate cream cheese sour cream frozen popsicles summer
Ingredients (varies)
- 8 ounces cream cheese
- 2/3 cup sour cream
- 2/3 cup heavy cream
- 2/3 cup sugar
- 1/2 teaspoon lemon zest
- 1/8 teaspoon fine sea salt
- 1/2 - 1 cup caramel sauce, cooled (I'm sure store-bought would be fine as well)
- 1 cup semi-sweet or dark chocolate chips
- 3 tablespoons refined coconut oil
- Optional: 1/4 cup finely chopped pecans
Instructions
Combine the cream, sour cream, cream cheese sugar, lemon zest and salt in the blender. Puree until completely smooth. Add the caramel and pulse to combine. Adjust the caramel amount to taste, depending on how rich you would like the popsicles to be.
Pour into your popsicle molds and freeze 6-8 hours until firm. In a small, wide mouth jar or glass bowl, combine the chocolate chips and coconut oil. Warm the chocolate and the coconut oil in a glass bowl in the microwave at 50% power. Start with 1 minute and then add 30 second intervals, stirring to combine. It should take 2-3 minutes for the chocolate to soften. Stir to combine. (Any leftover chocolate can be stored at room temperature.)
Let the chocolate cool and place the chopped pecans in a shallow dish. Line a small tray or baking dish with wax paper or parchment and set next to the chocolate and nuts. Remove the popsicles one or two at a time from the freezer. Carefully peel the cup off of the popsicle. (If you are working with a full mold of popsicles, I'd recommend removing all the popsicles from the tray. Then set them on the prepared lined tray and put them back in the freezer while you dip each one.)
Dip the popsicles into the chocolate as much or as little as you like. I made all of mine different, just because I could. Place each coated popsicle on the lined tray and keep the tray in the freezer as you are dipping the rest of the popsicles. Store in the freezer until ready to serve. Enjoy!
I prefer refined coconut oil for this recipe, because there is no coconut flavor or aroma at all. However, refined or unrefined will work equally well.
So, while I go check my fridge and pantry for the ingredients, why not visit Mary at her blog, Barefeet In The Kitchen. You can also find her on Facebook, Twitter, Pinterest, and Google+!
Thanks so much for being here today, Mary!
Wednesday, August 21, 2013
Triple Berry Ice Pops {#SummerOfThePopsicle Guest Post: Everyday Maven}
Who's Holding the Stick: First of all, I am so relieved to have somebody take over for me today since I'm busy getting the kids off for their first day back to school. I mean, come on school corporation - it's still summer! Popsicles are still lining the freezer... So, hooray for Wednesday! I'm very excited to welcome my friend Alyssa from Everyday Maven back (she was also here during the 12 Weeks of Winter Squash)! Take a gander at these beautiful frozen treats on a stick!
Deciding which popsicle to share with you was extremely difficult. As a mom to a 3.5 year old, we seem to have an endless supply and variety of popsicles in our freezer. As you can imagine, they range from creamy, rich and fruity to icy and refreshing. Then there are the adults only pops spiked with booze and/or coffee.
Throw in the fierce competition that has graced these pages every Wednesday since #SummerOfThePopsicle returned and you have one hard decision!
As I was wrestling with which recipe to share, it became obvious when my son asked me for an ice pop the other day. He asked me for one of the Triple Berry Ice Pops that have been a summer staple regardless of what other concoctions have come and gone, we always have these.
These Ice Pops are refreshing, light and beyond easy to make. All you need is a blender, some berries, a splash of coconut milk, coconut water, a touch of honey (or maple syrup) and a pinch of salt.
I like to make these in Dixie cups as they are the perfect size for little hands and not so big that they ruin my son’s dinner appetite when he wants an afternoon snack.
Enjoy and thanks for having me Heather!
Alyssa, Everyday Maven
P.S. These Ice Pops are Dairy-Free, Nut-Free, Paleo and Vegan Friendly (if you swap Maple Syrup for the Honey). 1 Points Plus Each.
Triple Berry Ice Pops
by guest post by Alyssa Brantley of Everyday Maven
Prep Time: 5 minutes (+ time to freeze)
Cook Time: n/a
Keywords: dessert snack vegetarian dairy-free nut-free soy-free frozen popsicles summer
Ingredients (15 (3 ounce) Pops)
- 28 ounces coconut water
- 4 ounces full-fat coconut milk (from a can)
- pinch sea salt
- 2 Tablespoons raw honey
- 10 ounces organic mixed berries
- 15 (3-ounce) Dixie Cups
- wood popsicle sticks
Instructions
Grab a small baking sheet or large flat plate. Line up the Dixie Cups and set aside.
Combine coconut water, coconut milk, sea salt, honey and mixed berries in a blender jar or bowl of a food processor. Process until completely liquefied.
Pour berry mixture into Dixie Cups.
You have two options for when to add in the wooden popsicle sticks. You can wait about 30 to 45 minutes when the popsicles will be slushy and not yet frozen but sturdy enough to hold up the sticks and insert them OR cover each Dixie Cup with a small piece of tinfoil and place the stick through the center prior to placing in the freezer. Personally, I usually do the first method unless I am running out of the house and won't be around 45 minutes later to place the wood sticks.
Allow the pops to set for a couple of hours (4 to 6). When ready to eat, use a scissors to snip the Dixie Cup and then just unpeel it off and discard.
TIPS:
- These Ice Pops are only as good as the fruit you make them with so make sure your fruit is naturally sweet and super ripe. Taste the mixture before pouring into the cups and adjust sweetness at that point as the frozen version will be very close to that.
- I used a combination of blackberries (2 ounces), blueberries (4 ounces) and strawberries (4 ounces). Any berry combo will work but if you use blackberries, strawberries or raspberries and want a smoother popsicle, strain blended mixture through a fine mesh strainer before pouring into the cups.
Wednesday, August 14, 2013
Blueberry Sweet Tea Pops {#SummerOfThePopsicle Guest Post: Blueberries and Blessings}
Who's Holding the Stick: Today, I'm so happy to welcome my sweet friend Pam from Blueberries and Blessings. I've known Pam for quite a few years now, through several of her blog name changes and many mutual events, and I couldn't be more excited that she's sharing a little slice of her Southern charm in popsicle form today!
I have known Heather for many years now, meeting in one of the many cooking clubs that have come and gone. I was lucky enough to meet her at long last at the recent Food And Wine Festival in Orlando - what a thrill! She is every bit as amazing in person if not more so!
So, when she was looking for guests to bring some popsicles to her, I had to jump at the chance. I had just bought my first set of molds and had been having a blast with mixing up frozen treats for my family.
I wanted to create something simple, yet something that would be special and represent me well, for those who don't know me.
Being in the south, we relish our sweet tea. It's a southerner's water, you know. Of course, I had to add some of my very favorite summertime fruit, and with a blog name like Blueberries and Blessings, it doesn't take much imagination to figure out what it is!
These turned out great - very refreshing. My son loved them - he's a tea lover, so I knew he'd be easily won over.
I loved the blueberries throughout the frozen sweet southern nectar. Adding the blueberry juice into the tea gives the pops an extra burst of berry.
These were actually the first non-creamy pops that I had made, and I wasn't sure what I would think, but I actually think these were my favorite so far.
They are totally customizable - you can make your tea as strong as you'd like, as sweet as you'd like. If you want a nice lil zing, you can use a cranberry blueberry juice instead of a straight blueberry juice. It's the beauty of this recipe. I do hope you'll try it and hope you enjoy the lil south that will be hitting your mouth!

I don't know why I never thought of making sweet tea into ice pops! I've used tea in a creamy pop or two, but never this way. I know I'll be brewing up an extra strong batch before summer slips away so that I can while away the heat in true Southern form ;). Thanks for being here, Pam!
You can find Pam and follow along with some of her fabulous events at Blueberries and Blessings, as well as on Facebook, Twitter, and Google+.
A big hello from North Florida! I'm Pam from Blueberries and Blessings.
I have known Heather for many years now, meeting in one of the many cooking clubs that have come and gone. I was lucky enough to meet her at long last at the recent Food And Wine Festival in Orlando - what a thrill! She is every bit as amazing in person if not more so!
So, when she was looking for guests to bring some popsicles to her, I had to jump at the chance. I had just bought my first set of molds and had been having a blast with mixing up frozen treats for my family.
I wanted to create something simple, yet something that would be special and represent me well, for those who don't know me.
Being in the south, we relish our sweet tea. It's a southerner's water, you know. Of course, I had to add some of my very favorite summertime fruit, and with a blog name like Blueberries and Blessings, it doesn't take much imagination to figure out what it is!
These turned out great - very refreshing. My son loved them - he's a tea lover, so I knew he'd be easily won over.
I loved the blueberries throughout the frozen sweet southern nectar. Adding the blueberry juice into the tea gives the pops an extra burst of berry.
These were actually the first non-creamy pops that I had made, and I wasn't sure what I would think, but I actually think these were my favorite so far.
They are totally customizable - you can make your tea as strong as you'd like, as sweet as you'd like. If you want a nice lil zing, you can use a cranberry blueberry juice instead of a straight blueberry juice. It's the beauty of this recipe. I do hope you'll try it and hope you enjoy the lil south that will be hitting your mouth!
Blueberry Sweet Tea Pops
by: a guest post from Pam of Blueberries and Blessings
Prep Time: 10 minutes (+ time to freeze)
Cook Time: n/a
Keywords: dessert snack vegan nut-free soy-free gluten-free dairy-free blueberries tea frozen popsicles Southern summer
Ingredients (8-10 (2 ounce) pops)
- 1 cup strong brewed tea
- 3-6 tablespoons sugar
- 1/2 cup frozen whole blueberries
- 1/2 cup blueberry juice
Instructions
Dissolve sugar (to taste) into brewed tea while tea is still warm. Mix blueberry juice into tea.
Divide the blueberries evenly amongst popsicle molds. Pour tea mixture over the berries to fill molds.
Add sticks/holders to the molds as directed by the manufacturer. Place in freezer and allow to freeze for at least 4 hours, or up to overnight.
You can find Pam and follow along with some of her fabulous events at Blueberries and Blessings, as well as on Facebook, Twitter, and Google+.
Wednesday, August 7, 2013
Grapefruit & Mint Boozesicles {#SummerOfThePopsicle Guest Post: Nutmeg Nanny}
Who's Holding the Stick: Please help me welcome another of my talented blogging friends...a woman after my own heart, who is bringing two of my favorite things about summer together in one glorious post (that would be popsicles and alcohol). Today we have the pleasure of spending time with the kind and talented Brandy from Nutmeg Nanny!
Hi girlichef readers! I’m Brandy from the blog Nutmeg Nanny and I’m super excited to be bringing you a little summerpopsicle boozesicle treat.
Ice pops were a big part of my childhood. My mom used to make them all the time and I would happily eat them all day long. Even as an adult I could eat ice pops all day long instead of actually eating a real meal. I know, as a food blogger I should probably not admit that I’m happy to not eat all day.
Now, these boozesicles are packed full of fresh summer flavor and can easily be made kid friendly by leaving out the vodka. But then they just become an ice pop instead of a boozesicle and lets face it, boozesicle is A LOT more fun to say.
Am I right?


Oh yeah, you're definitely right, Brandy! Speaking of booze, while you've got the vodka out, you may to head over and visit Brandy at her place, Nutmeg Nanny - she's got all sorts of great boozy creations I know you'll want to make. You can also find her on Facebook, Twitter, Google +, Pinterest, and Instagram.
Join me again next Wednesday for another frozen treat on a stick from another talented friend...
Hi girlichef readers! I’m Brandy from the blog Nutmeg Nanny and I’m super excited to be bringing you a little summer
Ice pops were a big part of my childhood. My mom used to make them all the time and I would happily eat them all day long. Even as an adult I could eat ice pops all day long instead of actually eating a real meal. I know, as a food blogger I should probably not admit that I’m happy to not eat all day.
Now, these boozesicles are packed full of fresh summer flavor and can easily be made kid friendly by leaving out the vodka. But then they just become an ice pop instead of a boozesicle and lets face it, boozesicle is A LOT more fun to say.
Am I right?
Grapefruit & Mint Boozesicles
by a guest post from Brandy O'Neill of Nutmeg Nanny
Prep Time: 5 minutes (+ time to freeze)
Cook Time: n/a
Keywords: dessert snack alcohol mint grapefruit vodka frozen popsicles summer
Ingredients (4 small boozesicles)
- 1 large ruby red grapefruit, peeled
- 1 teaspoon grapefruit zest
- 15 fresh mint leaves
- 1 tablespoon sugar
- 2 tablespoons vodka
Instructions
In a blender add all ingredients until smooth.
Add into popsicle molds or Dixie cups.
If your molds hold the stick add it immediately or add it after a few hours. Another option is covering your cups with foil and putting in the stick right away. The foil will help keep the stick in place. (This is the way I tend to do things.)
Let freeze for at least 6 hours until hard.
Oh yeah, you're definitely right, Brandy! Speaking of booze, while you've got the vodka out, you may to head over and visit Brandy at her place, Nutmeg Nanny - she's got all sorts of great boozy creations I know you'll want to make. You can also find her on Facebook, Twitter, Google +, Pinterest, and Instagram.
Join me again next Wednesday for another frozen treat on a stick from another talented friend...
Wednesday, July 31, 2013
Mocha Almond Fudgsicles {#SummerOfThePopsicle Guest Post: An Edible Mosaic}
Wednesday, July 31, 2013
Mocha Almond Fudgsicles {#SummerOfThePopsicle Guest Post: An Edible Mosaic}
Ten weeks. Ten weeks I've had the honor of welcoming talented bloggers to share my space here at girlichef! And each and every week I want to reach into my screen and grasp a couple of popsicle sticks to bring back out. There has not been a single one that I did not want to try!
Who's Holding the Stick: This week, please help me welcome another of my favorite blogging friends, Faith of the blog An Edible Mosaic. Now, I'm sure exactly how long I've known Faith...a couple of years maybe? But even before I knew her, I knew of her. Aside from gorgeous photography and recipes that set my tummy a growling on her blog, she has an amazing cookbook with a prominent space on my bookshelf (and in my kitchen - every recipe I've tried has been delicious). Plus a couple of fantastic smoothie e-books (along with Alyssa of Everyday Maven). I could go on and on, but I want to let her speak...please help me welcome Faith!
First I have to give a huge, heartfelt thank-you to Heather for inviting me to participate in her Summer of the Popsicle event. She is one of the sweetest bloggers I have had the pleasure of getting to know, and on top of that she’s a complete inspiration and incredibly talented. Thank you so much for inviting me, Heather!
So, popsicles!
Growing up, I was all about the frozen treats when summer vacation hit.
I’d be out riding my bike all day long – with or without one of my friends in tow, it made no difference to me – only returning home briefly to simultaneously re-fuel and cool down with a deliciously frozen goodie. Which, I have to say, was usually a freeze-pop, because they were the most portable frozen treat…and when you’re a kid and riding your bike is your number one priority, portability is high on your list of demands.
Rainbow-colored, “fruit” flavored (haha, who knows how they get the fruit flavor, lol!) twin pops were also a favorite. And push-pops. Oh, and fudgsicles. Mmm, fudgsicles.
And if a real treat was in order, I used to love going to a local ice cream stand and ordering a soft serve cone of what they called “Swiss Mocha” flavor, which was basically chocolate with a hint of coffee and toasted almond. Although it’s still a favorite of mine, Swiss Mocha seems to be an elusive ice cream flavor these days, which is why I decided to re-make my own version of it into healthy fudgsicles. Because when warm weather hits, I’m still all about the frozen treats.
These healthy beauties are everything I remember about Swiss Mocha: predominantly chocolate, with a hint of coffee and a touch of toasted almond. And the avocado? Other than the super velvety consistency of these fudgsicles you won’t even know it’s there.

These look so creamy and rich and like-they-belong-in-my-belly, Faith. Thank you so much for taking over for me today and sharing these amazing fudgsicles with us!
So, once you're finished contemplating on how many times to multiply this recipe so that you can stock your freezer for the rest of the summer, be sure to drop by and visit Faith at her blog, An Edible Mosaic...or find her on Facebook, Twitter, Instagram, or Pinterest.
Who's Holding the Stick: This week, please help me welcome another of my favorite blogging friends, Faith of the blog An Edible Mosaic. Now, I'm sure exactly how long I've known Faith...a couple of years maybe? But even before I knew her, I knew of her. Aside from gorgeous photography and recipes that set my tummy a growling on her blog, she has an amazing cookbook with a prominent space on my bookshelf (and in my kitchen - every recipe I've tried has been delicious). Plus a couple of fantastic smoothie e-books (along with Alyssa of Everyday Maven). I could go on and on, but I want to let her speak...please help me welcome Faith!
First I have to give a huge, heartfelt thank-you to Heather for inviting me to participate in her Summer of the Popsicle event. She is one of the sweetest bloggers I have had the pleasure of getting to know, and on top of that she’s a complete inspiration and incredibly talented. Thank you so much for inviting me, Heather!
So, popsicles!
Growing up, I was all about the frozen treats when summer vacation hit.
I’d be out riding my bike all day long – with or without one of my friends in tow, it made no difference to me – only returning home briefly to simultaneously re-fuel and cool down with a deliciously frozen goodie. Which, I have to say, was usually a freeze-pop, because they were the most portable frozen treat…and when you’re a kid and riding your bike is your number one priority, portability is high on your list of demands.
Rainbow-colored, “fruit” flavored (haha, who knows how they get the fruit flavor, lol!) twin pops were also a favorite. And push-pops. Oh, and fudgsicles. Mmm, fudgsicles.
And if a real treat was in order, I used to love going to a local ice cream stand and ordering a soft serve cone of what they called “Swiss Mocha” flavor, which was basically chocolate with a hint of coffee and toasted almond. Although it’s still a favorite of mine, Swiss Mocha seems to be an elusive ice cream flavor these days, which is why I decided to re-make my own version of it into healthy fudgsicles. Because when warm weather hits, I’m still all about the frozen treats.
These healthy beauties are everything I remember about Swiss Mocha: predominantly chocolate, with a hint of coffee and a touch of toasted almond. And the avocado? Other than the super velvety consistency of these fudgsicles you won’t even know it’s there.
Mocha Almond Fudgsicles
by a guest post from Faith Gorsky of An Edible Mosaic
Prep Time: 10 minutes (+ time to freeze)
Cook Time: n/a
Keywords: dessert snack vegan almonds avocado frozen popsicles summer
Ingredients (6 fudgsicles)
- 1/2 cup (120 ml) plain, unsweetened almond milk (or any plain, unsweetened milk you like)
- 6 tablespoons unsweetened cocoa powder
- 6 tablespoons pure maple syrup
- 1 teaspoon pure vanilla extract
- 1/4 teaspoon pure almond extract
- 3/4 teaspoon instant espresso powder, dissolved in 1 1/2 teaspoons hot water
- 1/8 teaspoon sea salt
- 2 medium avocados, pitted and flesh scooped out
- 4 tablespoons toasted, slivered almonds
Instructions
Puree all ingredients except the almonds in a food processor until smooth, scraping down the sides of the bowl as necessary (the mixture will be about the consistency of pudding).
Add the almonds and pulse a couple times to coarsely chop and incorporate them.
Spoon the mixture into popsicle molds, making sure not to fill the molds over the “fill” line, since liquid expands as it freezes. (My molds are 2 1/2 oz/75 ml and I got exactly 6 popsicles.) Gently tap the mold a couple times on a hard surface to help any air bubbles escape.
Freeze for 30 minutes, then insert the sticks (waiting 30 minutes ensures that the sticks won’t sink all the way down).
Return to the freezer and freeze completely, about 2 to 3 hours more, depending on the size of your popsicles and how cold your freezer is.
To easily unmold the popsicles, dip the plastic bottoms in warm water and they should slide right out.
Once completely frozen and unmolded, I like to wrap each popsicle individually in plastic wrap so it’s easy to grab one whenever a craving hits!
So, once you're finished contemplating on how many times to multiply this recipe so that you can stock your freezer for the rest of the summer, be sure to drop by and visit Faith at her blog, An Edible Mosaic...or find her on Facebook, Twitter, Instagram, or Pinterest.

Wednesday, July 24, 2013
Cherry Strawberry Lemonade Popsicles (#SummerOfThePopsicle guest post: Javelin Warrior}
Wait. What? It's Wednesday again? Already? I'll take it! This past week has flown by in a whirlwind of preparation and enjoyment for and of the Food and Wine Conference in Orlando. I'm just now shaking off the jet lag from Monday, and beginning for form cohesive thoughts. Thank goodness I have one of my ridiculously talented and kind blogger friends dropping by to share a post with you today.
Who's Holding the Stick: Today, I'm so excited to welcome the creator of Made with Love Mondays, Tuesday Tutor, and Food Fetish Fridays, Mark of Javelin Warrior's Cookin w/ Luv! Please help me welcome him...and his gorgeous popsicles today.
Fear Conquered: Cherry Strawberry Lemonade Popsicles
I almost never eat popsicles.
When I want something cold and frozen, it's almost always ice cream. Typically, I prefer scoopable ice cream. Although I'll never turn my nose up at a Klondike bar. (And I really need to learn to make a suitable ice cream bar replacement so I can stop buying Klondikes entirely!)
So why, of all things, am I sharing a popsicle recipe that doesn't even come close to resembling ice cream? Trust me, I'm scratching my head too. Because even though I made these, I'd still reach for that tub of ice cream.
But truthfully, these popsicles exist because I desperately wanted to participate in girlichef's awesome Summer of the Popsicle 2. Every Wednesday for the whole summer, different bloggers share delicious frozen popsicle (or popsicle-like) treats with Heather and I felt compelled to make an attempt. I mean really, I should be able to at least attempt making popsicles. Even if I rarely eat them. TA-DA! Cherry Strawberry Lemonade Popsicles!
But even if my admittedly inept take on popsicles isn't to your fancy, make sure to check out all the other possibilities over at girlichef's Summer of the Popsicle. Because there are some amazing combinations and nearly every one of them is easy to make.
And if you're not me, and if you have a hankering for something cold and frozen and sweet, you might just be happy to reach for one of these guilt-free indulgences rather than that Klondike bar. Which is probably a good thing, given I've already finished off the last Klondike bar...

Hungry for Tips?


Well Mark, I can hardly fault you for reaching for cool, creamy ice cream now, can I? Hardly. I mean, I'd never turn an ice cream treat down. But me and my cold, refreshing, icy pop-lovin' self would never be able to resist grabbing the stick to one of these gorgeous garnet beauties! You may not be a convert, but I'm so happy that you took a bit of time to explore and test so that you could be a (fabulous) #SummerOfThePopsicle guest host!
If you're not familiar with Javelin Warrior, I hope you'll take some time to drop by and say hello at his blog. You can also find Javelin Warrior on twitter, pinterest, google+, facebook, and instagram!
Who's Holding the Stick: Today, I'm so excited to welcome the creator of Made with Love Mondays, Tuesday Tutor, and Food Fetish Fridays, Mark of Javelin Warrior's Cookin w/ Luv! Please help me welcome him...and his gorgeous popsicles today.
Fear Conquered: Cherry Strawberry Lemonade Popsicles
I almost never eat popsicles.
When I want something cold and frozen, it's almost always ice cream. Typically, I prefer scoopable ice cream. Although I'll never turn my nose up at a Klondike bar. (And I really need to learn to make a suitable ice cream bar replacement so I can stop buying Klondikes entirely!)
So why, of all things, am I sharing a popsicle recipe that doesn't even come close to resembling ice cream? Trust me, I'm scratching my head too. Because even though I made these, I'd still reach for that tub of ice cream.
But truthfully, these popsicles exist because I desperately wanted to participate in girlichef's awesome Summer of the Popsicle 2. Every Wednesday for the whole summer, different bloggers share delicious frozen popsicle (or popsicle-like) treats with Heather and I felt compelled to make an attempt. I mean really, I should be able to at least attempt making popsicles. Even if I rarely eat them. TA-DA! Cherry Strawberry Lemonade Popsicles!
But even if my admittedly inept take on popsicles isn't to your fancy, make sure to check out all the other possibilities over at girlichef's Summer of the Popsicle. Because there are some amazing combinations and nearly every one of them is easy to make.
And if you're not me, and if you have a hankering for something cold and frozen and sweet, you might just be happy to reach for one of these guilt-free indulgences rather than that Klondike bar. Which is probably a good thing, given I've already finished off the last Klondike bar...
![]() |
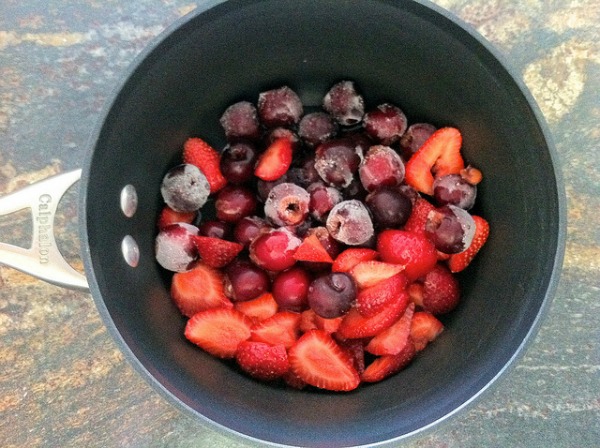
| Measure 8 ounces of strawberries and 8 ounces of pitted cherries (I used cherries I had previously pitted and frozen). |
![]() |
| Transfer to a medium sauce pan and add 1/4 cup of purified water. |
![]() |
| Add the juice of 2 lemons to the fruit. |
![]() |
| Cover the sauce pan and bring the fruit to a simmer. |
![]() |
| Simmer covered for 20 minutes until the strawberries have begun to break down and the cherries have softened. |
![]() |
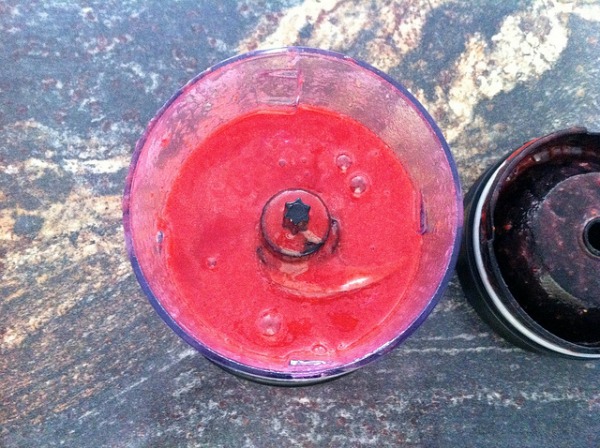
| Add the cherries and strawberries to a blender. |
![]() |
| Puree the fruit until smooth. |
![]() |
| Allow the fruit puree to cool, then pour into the popsicle molds. |
![]() |
| Add your popsicle sticks, then freeze the popsicles for at least 6 hours (I freeze mine overnight). |
![]() |
| To remove the popsicles, run the popsicle molds under hot water until the popsicles are loosened. |
Cherry Strawberry Lemonade Popsicles
by a guest post from Mark of Javelin Warrior
Prep Time: 10 minutes (+ time to freeze)
Cook Time: 20 minutes
Keywords: dessert snack vegan dairy-free nut-free soy-free frozen popsicles summer
Ingredients (varies)
- 8 ounces strawberries
- 8 ounces pitted cherries
- 1/4 cup purified water
- juice of 2 lemons
Instructions
Place strawberries and cherries (I used cherries I had previously pitted and frozen) into a medium sauce pan and add the purified water. Add the juice of the 2 lemons to the fruit. Cover the sauce pan and bring the fruit to a simmer.
Simmer covered for 20 minutes until the strawberries have begun to break down and the cherries have softened.
Transfer the mixture to a blender. Carefully (hold the top down with a kitchen towel) puree the fruit until smooth.
Allow the fruit puree to cool, then pour into the popsicle molds. Add your popsicle sticks, then freeze the popsicles for at least 6 hours (I freeze mine overnight).
To remove the popsicles, run the popsicle molds under hot water until the popsicles are loosened.
- Sugar: Thanks to the sweetness of the strawberries, you really don't have to add any sugar to these popsicles. And no bottled juice is needed either. So all in all, this is a fairly guiltless snack.

- Frozen or Fresh: If you start with fresh cherries and strawberries, they will come to a simmer faster. However, you will also have to pit and hull all of your strawberries and cherries. So to make my life simpler, I buy cherries and strawberries when they're in-season or on sale, hull and pit the fruit and then freeze for later.

- Freeze-time: Unless you like semi-soft popsicles, make sure you plan on a good 6 hours of freezer time. I like to make these a day in advance, that way I'm not tempted to go searching for a treat a couple hours after popping them into the freezer.

- Alternatives: I originally tried these popsicles with cherry and rhubarb (and no lemon). It was a good combination, but Boyfriend Javelin wasn't happy with the flavor. I've also tried swirling in about 1/4 cup of non-fat Greek yogurt to the cooled fruit puree before pouring into the molds. This also works nicely, especially if you prefer a creamier popsicle.
Well Mark, I can hardly fault you for reaching for cool, creamy ice cream now, can I? Hardly. I mean, I'd never turn an ice cream treat down. But me and my cold, refreshing, icy pop-lovin' self would never be able to resist grabbing the stick to one of these gorgeous garnet beauties! You may not be a convert, but I'm so happy that you took a bit of time to explore and test so that you could be a (fabulous) #SummerOfThePopsicle guest host!
If you're not familiar with Javelin Warrior, I hope you'll take some time to drop by and say hello at his blog. You can also find Javelin Warrior on twitter, pinterest, google+, facebook, and instagram!
Subscribe to:
Posts (Atom)