posts may contain Amazon affiliate links, which earn me a small commission when you buy (but doesn't cost you anything extra). Occasionally I receive free products and/or run sponsored posts—this will always be stated clearly in the post. Thank you for supporting this blog.

This website contains some quotations, excerpts, and screen clips from copyrighted material. These uses fall well within the copyright doctrine of "Fair Use".
Thursday, March 19, 2009

Pulled Pork Barbecue for TFF

The recipe I wanted to try for this week's Tyler Florence Friday was a pulled pork barbecue recipe from Eat This Book (p 190). I've always been a big fan of pulled pork...though it's usually a summertime thing...or an awesome fall barbecue event! But hey...end of winter...why not? Tyler uses a shoulder or butt roast, a personal favorite of mine for any and every type of long, slow-cooked pork dish. Any changes that I made (there weren't many), will be written in a different color. This serves about 12 people...so turn on March Madness and serve up some fun & satisfying barbecue pork sandwiches!
Pulled Pork Barbecue
adapted from recipe by Tyler Florence, Eat This Book
serves: ~12

Dry rub:
3 Tbs Paprika
1 Tbs Garlic Powder
1 Tbs Brown Sugar
1 Tbs Dry Mustard
3 Tbs Coarse Sea Salt
1 (5-7 lb) pork roast, shoulder or boston butt I actually used 2 separate roasts
Mix all in small bowl. Rub all over pork and marinate for as little as an hour or overnight (refrigerated). I marinated overnight
Preheat oven to 300 F. Put pork in roasting pan and roast for about 6 hours it took mine 5. Roast until it is falling apart, about 170 degrees F. 


While pork is roasting, make...

Cider-Vinegar Barbecue Sauce

1 1/2 c. cider vinegar
1 c. yellow or brown mustard
1/2 c. ketchup
1/3 c. brown sugar
2 (3) garlic cloves smashed
1 tsp. sea salt
1 tsp. cayenne pepper
1/2 tsp. freshly ground black pepper

Combine all in saucepan over medium heat. Simmer gently, stirring for 10 minutes, or until sugar dissolves. Take off heat & let stand until ready to use. 


While pork is roasting, also make...

Spicy Slaw 
(yield 8-10 c.)


1 head green cabbage, shredded 3/4 head
2 carrots, grated
1 red onion, thinly sliced
2 green onions, chopped 
1 fresh red chile, sliced green
1 1/2 c. mayonnaise
1/4 c. Dijon mustard
1 Tbs. cider vinegar
Juice of 1 lemon
pinch of sugar
1/2 tsp. celery seed i used 2 tsp.
several dashes of hot sauce
sea salt & black pepper
i also added some chopped cilantro
Combine all veggies in a VERY large bowl. In another bowl, whisk the rest of the ingredients (except s & p) together. Pour over veggies and toss gently to mix. Season. Chill for 2 hours before serving.
Okay...when pork is done, take it out of the oven and put it on a large platter. Allow meat to rest for about 10 minutes. While it's still warm, "pull" meat with two forks. Put shredded pork in a bowl and pour half the sauce over and mix.
To serve, pile pulled pork onto a bun then top with slaw and top bun w/ more sauce on the side, if you wish.
***My thoughts on this recipe: I loved the pork itself. I liked the slaw, but didn't think it was "spicy" at all. I did not care for the barbecue sauce AT ALL! I kid you not, the sauce totally burned my nasal passages...I like vinegar...but this was far too much. It wasn't much of a barbecue sauce (okay, not the kind I like) at all. But, I knew this was going to be the case when it was cooking (more clearing of the sinuses)...so, I actually only mixed up enough of the pork and barbecue sauce just to try it as written (basically). It was a very pretty sandwich...but I went ahead and mixed some of the pork with some BBQ sauce we had around the house for the rest of the sandwiches....and saved the rest of the pork for other meals. Yay! So, overall I liked the recipe...just not the sauce :( sorry Tyler.
Don't forget to head over to Tyler Florence Fridays to see more recipes from Tyler fans.
Wednesday, March 18, 2009

Lemony Baked Goods Hate Me!

I'm convinced...any baked good that has lemons in it has it out for me! It's a sinister little plot that rears its ugly fangs and dashes my (lemon-flavored) hopes and dreams. I don't know if you say my When life gives you lemons... post a while back, but I kid you not, baking + lemons + me =flop. I've made lemon bars from a mix and yes, they worked. Cooking with lemons...no problem. I make killer lemonade, for sure. But set me loose in the kitchen (armed with a recipe, even) and see what happens...or doesn't. My latest attempt at lemon-bakery (? I know, not a real term !) was a recipe by Gin from Once Upon a Gourmet Gin. Check out the actual recipe on her blog and her gorgeous picture...and then continue on to see my attempt (I'll post the recipe, too). My troubles in NO WAY reflect Gin's creative recipe...they were mine and mine alone! The thing that attracted me most to this recipe (aside from the lemon) was the fact that they are a variation of a Cake Mix Cookie. Cake Mix cookies are near & dear to my heart because my and I and possibly my brother (?) made cake mix cookies all the time when were young! Actually, we still make them...but we just make the "basic" version. Gin added such intriguing ingredients to hers that I needed to bake them as soon as possible. The Most Lemony Cookie of all Time
1 box lemon cake mix
2 eggs
1/2 cup vegetable oil
1 tablespoon lemon extract
1 7 oz box of Lemonheads®
zest from one lemon
1 box powdered sugar for rolling in...I just filled a plate w/ some
Preheat oven to 345 degrees I did 350 F
(1) Grind Lemonheads® in food processor into a fine powder.
(2) Add all ingredients and blend well. except powdered sugar
(3) Use melon ball scooper to measure small dough balls and roll in powdered sugar. *
(4) Place on a baking sheet and bake for 10 minutes. It is very important not to bake these cookie for more than 10 minutes. Ten minutes give these cookies the perfect texture inside and out. **
(5) ENJOY! despite the bedraggled appearance, they were still tasty
* One of my problems....I used a scoop that I normally use for scooping out my cookies...made cookies that were a little larger than the recipe intended, I think. So, switched to a melon baller and I think they were too small (I used the larger, parisienne side). Next time...somewhere in the middle.
** My cookies stuck like crazy!!! Tried to remove immediately and they fell apart. Tried to let sit on pan and they stuck. I sprayed the pan next time...same problems!!! Argh...frustration sets in. My larger cookies spread (unlike Gin's beauties) and seemed almost like a "lace" cookie. My smaller ones were very pretty, but ended up cooling to a hard cookie. Where's my in between?!
These are my 3, count them 3 tries... starting clockwise from top left, cooked a little too long, because they didn't seem done (remember, too big). Next, (still big) cooked exactly 10 minutes but super hard to get off of pan...ended up with the best texture of the 3 and last (bottom) my smaller attempt...looked great, tasted great but ended up crunchy throughout. Okay, there are worse things than crunchy throughout...because they are excellent dunked in some milk or coffee this way. Thanks for going along with me on my lemon baking adventures....stay tuned for next time :) ! ~~quick update (I wrote this post and scheduled it for later, so this update will show up when it is first posted) : Ever determined, I headed back to the kitchen to use up the rest of my dough, which I refrigerated when I gave up yesterday...I sprayed the cr*p out of the sheet pan this time and they didn't stick!!! But...they did spread more than Gin's did.....aaaahhhh! Maybe a little baking powder next go 'round. NOTE TO SELF: BUY THE DARN SILPAT ALREADY!!!
Tuesday, March 17, 2009

Everybody's Irish today!

Happy St. Paddy's Day everyone! All I felt like eating today was a traditional Irish meal...no muss, no fuss. I know the corned beef isn't actually completely authentic (it was originally Irish Bacon)...but, corned beef w/ cabbage is something I look forward to each year. I know, I know...I can have it anytime, but I usually just have it today (or there abouts). I wanted Champ with it, too...I didn't have any baking potatoes, so I used red potatoes. Did red potatoes originate in Ireland, too? I seem to remember reading about their origins being somewhere in Prussia (which no longer exists...it was between Poland & Russia). Does anybody know if red potatoes are originally from Ireland, too? Well, I used them anyway.
Monday, March 16, 2009

It's Taco Night!

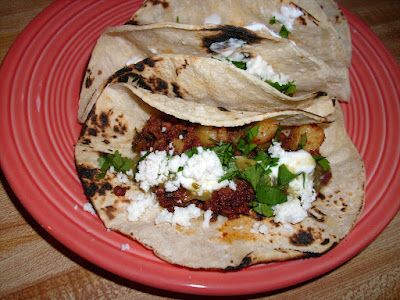
I love the fact that you can make so many different fillings for a taco! And I also love the fact that every time somebody talks about tacos, I want to say "let's go get a taco"...a la Reservoir Dogs & Harvey Keitel (right? It's been awhile since I've actually watched it). You could probably interest me in a taco anytime of day...or night for that matter.
Okay, so here are the ingredients for my Tacos de chorizo, papas y verdes:
I start by making a quick blender salsa. I don't have any exact measurements for anything, because this is just one of those meals that you throw together from what you have around.
Salsa Verde:
tomatillos
jalapenos
garlic cloves
cilantro
salt
Wash the veggies and put in a pot. Cover with cold water and bring to a boil. Turn heat down and simmer until veggies are tender.
Transfer to the jar of a blender. Add a little cold water, some salt and the cilantro. Blend until smooth. The great thing about making a blender salsa is that you can change the flavors so easily. Try substituting a tomato or two for some of the tomatillos. Add in some dried red chiles to the boiling water. Throw some chiles de arbol in with the green ingredients for extra heat. Boil or roast the veggies for different levels of flavor. Set aside until ready to use. Refrigerate any extra in an airtight container for other uses. This lasts a couple of weeks.
Filling:
chorizo (fresh Mexican, not cured Spanish-type)
red potatoes, diced
greens (I used turnip), cooked
Start by browning the chorizo in a pan over medium heat.
Cover potatoes w/ salted water. Bring to a boil and cook until just tender.
Once chorizo is cooked, pour into a strainer set over a grease-catcher. Add chorizo back to pan.
Add potatoes and greens to pan with chorizo, mix and heat through.
To Assemble:
corn tortillas- heated over open flame on stove (or in pan or microwave if you don't have a gas stove)
table cream (like sour cream, but thinner. If you can't find it, stir a little milk in to regular sour cream until a thin, drizzle-able consistency)
queso fresco, crumbled
cilantro- chopped
Fill hot tortillas with filling and add garnish and salsa. Serve!
If you want some more tasty taco ideas, click your way over to Taco Tuesday on Gloria Chadwick's Foods and Flavors of San Antonio!
Sunday, March 15, 2009

Pasta e Fagioli for this Souper Sunday

Time for that weekly dose of soup! My contribution to this week's Souper Sunday is a Pasta e Fagioli... a soup pasta and beans. I love a good fagiol that takes a few hours to make from dried beans, but sometimes I really do not feel like taking the time to soak (even quick-soak) the beans and I want something quick. I always try to keep some canned beans in the pantry, along with some canned tomatoes and of course a few types of pasta! Another thing I try to always keep around is fresh herbs and some sort of stock or broth, be it in the freezer or in the pantry. Along with onions, garlic and bacon (again, I usually have these) and a couple of staple condiments, I was able to make a tasty Pasta e Fagioli!

Pasta e Fagioli
recipe by girlichef
yield: 2-3 quarts

1/4 lb. bacon (I used peppercorn crusted, but regular will do), cut into 1/4" strips
1 medium onion, chopped
2 ribs celery, diced
2 carrots, diced
2 garlic cloves, minced
parmesan rind (optional)
Sprig rosemary
sprig thyme
couple of bay leaves
1/4 c. rough chopped parsley
3 quarts stock, broth or water
15 oz can tomatoes in juice, chopped (or can of diced)
2 (~15 oz) cans of beans of your choice (I used kidney & pink combo)
1/2 lb. Ditalini pasta (or your choice), cooked until al dente...reserve 1 c. pasta water
Sea salt & Black Pepper
Extra Virgin Olive Oil
Parmesan, fresh grated

Heat a large dutch oven over medium-low heat. Add bacon and cook until done to your liking.

Add your chopped vegetables and herbs to the pot with the bacon & it's grease.
Saute for a few minutes, while stirring occasionally, until veggies start to soften.
As you stir, you will scrape all that wonderful flavor from the bacon (fond) from the bottom of the pot...adding to the flavor your building up.
Once veggies have started to soften, add your parmesan rind and your liquid.
Bring soup to a boil...let it bubble for a couple of minutes. Then add drained & rinsed beans and tomatoes to pot.
Add your reserved pasta & pasta water if you remembered to save some. Boil for a couple more minutes to let it all come together. Discard bay leaves, rosemary & thyme sprigs. Season to taste with salt & pepper...and if you're like me, gnaw on the parmesan rind for a minute...or throw it straight away. Ladle hot into bowls.
Garnish with a drizzle of olive oil, some grated Parmesan and some fresh cracked black pepper.


So simple and so tasty and so easy...what more could you ask for? Okay yes, a good loaf of crusty Italian bread to sop up the remains and a glass of wine, but then...what more could you ask for? Be sure to head over to Kahakai Kitchen to get a gander at more soup on the Souper Sunday Roundup!
Saturday, March 14, 2009

My Three Tarts tart

Okay, it's actually just one tart, made up of three ladies (tarts) names...Rosemary, Cherry & Ginger...so, a play on words, if you will. I found yet another great group for foodie bloggers and it has to do with PIE! I love pie. I know, I know...what don't I love when it concerns food? Not much, I suppose...but I have certain things I love more than others and pie is one of them. You want Pies with that? picks a new them each month and members back their pie or tart...savory or sweet and enter them by a certain day of the month for judging by the other entrants. There's a cute system based on pi that is used to calculate when things are due (dates & times, etc.) and there's lots and lots of glorious pie. The pie for March is due today (March 14...3/14...3.14 = pi) and the theme for this month is herbs & spices.
My all time favorite fruit is cherries, so I am very fortunate to live in an area of the Midwest where they are abundant...if only for a month or two each year. When the farmer's market gets overrun by all the varieties of cherries, I'm there to stock up by the bushel-full! Years ago I invested in a cherry pitter and it works overtime for the few weeks after those sour cherries arrive! I wash, pit, measure and freeze enough sour cherries to get me through until at least Spring...and then I only have a few months to wait until they come back. I use the same process for sweet cherries, but it's so much harder for me to keep those around...or even get them in to the freezer. But, the few packages that do end up in the freezer are used up in quick fashion (my daughter loves frozen cherries & berries and eats them as a snack year round) as they are used in smoothies, sauces and compotes.
Where is all this cherry talk leading, you wonder? No, I'm sure you've guessed by now that I made some sort of cherry pie or tart...and yes, of course I did! I paired cherries with ginger and rosemary to make my first You want Pies with that? entry.
My Three Tarts tart
recipe by girlichef
Crust:
2 c. AP flour
1 tsp. sea salt
1 1/2 sticks unsalted butter, cold & cut into pcs.
Needles from 2" sprig of Rosemary
1/4 c. heavy cream
3-5 Tbs. ice water
Combine flour & salt in food processor. Add butter & rosemary and pulse until coarse crumbs form. Add cold cream, pulse. Add a little of ice water at a time, just until it is wet enough to hold together. Turn out onto plastic wrap, for into a disk, wrap and refrigerate for about an hour.
Roll out and put into 9" tart pan w/ removable bottom. Press and form to fit, if needed. Par bake for ~12-15 minutes at 400 degrees F (preheated).
Filling:
4 c. sour cherries, pitted (let thaw a bit if frozen)
4 Tbs. quick-cooking tapioca
1 c. granulated or raw sugar
1 1/2 tsp. finely chopped rosemary
1 1/2 tsp. minced fresh ginger
Mix all ingredients in large bowl and let sit for about 15 minutes to mix & mingle & get familiar with one another (let the girls bond). Dump all of the filling into the par baked shell. Put on a foil-lined sheet pan and bake in preheated oven for 45-55 minutes. Remove from oven and brush a little melted apricot jam/preserves over the top to make it shiny. Remove tart pan. Garnish with rosemary & a little crystallized ginger, if you wish. This was a tart in all forms of the word...baked in a tart pan and very tart in flavor. The cherry has that bright, sour bite, the ginger gives a beautiful warming undertone and the rosemary is very earthy...these are three tarts that play nice with others (well, each other)! Again, it's mouth-puckering, so I recommend eating with a big scoop of creamy vanilla ice cream to mellow it out a bit...I did, and it was quite an experience. Be sure to head over to You want Pies with that? to see all of the other mouthwatering entries!
Friday, March 13, 2009

Toasted Almonds...Tyler style

I've found an excuse for spending more time with Tyler Florence. Ah, Tyler...he's a chef, he's oh, so handsome and he takes such a down to earth approach to food and cooking...so, imagine how happy I was to find a group devoted to making Tyler's recipes once a week. This group of food bloggers goes by the name Tyler Florence Fridays. So, at least once a week I can spend some time with Tyler and food! Since I started out a little late in the week, I picked a quick and easy recipe from Eat This Book to start my journey. I'm a big fan of almonds and a big fan of chili's, so when I saw his Toasted Almonds in Chile Oil, I knew I had to try them! Tyler called for one red chili, but I didn't have any and I was in a hurry to make these, so I substituted a green one (jalapeno)...it didn't really provide the heat I thought it would, perhaps using more than one would have produced a hotter chili oil...next time. Toasted Almonds in Chile Oil from Eat This Book by Tyler Florence p.44 makes 1 1/4 c.

1/2 c. extra virgin olive oil

1 fresh hot red chili, split I used a green chili

1/2 lb. whole raw almonds, not skinned

1/2 tsp. kosher salt I used sea salt

Preheat oven to 375 degrees F. Heat oil in large ovenproof skillet over medium heat for a couple of minutes to get it nice and hot. Add the chili and cook for about 1 minute to let it infuse the oil with its flavor. Add the almonds and cook, stirring, to coat them completely with the chili oil about 2 minutes. Now put the whole pan in the oven and roast for 15 minutes, or until the nuts are toasty and fragrant. Remove to a plate lined w/ paper towels and sprinkle with the salt while they're still hot.

So, as I said, I would have liked them with a little more heat! I may try a flavored sea salt next time, as well....maybe a habanero salt...oh yum! Can't wait til next Friday and my next date with Tyler.
Thursday, March 12, 2009

Chicken Piccata


At this point, I'm still a relatively new blogger. I love to surf my way through the countless number of food blogs out there and find new ones to follow and groups to join...there is such a wonderful community of foodies out in blogger-space! I recently came across Barefoot bloggers...a group of Ina Garten devotees. I remember buying Ina's first cookbook many years ago and making (successfully) my first batch of scones. I don't have the Food Network but I watch it any chance I get...so, I don't get to actually watch Ina faithfully, but I do enjoy her recipes and look forward to putting my skillet (and various other kitchen tools) to the task of re-creating them twice a month! Lindsey of Noodle Nights and Muffin Mornings chose this one.

Chicken Piccata is my first recipe on this journey. The following recipe is from Ina Garten's cookbook Barefoot Contessa at Home.

Chicken Piccata
serves 4

4 split (2 whole) boneless, skinless chicken breasts
kosher salt & freshly ground black pepper I used sea salt 

1 c. AP flour
2 extra-large eggs I used large
1 1/2 c. seasoned dried bread crumbs
good olive oil
3 Tbs unsalted butter, at room temperature
1/3 c. freshly squeezed lemon juice (2 lemons), lemon halves reserved
1/2 c. dry white wine
sliced lemon, for serving
chopped fresh flat-leaf parsley, for serving I used curly

Preheat oven to 400 degrees. Line a sheet pan with parchment Paper.

Place each chicken breast between 2 sheets of parchment paper or plastic wrap and pound it out to 1/4" thick. Sprinkle both sides with salt & pepper.

Mix the flour, 1 tsp. salt and 1/2 tsp. pepper on a shallow plate. In a second plate, beat the eggs and 1 Tbs. water together. Place the bread crumbs on a third plate. Dip each chicken breast first in the flour, shake off excess, and then dip in the egg and bread-crumb mixtures (S.B.P.- standard breading procedure).
Heat 2 Tbs. olive oil in a large saute pan over medium to medium-low heat. Add 2 chicken breasts and cook for 2 minutes on each side, until browned. Place them on the sheet pan while you cook the rest of the chicken. Heat more olive oil in the saute pan and cook the second 2 chicken breasts. Place them on the same sheet pan and allow them to bake for 5 to 10 minutes (7 was perfect for mine) while you make the sauce.

For the sauce, wipe out the saute pan with a dry paper towel. On medium heat, melt 1 Tbs. of butter and then add the lemon juice, white wine, reserved lemon halves, 1/2 tsp. salt and 1/4 tsp. pepper. Boil over high heat until reduced by half, about 2 minutes. Off the heat, add the remaining 2 Tbs. of butter and swirl to combine. Discard the lemon halves. Serve on chicken breast on each plate, spoon on the sauce, and serve with sliced lemon and a sprinkling of fresh parsley.

This dish was simply beautiful on the plate. It was juicy and moist, as well. The only criticism I have of the recipe is that the sauce was EXTREMELY lemony! I'm talking...SOUR! Next time I may leave out one lemon...or maybe add some chicken broth the sauce before reducing. I did like it, though...the kids all said "Oh my gosh Mom...it's so sour!!!" But, they ate it anyway.