Tuesday, May 18, 2010
10-Minute Shrimp and Tortilla Soup

Monday, May 17, 2010
Curried Rice with Chickpeas...a complete protein.

Curried Rice with Chickpeas
from How to Cook Everything Vegetarian by Mark Bittman
serves 4
1 Tbs. Olive oil
1/2 medium onion, finely chopped
2 garlic cloves, minced
1/2 medium bell pepper, cored, seeded & finely chopped
1 heaping Tbs. curry powder
1 1/2 c. chopped ripe tomato w/ juice
1 can unsweetened coconut milk (plus some water or veg stock if using brown rice like I did)
1 bay leaf
1 1/2 c. long grain rice (or long grain brown rice)
1 c. cooked or drained canned chickpeas
handful of peas, fresh or frozen
Put oil in a medium pot with a lid over medium-high heat. When hot, add onion, garlic, bell pepper and curry powder, stirring occasionally, until the onion softens, about 5 minutes. Add tomatoes, coconut milk, bay leaf , some salt and plenty of pepper; bring to a boil.
Stir in the rice and chickpeas, cover and turn the heat down to low so that the mixture bubbles gently. Cook until the liquid is absorbed and the rice is tender, about 20 minutes. Fluff with a fork, taste, and adjust the seasoning if necessary.
*If using brown rice, I recommend starting with water and after the first 30 minutes, stirring in the coconut milk. This will allow the rice to cook about 2/3 of the way before adding the coconut milk which can burn onto bottom of pan during longer cooking time, which was a total of about 45 minutes.

I'm submitting this at IHCC this week for our POTLUCK! theme...why not join us this week...nothin' but Bittman :) I'm also submitting this to Meatless Mondays over at My Sweet and Savory hosted by Chaya.


Sunday, May 16, 2010
Tortilla Soup, take 2. AAAAAAAAnd Action!
I have a favorite Tortilla Soup recipe. I have never strayed from that recipe. Until now. You see...my favorite Tortilla Soup recipe is the freakin' bomb. Period. Exclamation mark! Of course I've eaten tortilla soup elsewhere, from different recipes...but nothing compares. I know, I know, people's tastes vary as much as the people themselves. But that's me. It was actually my 11th post. Ever! And do I even need to say it is a Rick Bayless recipe? Didn't think so. So, for my favorite Tortilla Soup recipe click HERE...but only if you're willing to overlook the "beginner"-ness of the post. The pictures, the formatting, the newness of it all...remember, 11th post ever!!
But, on to the reason for me finally breaking down and making a different Tortilla Soup recipe. There are two culprits. IHCC and Mark Bittman. And they go hand in hand. You probably know we're currently cooking the recipes of Bittman over at IHCC and our theme this week is Movie Night! Guess which movie I watched? Tortilla Soup. Ha! It's one of those wonderful foodie movies I adore so much. A Latino family where the father is a retired chef and has always cooked weekly meals for his daughters. It's a story of food, family, love and their connections...and there are connections...as in our everyday lives. If you've seen Eat, Drink, Man, Woman or Soul Food...and enjoyed them...you'll enjoy this one, too. And if you haven't...go rent all three and have a foodie fun movie night!!
 Tortilla Soup
from Mark Bittman's How to Cook Everything Vegetarian
yield: 4 svgs.
1/2 c. peanut or neutral oil
6 corn tortillas (stale are fine), cut into 1/2-inch strips
salt
2 fresh chiles, preferably poblano, or 2 dried ancho chiles I used anchos
3 garlic cloves, sliced
1 large onion, sliced
1 1/2 pounds tomatoes, or one 28-oz. can whole tomatoes I used canned
freshly ground black pepper
pinch dried oregano or epazote I used oregano
1 quart water or vegetable stock
1 lime, cut into wedges
1 c. fresh cilantro leaves, chopped for garnish (optional)
1 c. queso fresco, cubed for garnish (optional) Used this
1 ripe avocado, peeled, pitted and sliced for garnish (optional) Used this
1 or 2 radishes, thinly sliced for garnish (optional)
1/2 carrot, grated on the biggest holes of a box grater for garnish (optional)
Okay, I'm gonna give you the instructions for the version I made, using anchos & canned tomatoes...to get the instructions for the poblanos & fresh tomatoes, see the book...
1. Heat the oil in a saucepan over medium-high heat. When oil is hot (about 350 degrees F), begin to fry the tortilla strips in batches until golden brown and crisp, turning after a minute or two, for a total of 2-4 minutes. Drain on paper towels, season each batch with a pinch of salt, and set aside. I didn't season them, just waited to season the soup. Do in batches if necessary. Fry ancho chiles for ~30 seconds each. Set aside.
2. Discard all but 2 Tbs. of the oil. Turn heat to medium and cook garlic and onion, stirring occasionally, until golden and softened, about 10 minutes.
3. Add the tomatoes and chiles to the pan with the onion and garlic and crush the tomatoes with the back of a wooden spoon. Season w/ salt, pepper and a pinch of oregano; add the water and adjust the heat so the mixture simmers gently. Cook for 20-30 minutes, crushing the tomatoes from time to time.
4. Cool slightly and using an immersion blender or upright blender, purée until smooth. Return to stove over medium, stir in the fried tortillas, and simmer for another 3-5 minutes. Season to taste with lime juice, salt and pepper. Garnish w/ any or all of suggested garnishes.


But, on to the reason for me finally breaking down and making a different Tortilla Soup recipe. There are two culprits. IHCC and Mark Bittman. And they go hand in hand. You probably know we're currently cooking the recipes of Bittman over at IHCC and our theme this week is Movie Night! Guess which movie I watched? Tortilla Soup. Ha! It's one of those wonderful foodie movies I adore so much. A Latino family where the father is a retired chef and has always cooked weekly meals for his daughters. It's a story of food, family, love and their connections...and there are connections...as in our everyday lives. If you've seen Eat, Drink, Man, Woman or Soul Food...and enjoyed them...you'll enjoy this one, too. And if you haven't...go rent all three and have a foodie fun movie night!!

from Mark Bittman's How to Cook Everything Vegetarian
yield: 4 svgs.
1/2 c. peanut or neutral oil
6 corn tortillas (stale are fine), cut into 1/2-inch strips
salt
2 fresh chiles, preferably poblano, or 2 dried ancho chiles I used anchos
3 garlic cloves, sliced
1 large onion, sliced
1 1/2 pounds tomatoes, or one 28-oz. can whole tomatoes I used canned
freshly ground black pepper
pinch dried oregano or epazote I used oregano
1 quart water or vegetable stock
1 lime, cut into wedges
1 c. fresh cilantro leaves, chopped for garnish (optional)
1 c. queso fresco, cubed for garnish (optional) Used this
1 ripe avocado, peeled, pitted and sliced for garnish (optional) Used this
1 or 2 radishes, thinly sliced for garnish (optional)
1/2 carrot, grated on the biggest holes of a box grater for garnish (optional)
Okay, I'm gonna give you the instructions for the version I made, using anchos & canned tomatoes...to get the instructions for the poblanos & fresh tomatoes, see the book...
1. Heat the oil in a saucepan over medium-high heat. When oil is hot (about 350 degrees F), begin to fry the tortilla strips in batches until golden brown and crisp, turning after a minute or two, for a total of 2-4 minutes. Drain on paper towels, season each batch with a pinch of salt, and set aside. I didn't season them, just waited to season the soup. Do in batches if necessary. Fry ancho chiles for ~30 seconds each. Set aside.
2. Discard all but 2 Tbs. of the oil. Turn heat to medium and cook garlic and onion, stirring occasionally, until golden and softened, about 10 minutes.
3. Add the tomatoes and chiles to the pan with the onion and garlic and crush the tomatoes with the back of a wooden spoon. Season w/ salt, pepper and a pinch of oregano; add the water and adjust the heat so the mixture simmers gently. Cook for 20-30 minutes, crushing the tomatoes from time to time.
4. Cool slightly and using an immersion blender or upright blender, purée until smooth. Return to stove over medium, stir in the fried tortillas, and simmer for another 3-5 minutes. Season to taste with lime juice, salt and pepper. Garnish w/ any or all of suggested garnishes.

It was good. It was really good. I'm woman enough to admit it. But, I'm not gonna go so far as to say it was better than my favorite. But I would make it again. And eat it. With a smile on my face. Head on over to IHCC to see what everybody else came up with on this Movie Night! theme! I'm also submitting this to Deb of Kahakai Kitchen for Souper Sundays!!
Monday, May 10, 2010
Foodierama...
Hey Foodies...check out this tasty new(-ish) site!
"Foodierama is a homepage for foodies based on the idea of serendipity. It's designed as a portal front page containing teasers to the latest posts of a list of hundreds of the best food blogs. Whenever users enter the page they discover something new and exciting: a new blog, a new recipe or cooking technique etc. In addition, users get a panoramic view of what's going on in the food blog-sphere all on one graphic page." ...Dave, co-founder of Foodierama
Sunday, May 9, 2010
Happy Mama's Day...to all the mama's out there! Care for some breakfast in bed?

My favorite breakfast depends on my mood. I'm not one of those breakfast haters...quite the contrary. I love breakfast. I mean, after all...it is the most important meal of the day. Right? That's what I grew up hearing and that's what is ingrained in my head. So be it. ...and then there's my daughter who chokes and gags her way through breakfast on school days...even if it's just a drinkable yogurt...whose child is this? Although she can tear it up on the weekends. Go figure. But in honor of Mother's Day, I was in the mood for some boiled eggs w/ dippin' soldiers. MMMMMM. Some days it's cereal, some it's yogurt and fruit, others it's a donut or huevos rancheros or Greek skillet or chorizo con huevos or chilaquiles or bacon and eggs or eggs benedict or.... but ultimately, if I was forced to choose my favorite way of cooking an egg, it would be poached. And medium-boiled comes in a close second...now. I love runny yolks...for dippin' other goodies in. And I hate a rubber, chewy, over-done white...so I only like 'em fried if I do it or somebody else I know can make 'em "right" does it.
Medium-boiled eggs are kinda like poaches eggs, but still in the shell. I always held off on making them at home because I didn't have any egg cups. Still don't. I mean, I know it's not a requirement to have an egg cup to eat a medium-boiled egg...but I wanted one anyway. I also don't have one of those little egg snippers to snip the top clean away...shell and all. I stopped being stubborn. Asparagus is gorgeous right now and I wanted to dip those spears in some yolk...some warm, runny yolk...that craving won. I substituted a shot glass my sister brought me back from Vegas as the egg cup and just cut the top off with a sharp knife.
Medium-boiled eggs
from How to Cook Everything Vegetarian by Mark Bittman
Fill a saucepan about 2/3 full with water and bring to a gentle boil. Use a spoon or some other handy tool to lower the egg into the gently boiling water. Adjust the heat so the mixture barely simmers, then cook for 6-7 minutes; the shorter time guarantees a cooked but runny yolk, but there may be some undercooked white. With the longer time, the white will be fully cooked, but some of the yolk may have hardened. To remove the shell plunge it into cold running water for about 30 seconds, then crack and peel gently, as you would a hard-cooked egg.
I served mine with al dente asparagus spears and buttered toast soldiers...and sprinkled the yolk with Black Truffle Sea Salt. Simple, clean flavors that made a perfect Mother's Day or any day, of course Breakfast.

Although............these are really........

This is my IHCC submission for Breakfast in Bed this week...head on over to check out more delicious breakies! Oh...and if you can, go kiss ya mutha!! Or your kids mutha. Or your neighbors mutha. Any mutha! Happy Mother's Day Mom...love you...breakfast nice & healthy, just the way you like it :) !
Saturday, May 8, 2010
What's in your wallet pile?
How big does your stack of cookbooks next to your computer get? Mine usually teeters precariously before I put a few away. It doesn't take long for it to build back up, though...sometimes just a matter of minutes as I spot one on the shelf that I must pull back out and peruse. My current pile...okay, my pile 2 days ago (it's been switched up a bit since)...screamed photo-op, sitting there all serene in front of the window with its Red Stripe all cozied up next to it. Which was light by the way. I don't usually drink light beer, but I thought I'd try it...it was good. All the pungeant skunkiness of regular Red Stripe. Hey...we do what we can, right?


Hmmm...can you tell who our current IHCC focus is?? His will probably occupy that pile for another 5 or so months...with rotating company.
What's in your current pile?
Friday, May 7, 2010
Cookbook Review: River Road Plantation Country Cookbook by Anne Butler
A cookbook that is focused on the historic, mighty, rich and diverse area in Louisiana...an area focused on the Mississippi River and the plantations that lined it...can you imagine? I am a big history buff...especially when it focus on the culture and traditions of a people or an area...and extra especially when it circles around and connects to the food and eating habits of those people! From the swanky river boats to the owners of the manor homes and slaves that worked their plantations to the generous cook at a Leper's colony under the guise of an ostrich farm...Anne Butler weaves history, photographs and recipes from this connected, yet diverse area that she adores. She operates a bed and breakfast on the Butler Greenwood Plantation which dates back all the way to the 1790's (how badly do I want to visit there!?). Butler used tons of photos, all in sepia, to help draw me in and set the tone of a history book...and included recipes...from each of the separate areas of this Plantation Country that she described. Some dated way back and some were current. Either way you look at it, I was happy that I had my little sticky tabs handy...it was then just a matter of choosing which of the marked recipes I wanted to try right away!

The section on Community Coffee Company was one of my favorites...dating back to a General Merchandise company that started in 1919 that ground and brewed coffee on the spot and served as a meeting place for local friends and neighbors. By 1924, the backyard barn had been transformed into a coffee mill...and by 1946 the company had its own roasting plant. The Community Coffee Company is a landmark and a huge part of the community and the whole South these days. I love coffee in any form anyway...and the recipes included from the CCC all had me drooling...but the Coffee Pecan Pie was something I had to make! And I was NOT disappointed....except by the fact that the hubs devoured almost the whole pie by himself. Shhhh....don't tell him I told you. Although I didn't actually use CC coffee since I don't have any (Sure, I could have ordered it, but I didn't want to wait)...the rich, deep, earthy flavor of the pie paired with a nice cup of coffee and a blob of whipped cream was like being lost in a dream.

 Apparently I was in a pie kinda mood while reading this, because I made not one, but another pie from the book. I've always wondered about Buttermilk pie...and there was a recipe for it in all of its splendor...so I couldn't resist. This recipe was from The Cabin...a restaurant/bar/lounge...that had its beginnings as slave quarters on the Monroe Plantation almost two centuries ago. I don't know if it was me or the recipe (although I'm guessing it must be me because if they serve this at the restaurant, it must work for them), but I couldn't get the pie to set up! Oh yeah, it looked all golden and gorgeous and crispy on the surface...but inside was another story. Oh well...I broke off the top layer of cinnamon/sugar goodness and ate it like a biscuit, so it wasn't a total bust.

From an old Indian camp in disrepair came a Leprosarium under the guise of an Ostrich Farm. What an insanely interesting piece of history lies behind a simple, tasty recipe for Cajun Potato Cakes!
 The last thing I made from the book was definitely my favorite. From grandmother of a local art and history buff at Sun Oak in Faubourg Marigny is a delicious Cabbage Roll...called fondly Grandma's Cabbage Cigars.
Grandma's Cabbage Cigars
1 lb. ground meat
1 large onion, chopped
1/2 bell pepper, chopped
2 cloves garlic, minced
breadcrumbs
1 tsp. sugar
green onion tops, chopped
parsley
salt, red (cayenne) pepper, black pepper- to taste
1 large head cabbage, leaves separated
1/2 c. rice, cooked
1 regular-sized can whole tomatoes
Sauté ground meat, onion, bell pepper and garlic until meat is cooked. Add breadcrumbs to hold mixture together. Season with sugar, green onion tops parsley and salt and peppers to taste. Cover cabbage leaves in boiling water, cook for 4 minutes and drain. Place portions of rice and meat mixture in each cabbage leaf and roll. Place rolls in a deep pot seams down. Add canned tomatoes, cover and cook over medium heat for 20-30 minutes. Serves 4-6.
 Know what I love about this recipe other than its delicious outcome? The impreciseness of it. It is like so many of the recipes that my own grandma has. No amounts, just ingredients for parts. It urges you to use your senses. Choose your favorite type of ground meat. Season it to your family's tastes. Feel it...smell it...eyeball it...taste it. Gorgeous.
 I am looking forward to going back (ha! looking forward to going back) and checking out Butler's previous three books which are all written in the same style...history, culture, food and photos.
*In the interest of full disclosure...I received this cookbook for FREE from Pelican Publishing. Doesn't that rock!? ;)

The section on Community Coffee Company was one of my favorites...dating back to a General Merchandise company that started in 1919 that ground and brewed coffee on the spot and served as a meeting place for local friends and neighbors. By 1924, the backyard barn had been transformed into a coffee mill...and by 1946 the company had its own roasting plant. The Community Coffee Company is a landmark and a huge part of the community and the whole South these days. I love coffee in any form anyway...and the recipes included from the CCC all had me drooling...but the Coffee Pecan Pie was something I had to make! And I was NOT disappointed....except by the fact that the hubs devoured almost the whole pie by himself. Shhhh....don't tell him I told you. Although I didn't actually use CC coffee since I don't have any (Sure, I could have ordered it, but I didn't want to wait)...the rich, deep, earthy flavor of the pie paired with a nice cup of coffee and a blob of whipped cream was like being lost in a dream.


From an old Indian camp in disrepair came a Leprosarium under the guise of an Ostrich Farm. What an insanely interesting piece of history lies behind a simple, tasty recipe for Cajun Potato Cakes!

Grandma's Cabbage Cigars
1 lb. ground meat
1 large onion, chopped
1/2 bell pepper, chopped
2 cloves garlic, minced
breadcrumbs
1 tsp. sugar
green onion tops, chopped
parsley
salt, red (cayenne) pepper, black pepper- to taste
1 large head cabbage, leaves separated
1/2 c. rice, cooked
1 regular-sized can whole tomatoes
Sauté ground meat, onion, bell pepper and garlic until meat is cooked. Add breadcrumbs to hold mixture together. Season with sugar, green onion tops parsley and salt and peppers to taste. Cover cabbage leaves in boiling water, cook for 4 minutes and drain. Place portions of rice and meat mixture in each cabbage leaf and roll. Place rolls in a deep pot seams down. Add canned tomatoes, cover and cook over medium heat for 20-30 minutes. Serves 4-6.


*In the interest of full disclosure...I received this cookbook for FREE from Pelican Publishing. Doesn't that rock!? ;)
Wednesday, May 5, 2010
Halloumi...Finally!
Yes, finally! For some reason that is beyond my grasp, I have been unable to find Halloumi at any markets in my area. It's not that I hadn't ever tried Halloumi...as a cheese aficionado {ahem} I have ordered it at restaurants...Greek ones...hello Saganaki (flaming, oozing deliciousness)...YUM...I just haven't found it in the "raw" to bring home to experiment with. I mean, how long can a girl be expected to drool over samples, recipes, pictures and descriptions of tempting, fried, chewy cheese before losing her marbles? I reached my breaking point. I would just have to go and make some myself. TAKE THAT ELUSIVE CHEESE. Ha! With a little determination and a lot of support from my fellow Forgers...it wasn't so hard. Honest.
What exactly is Halloumi you ask? You asked. It's a white, sort of dry, sort of chewy, sort of salty cheese with a very high melting point. Hence, great for frying, grilling and setting a-flame. When you fry it and subsequently eat it...it squeaks between your teeth. Something I find quite pleasant. Traditionally it's made using sheep's &/or goat's milk...but it can be made using cow's milk (which I did)...the flavor will be a bit milder, though. If it lasts long enough...it's usually stored in a salt-water brine or the whey from making the cheese. I think this helps to keep some semblance of moisture in the cheese and keeps it salty.
I used this (slightly adapted)** recipe from Making Artisan Cheese by Tim Smith:
Halloumi
I halved the recipe because I didn't have a big enough pot!
2 gallons whole milk
1/4 tsp mesophilic direct-set culture
1/8 tsp calcium chloride- diluted in 1/4 cup cool, unchlorinated water
1/2 tsp liquid rennet (or 1/4 tab dry rennet) diluted in 1/4 cup cool, unchlorinated water
1/2 cup cheese salt not sure what cheese salt is...used kosher salt
Brine solution*
1 tsp dried mint, re hydrated in 1/2 cup boiling water I omitted as I couldn't find any mint yet!
Heat the milk in a double boiler to 86F (31C), then add the starter culture and blend for two minutes. I used a slow-cooker.
Maintaining the target temperature of 86F, add the rennet & calcium chloride, stir for one minute, and let rest for forty minutes, or until a clean break. To test for a clean break, use a curd knife to make one cut through the curds.
Cut curds into 1/2" (about 1cm) cubes, trying to keep them as uniform as possible.
Slowly heat curds to 104F (40C); this should take forty-five minutes. Continually stir the curds to keep them from matting. Once the curds reach target temperature, maintain the curds at that temperature for an additional twenty minutes while continuing to stir.
Drain the whey off curds into a cheese cloth-lined colander that is set in a catch bowl. Reserve the whey.
Blend mint into the drained curds with a spoon if using. Pour the curds into a 2-pound (900g) cheese cloth-lined mould. Fold a corner of the cheese cloth over the curds, and press at thirty pounds for one hour. Remove the cheese from the mould, and unwrap the cheese cloth. Turn over the cheese, and re wrap it with the cheese cloth. Press at forty pounds for one hour. The cheese should be firm with a spongy consistency. I used circular dumbbell weights wrapped in foil. Perfect!

Heat the reserved whey in a pan to 190F (88C). Take the cheese out of the mold, and cut it into 2" (5cm) thick strips. Put the strips into the heated whey, maintaining the target temperature for one hour.

The cheese should have a thick consistency. Drain it into the cheese cloth-lined colander, and let it rest at room temperature for twenty minutes. Store in brine solution or the whey used for cooking with salt added to that.

Coat the cheese with 1/2 cup (145g) of cheese salt ?, and let it rest for two hours at room temperature.
Yield - 2 pounds (900g)
Notes:
Leave milk out of fridge for a couple of hours before starting the cheese-making.
Brine Solution
A brine is a supersaturated solution of salt and water, in which cheeses are literally bathed. (Brine solution consists of 2 pounds (905g) of salt stirred into and dissolved in 1 gallon (4.5 l) of water, heated to 190F (88C). Brining occurs directly after a cheese is removed from the press. The cheese is literally dunked into this salty bath. Once in a the brine, the cheese begins to absorb salt, and the proteins begin to harden and form the rind.
**by Natashya & myself as we made it as we noticed some things were left out of the actually recipe as we went along. But it worked!
Mine ended up a little lop-sided, but that's because of my crude colander "mold". I didn't have a large enough cheese mold, so I used a colander...but that darn handle tilts it on the side of the bowl, so my weights pressed it unevenly. No harm, though...tasted the same ;)
 As I mentioned...I fried up this Halloumi like it was going out of style! Tell me you wouldn't love to try this tasty mess. No, don't tell me. It would make me sad. For you.
Halloumi w/ Chilli
from Nigella Bites
2 Tbs. chopped, seeded fresh red chilli I used green jalapeños, as it's all I had and I like to call it chile. As opposed to chilli. Just sayin'.
2 Tbs. Extra Virgin Olive Oil I refuse to call it EVOO
18 oz. Halloumi, sliced medium-thin I had already sliced it as per my Halloumi recipe, so... and I didn't measure. Such a rebel.
juice of 1/4 lemon
Mix the chopped chile & olive oil in a bowl or cup and leave the flavors to deepen while you cook the cheese.
 Using a nonstick frying pan I used my well-seasoned cast-iron comal without any oil, fry up about 2 minutes a side or until golden brown in parts.


What exactly is Halloumi you ask? You asked. It's a white, sort of dry, sort of chewy, sort of salty cheese with a very high melting point. Hence, great for frying, grilling and setting a-flame. When you fry it and subsequently eat it...it squeaks between your teeth. Something I find quite pleasant. Traditionally it's made using sheep's &/or goat's milk...but it can be made using cow's milk (which I did)...the flavor will be a bit milder, though. If it lasts long enough...it's usually stored in a salt-water brine or the whey from making the cheese. I think this helps to keep some semblance of moisture in the cheese and keeps it salty.
I used this (slightly adapted)** recipe from Making Artisan Cheese by Tim Smith:
Halloumi
I halved the recipe because I didn't have a big enough pot!
2 gallons whole milk
1/4 tsp mesophilic direct-set culture
1/8 tsp calcium chloride- diluted in 1/4 cup cool, unchlorinated water
1/2 tsp liquid rennet (or 1/4 tab dry rennet) diluted in 1/4 cup cool, unchlorinated water
1/2 cup cheese salt not sure what cheese salt is...used kosher salt
Brine solution*
1 tsp dried mint, re hydrated in 1/2 cup boiling water I omitted as I couldn't find any mint yet!
Heat the milk in a double boiler to 86F (31C), then add the starter culture and blend for two minutes. I used a slow-cooker.
Maintaining the target temperature of 86F, add the rennet & calcium chloride, stir for one minute, and let rest for forty minutes, or until a clean break. To test for a clean break, use a curd knife to make one cut through the curds.
Cut curds into 1/2" (about 1cm) cubes, trying to keep them as uniform as possible.
Slowly heat curds to 104F (40C); this should take forty-five minutes. Continually stir the curds to keep them from matting. Once the curds reach target temperature, maintain the curds at that temperature for an additional twenty minutes while continuing to stir.
Drain the whey off curds into a cheese cloth-lined colander that is set in a catch bowl. Reserve the whey.
Blend mint into the drained curds with a spoon if using. Pour the curds into a 2-pound (900g) cheese cloth-lined mould. Fold a corner of the cheese cloth over the curds, and press at thirty pounds for one hour. Remove the cheese from the mould, and unwrap the cheese cloth. Turn over the cheese, and re wrap it with the cheese cloth. Press at forty pounds for one hour. The cheese should be firm with a spongy consistency. I used circular dumbbell weights wrapped in foil. Perfect!

Heat the reserved whey in a pan to 190F (88C). Take the cheese out of the mold, and cut it into 2" (5cm) thick strips. Put the strips into the heated whey, maintaining the target temperature for one hour.

The cheese should have a thick consistency. Drain it into the cheese cloth-lined colander, and let it rest at room temperature for twenty minutes. Store in brine solution or the whey used for cooking with salt added to that.

Coat the cheese with 1/2 cup (145g) of cheese salt ?, and let it rest for two hours at room temperature.
Yield - 2 pounds (900g)
Notes:
Leave milk out of fridge for a couple of hours before starting the cheese-making.
Brine Solution
A brine is a supersaturated solution of salt and water, in which cheeses are literally bathed. (Brine solution consists of 2 pounds (905g) of salt stirred into and dissolved in 1 gallon (4.5 l) of water, heated to 190F (88C). Brining occurs directly after a cheese is removed from the press. The cheese is literally dunked into this salty bath. Once in a the brine, the cheese begins to absorb salt, and the proteins begin to harden and form the rind.
**by Natashya & myself as we made it as we noticed some things were left out of the actually recipe as we went along. But it worked!
Mine ended up a little lop-sided, but that's because of my crude colander "mold". I didn't have a large enough cheese mold, so I used a colander...but that darn handle tilts it on the side of the bowl, so my weights pressed it unevenly. No harm, though...tasted the same ;)

Halloumi w/ Chilli
from Nigella Bites
2 Tbs. chopped, seeded fresh red chilli I used green jalapeños, as it's all I had and I like to call it chile. As opposed to chilli. Just sayin'.
2 Tbs. Extra Virgin Olive Oil I refuse to call it EVOO
18 oz. Halloumi, sliced medium-thin I had already sliced it as per my Halloumi recipe, so... and I didn't measure. Such a rebel.
juice of 1/4 lemon
Mix the chopped chile & olive oil in a bowl or cup and leave the flavors to deepen while you cook the cheese.


When all the slices are cooked, transfer them to a couple of small plates. Give the oil a stir and spoon it over the cheese, then give a spritz of lemon. That's all there is to it. That's all there needs to be.

If you made Halloumi this month...or must do it now that you've seen just how easy it really is...join us over at Forging Fromage with your link by May 14...we'd love to forge with you!
Sunday, May 2, 2010
Baked Pancakes...


It is such an amazing late morning outside! And that has been my problem...well, not problem per se...but that is why I haven't been able to post. It's too gorgeous out! I made this easy salad a whole week ago...and it has been waiting patiently to be shared. The memory has...not the salad itself. This was another quick and easy idea from Kitchen Express (Mark Bittman).
I actually changed to salad part up a bit so I wouldn't have to run to market, but the Spicy Pork part, that stayed the same. Thin pork chops coated in a spicy yet sweet and oh so flavorful rub will grill up super quick and add a lot of flavor on top of a simple tossed salad! Of course, you could use this rub on any cut of pork (or chicken, etc) with delicious results!
A great, quick salad that will let you get back outside to enjoy the beautiful day!
Wednesday, April 28, 2010
Stuffed and Happy.

Stuffed

Happy
This was my daughters birthday meal request bacon cheeseburgers w/ smiley potatoes... I stuffed the burgers with the bacon and cheese...and browned up some smiles! October. That's how long these have been hanging out in my computer...sheesh.

Saturday, April 24, 2010
Pasta done right...and done right again.
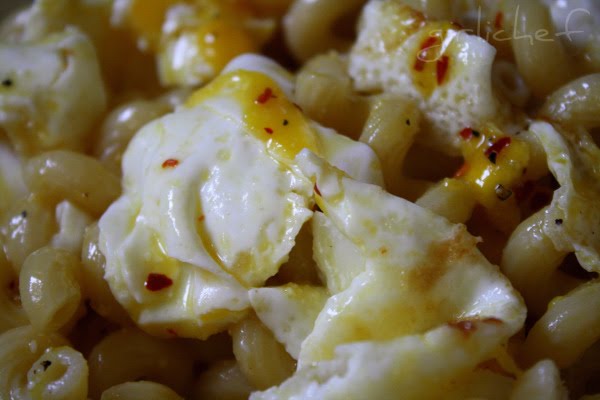
I remember praising the brilliance of scrambling eggs with pasta...so why did I never think of topping pasta with fried eggs? Huh. Slow on the uptake, I guess. Lucky for me I have a little Bitty to help me with things like that. I was broke trying to use up some more pantry items the other day...and came across 2 pasta recipes that I had HAD! to try...so I went ahead and just cooked up a pound of pasta and divided it in half. So there. Nothing holds me back ;).
Both of these come from my current fave, Kitchen Express...and ya know, cooking up a pound of pasta two ways didn't actually take that long. While I waited for the water to boil and then the pasta to cook, I was able to whip up the two add-ins and finish everything at the same time. The key was starting the onions caramelizing first thing, cuz that takes a while to do right. Although, the actual recipe didn't actually call for caramelizing come to think of it...it just called for browning. But that deep natural sweetness that comes from that process is just tooooooo amazing not to do it if you have the time (and if you're waiting for a big pot of water to come to a boil and cook up some pasta, you have the time!).
 Pasta with Fried Eggs
from Kitchen Express by Mark Bittman
Boil salted water for pasta and cook it; meanwhile, fry four eggs in butter, keeping them very runny. Drain the pasta, reserving some of the cooking water, and toss it with a few tablespoons of olive oil or butter, lots of freshly grated Parmesan cheese, salt, pepper, and enough of the reserved water to moisten; top with the fried eggs. Roughly cut the eggs up and toss the pasta again to serve.I also added in a little crushed red chilis...and I used gasp! Parm from a can. I know, I know. I wasbroke, remember! out of fresh. So good and so simple...love that warm, oozing yolk coating the pasta just so!


Pasta with Balsamic Onions
from the same place
Boil salted water for pasta and cook it; meanwhile, in a tablespoon or so of olive oil, sear a couple of sliced onions until nicely browned, stirring almost all the time. Splash some balsamic vinegar over all and sprinkle with salt and lots of black pepper; reduce the heat so the mixture thickens into a sauce. Drain the pasta, reserving some of the cooking water; toss the pasta with the onion sauce, adding some of the reserved cooking water; toss the pasta with the onion sauce, adding some of the reserved cooking water as needed to moisten and serve. Parmesan cheese is optional. As if.
I used four onions since I was caramelizing...I knew they'd cook down to almost nothing. Sweet nothing.
 This (well, these) is my entry for this weeks POTLUCK over at IHCC...and I'm also sending it over to Katie of Thyme for Cooking who is hosting Presto Pasta Nights this week.

Both of these come from my current fave, Kitchen Express...and ya know, cooking up a pound of pasta two ways didn't actually take that long. While I waited for the water to boil and then the pasta to cook, I was able to whip up the two add-ins and finish everything at the same time. The key was starting the onions caramelizing first thing, cuz that takes a while to do right. Although, the actual recipe didn't actually call for caramelizing come to think of it...it just called for browning. But that deep natural sweetness that comes from that process is just tooooooo amazing not to do it if you have the time (and if you're waiting for a big pot of water to come to a boil and cook up some pasta, you have the time!).
from Kitchen Express by Mark Bittman
Boil salted water for pasta and cook it; meanwhile, fry four eggs in butter, keeping them very runny. Drain the pasta, reserving some of the cooking water, and toss it with a few tablespoons of olive oil or butter, lots of freshly grated Parmesan cheese, salt, pepper, and enough of the reserved water to moisten; top with the fried eggs. Roughly cut the eggs up and toss the pasta again to serve.I also added in a little crushed red chilis...and I used gasp! Parm from a can. I know, I know. I was


Pasta with Balsamic Onions
from the same place
Boil salted water for pasta and cook it; meanwhile, in a tablespoon or so of olive oil, sear a couple of sliced onions until nicely browned, stirring almost all the time. Splash some balsamic vinegar over all and sprinkle with salt and lots of black pepper; reduce the heat so the mixture thickens into a sauce. Drain the pasta, reserving some of the cooking water; toss the pasta with the onion sauce, adding some of the reserved cooking water; toss the pasta with the onion sauce, adding some of the reserved cooking water as needed to moisten and serve. Parmesan cheese is optional. As if.
I used four onions since I was caramelizing...I knew they'd cook down to almost nothing. Sweet nothing.

Subscribe to:
Posts (Atom)